
Introduction
Celebrate summer gatherings and patriotic holidays with the show-stopping Red White and Blue Fruit Pizza, an eye-catching dessert that combines a buttery crust, creamy topping, and vibrant berries. Whether you’re hosting a Fourth of July barbecue, Memorial Day picnic, or Labor Day party, these festive pizzas capture the spirit of Americana in every bite. With a crisp, golden sugar cookie crust serving as the “dough,” a fluffy layer of cream cheese frosting, and an arrangement of fresh berries, these fruit pizzas are both a feast for the eyes and a delight for the tastebuds.
Patriotic desserts have long been a staple of summer celebrations, but the Red White and Blue Fruit Pizza takes center stage by artfully arranging strawberries and blueberries atop a smooth, white base. Its appeal lies in the playful twist on a classic dessert concept—transforming a traditional sugar cookie and frosting combination into a vibrant, shareable treat. Whether you choose to make one large pizza to serve a crowd or dozens of mini pizzas for individual servings, this recipe is sure to earn rave reviews.
What Is a Red White and Blue Fruit Pizza?
A Red White and Blue Fruit Pizza is not a savory pie at all; instead, it’s a dessert that borrows the visual format of a pizza but substitutes sweet ingredients for the typical tomato sauce and cheese. Here’s what sets it apart:
- Crust: A round, sugar-cookie base baked until just golden at the edges.
- Frosting: A layer of luscious cream cheese frosting that provides the “white” backdrop.
- Toppings: Sliced strawberries and whole blueberries that create the red and blue components.
This dessert pizza can be arranged in several eye-catching patterns, such as concentric circles of berries, an American flag motif, or a starburst design. Miniature versions—perfect for potlucks and family gatherings—are made by slicing individual rounds of dough and decorating each one separately.
Why Choose Red White and Blue Fruit Pizza for Patriotic Celebrations
When planning a festive menu, the Red White and Blue Fruit Pizza stands out for several reasons:
- Instant Visual Impact
- Bright red strawberries and deep-blue blueberries contrast sharply against the snowy cream cheese frosting, creating a dessert table centerpiece that’s impossible to ignore.
- The color arrangement instantly signals a patriotic theme, tying into holiday décor seamlessly.
- Versatility and Customization
- Available in full-size 10–12 inch pizzas or bite-sized mini rounds, making it ideal for large gatherings or intimate get-togethers.
- Crust and frosting variations allow for gluten-free, keto-friendly, or vegan adaptations without sacrificing flavor.
- Ease of Assembly
- With a straightforward sugar cookie dough and a simple frosting recipe, even novice bakers can achieve a bakery-worthy dessert.
- Fruit placement is forgiving—perfect concentric circles, flag patterns, or starburst designs can be achieved with minimal effort.
- Interactive and Kid-Friendly
- Kids and adults alike enjoy arranging the berries in creative ways—assemble a “decorate-your-own” station at your party to engage little helpers.
- No need for advanced piping or decorating skills; the frosting acts as an edible glue to keep fruit in place.
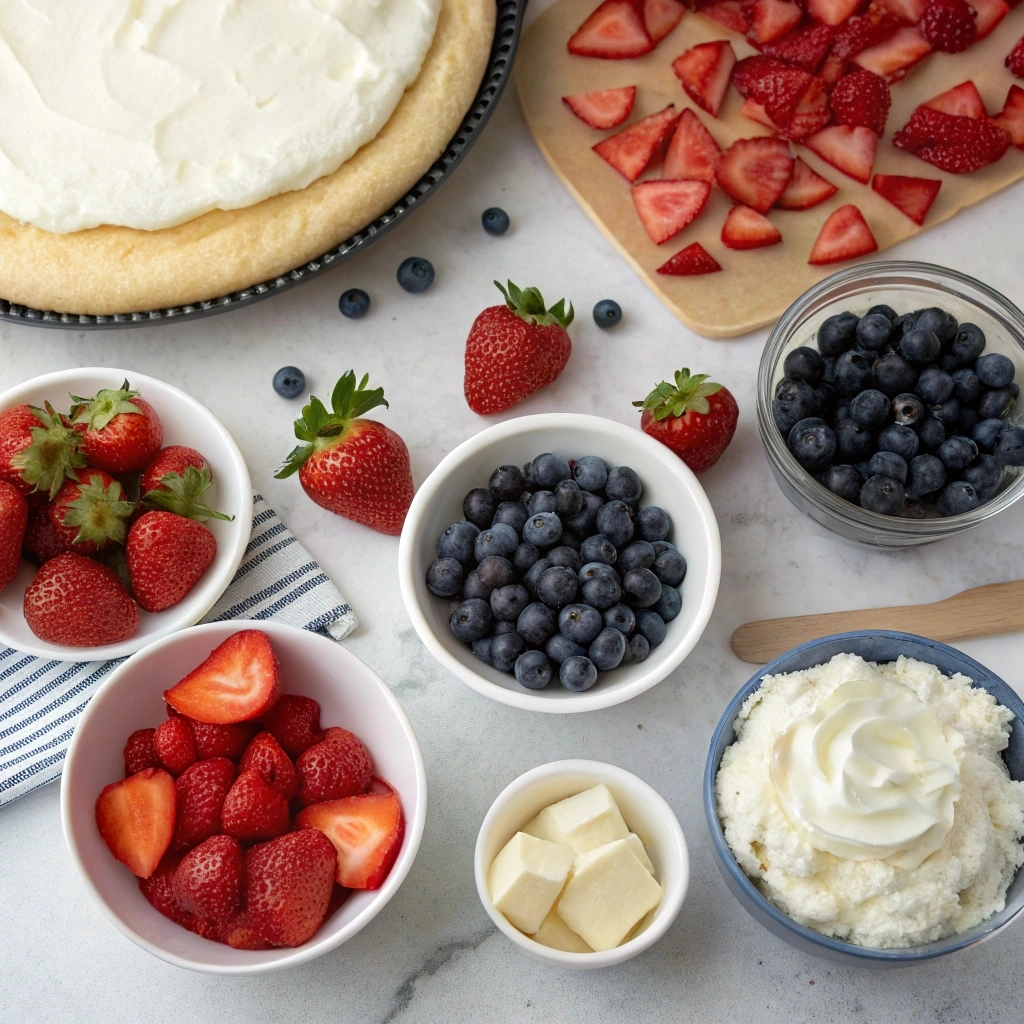
Essential Ingredients to Red White and Blue Fruit Pizza
Crafting the perfect Red White and Blue Fruit Pizza requires simple, high-quality ingredients. Below is everything you’ll need to ensure a balanced, crowd-pleasing dessert:
- Sugar Cookie Crust (Base)
- 2¼ cups all-purpose flour½ teaspoon baking powder½ teaspoon salt1 cup (2 sticks) unsalted butter, softened1 cup granulated sugar1 large egg1 teaspoon pure vanilla extract
- Cream Cheese Frosting
- 8 ounces (1 package) full-fat cream cheese, softened
- ½ cup (1 stick) unsalted butter, softened
- 2 cups powdered sugar, sifted
- 1 teaspoon vanilla extract
- Optional: ½ teaspoon lemon zest for brightness
- Red Fruits
- 2 cups fresh strawberries, washed, hulled, and sliced
- 1 cup fresh raspberries (optional)
- Blue Fruits
- 2 cups fresh blueberries, washed and pat-dried
- 1 cup blackberries (for a deeper blue hue, optional)
- White Elements
- The creamy frosting provides the “white” in the design, but you can enhance by sprinkling white nonpareils or shredded coconut for extra texture.
Equipment and Tools Needed
- Baking Sheet or Pizza Pan:
- Use a light-colored, non-stick pan for best results. A 12-inch pizza pan works well for a large pizza; for minis, use a baking sheet.
- Mixing Bowls:
- One medium bowl for the dough, another for frosting. Glass or metal bowls are ideal when using a hand mixer.
- Hand Mixer or Stand Mixer:
- A hand mixer works fine, but a stand mixer with paddle attachment speeds up frosting preparation.
- Parchment Paper or Silicone Baking Mat:
- Line your pan for easy removal and cleanup.
- Rolling Pin:
- Needed if making a large pizza or mini rounds by hand. For individual minis, you can also press dough into cookie cutters or muffin tins.
- Offset Spatula or Butter Knife:
- Use for spreading an even layer of frosting over the cooled crust.
- Sharp Knife:
- For slicing strawberries and cutting baked crust into rounds (for minis) or triangles (for quesadillas, if wanting extra shape).
- Cooling Rack:
- Let the cookie crusts cool completely before frosting to prevent melted icing.
Step-by-Step Recipe
1. Prepping the Sugar Cookie Crust
- Gather Dry Ingredients
- In a medium bowl, whisk together 2¼ cups all-purpose flour, ½ teaspoon baking powder, and ½ teaspoon salt. Set aside.
- Cream Butter and Sugar
- In a large mixing bowl (preferably using a stand mixer with paddle attachment), beat 1 cup of softened unsalted butter on medium speed until smooth and creamy (about 30 seconds).
- Add 1 cup granulated sugar and continue beating on medium-high speed for 2–3 minutes until the mixture turns pale and fluffy. This aeration helps create a tender, melt-in-your-mouth crust.
- Incorporate Egg and Vanilla
- Crack 1 large egg into the creamed butter and sugar mixture.
- Pour in 1 teaspoon pure vanilla extract.
- Beat on medium speed until the egg and vanilla are fully incorporated—scrape down the bowl sides with a rubber spatula to ensure even mixing.
- Add Dry Ingredients
- With the mixer on low speed, gradually add the flour mixture (in 2–3 increments), mixing just until the dough comes together and no dry flour streaks remain.
- The dough should be soft but not sticky; if it appears too dry, add a tablespoon of milk to bind. If too wet, sprinkle a bit more flour.
- Shape the Dough
- For One Large Pizza:
- Transfer the dough to a lightly floured surface and roll into a roughly 12-inch circle, about ¼ inch thick.
- Carefully transfer the circle to a parchment-lined pizza pan—an easy way is to roll the dough around the pin, then unroll it over the pan.
- For Mini Pizzas:
- Divide dough into eight equal portions.
- Use a rolling pin to flatten each portion into a 4-inch round, about ¼ inch thick. Place these on a parchment-lined baking sheet, leaving 1–2 inches between each to allow for slight expansion.
- For One Large Pizza:
- Bake the Crust
- Preheat your oven to 350 °F (175 °C).
- Mini Rounds: Bake for 10–12 minutes, or until edges are lightly golden. They should still be pale on top.
- Large Pizza: Bake for 12–15 minutes, until the circumference edges just start to turn a light golden brown. The center may look slightly underbaked—that’s okay, as it will firm up as it cools.
- Rotate the pan halfway through baking to ensure even coloring.
- Cool Completely
- Remove crust(s) from oven and transfer parchment paper to a cooling rack immediately.
- Allow to cool for at least 15 minutes before frosting—if you frost too soon, residual heat will melt the cream cheese layer and make it runny.
2. Making the Cream Cheese Frosting
- Soften Your Ingredients
- For best results, let 8 ounces of cream cheese and ½ cup of butter sit at room temperature for at least 30 minutes. Softer ingredients whip up more smoothly.
- Beat Cream Cheese and Butter
- In a clean mixing bowl, use a hand mixer or the stand mixer (with paddle attachment) to beat 8 ounces of softened cream cheese on medium speed for about 30 seconds until smooth.
- Add ½ cup softened unsalted butter. Continue beating on medium-high speed for 2–3 minutes until light, fluffy, and pale in color.
- Incorporate Powdered Sugar and Flavorings
- With the mixer on low, gradually add 2 cups of sifted powdered sugar. Add in 1 teaspoon of pure vanilla extract and (optional) ½ teaspoon lemon zest.
- Pause halfway to scrape down the bowl sides and ensure even mixing. Once all powdered sugar is added, increase speed to medium and beat for an additional minute to remove any lumps.
- Adjust Consistency
- The frosting should be thick enough to hold berries aloft but still spreadable. If it’s too stiff, add 1–2 teaspoons of milk (or half-and-half), one teaspoon at a time, until you can easily swirl it with an offset spatula.
- Avoid over-thinning; runny frosting won’t keep fruit in place and may seep into the crust.
- Chill Slightly (Optional)
- If you live in a warm climate or your kitchen is hot, place the frosting in the refrigerator for 5–10 minutes to firm up slightly before assembly. This helps maintain a clean layer under the fruit.
- Frost Immediately Before Topping
- Spread the frosting over completely cooled crust(s) right before decorating to prevent moisture from accumulating on the surface.
3. Choosing and Preparing the Fruit
Quality fruit is the star of any Red White and Blue Fruit Pizza. Here’s how to select and prep strawberries, blueberries, and optional berries to achieve the brightest colors and best texture:
- Selecting Strawberries
- Choose firm, plump berries with a deep red color and fresh green caps. Avoid berries with white tips (underripe) or mushy spots (overripe).
- Inspect for uniform size, which helps in creating neat concentric rings or flag stripes.
- Selecting Blueberries
- Look for smooth, taut skins without wrinkles or dullness. Firm berries splash with a vibrant blue or purplish-blue hue.
- Check the container’s bottom for any crushed berries—fresh blueberries should be free of juice stains.
- For a deeper contrast, mix in a handful of blackberries or boysenberries.
- Washing and Drying
- Place strawberries and blueberries in separate colanders. Gently rinse under cool running water to remove dirt and debris.
- Spread berries in single layers on paper towels and gently pat dry with additional towels. Excess water leads to a soggy crust and diluted frosting.
- Only wash berries right before assembly to prevent them from becoming too moist and losing firmness.
- Preparing Strawberries
- Hulling: Remove the green stem and core. An easy method is to insert a straw through the bottom of the strawberry and push upward, popping out the core.
- Slicing: For consistent thickness, slice berries into ¼-inch rounds or quarters, depending on size. Uniform slices ensure a neat berry pattern.
- Discard any bruised or overly soft berries—these can leak juice and discolor the frosting.
- Preparing Blueberries
- Most blueberries can be left whole. If using larger berries, cut them in half or quarters to match the size of strawberry slices and maintain an even fruit layer.
- Remove any stems or green bits.
- Other Berry Options (Optional)
- Raspberries: For a bolder red accent, incorporate raspberries alongside strawberries. Gently wash and pat dry before placing.
- Blackberries: Use these sparingly for a darker blue accent—halve large blackberries so they rest flat on the frosting.
4. Assembly Instructions
Once your crust is baked and your frosting and fruit are ready, it’s time to bring everything together. You can choose from multiple design options to create a dazzling layout. Follow these step-by-step instructions for perfect results.
A. Cooling and Prepping the Crust
- Ensure that the sugar cookie crust is completely cooled (at least 15 minutes on a cooling rack). A warm crust will melt the frosting, resulting in a runny mess.
- If you’ve opted for mini rounds, confirm all are sufficiently cool before frosting.
B. Applying the Cream Cheese Frosting
- Using an offset spatula or butter knife, scoop the cream cheese frosting onto the center of the cooled crust.
- Spread frosting in a thin, even layer (about ¼ inch thick), leaving a ½-inch border at the crust’s edge to create a defined “crust” appearance.
- Aim for smooth, uniform coverage—peak and valley streaks will disrupt fruit placement.
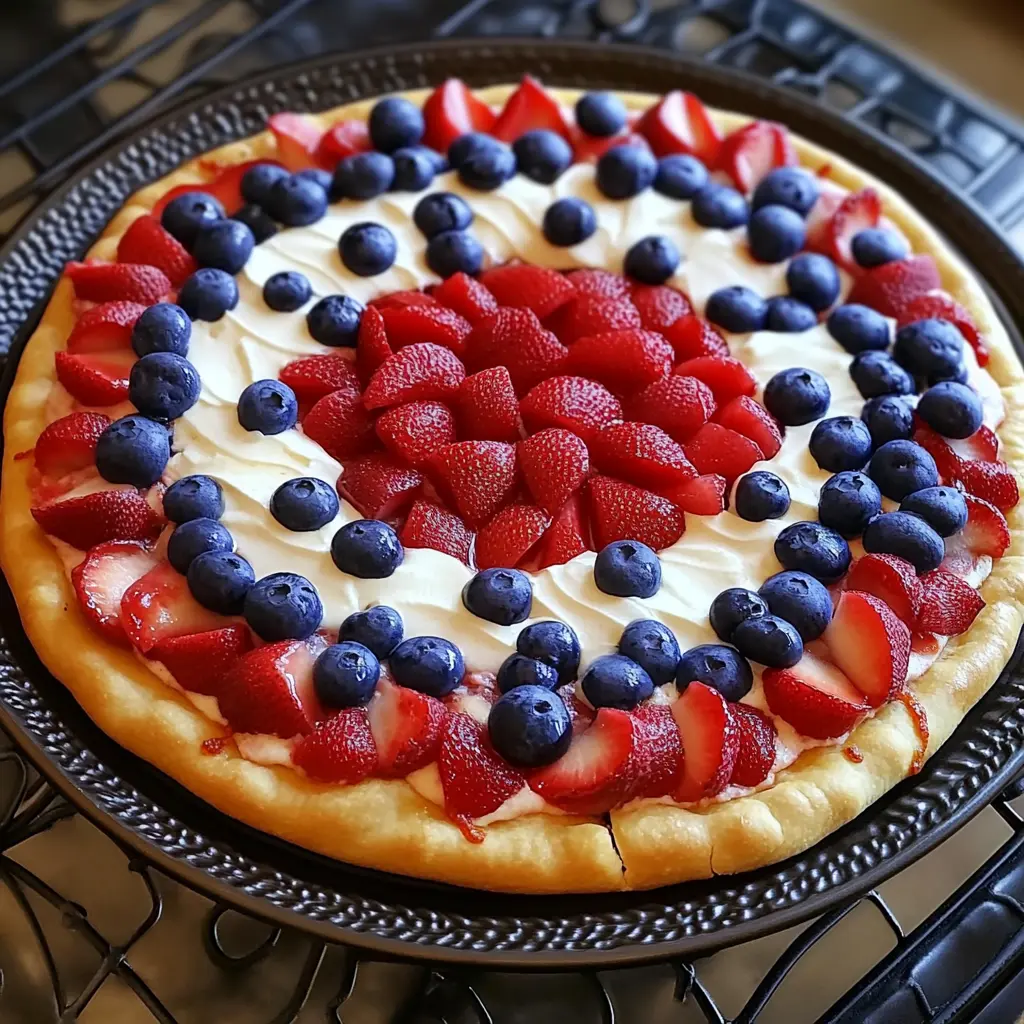
C. Design Options
Below are three popular patterns to assemble your Red White and Blue Fruit Pizza. Each provides a different visual twist on the patriotic theme.
- Circle Pattern
- Step 1: Arrange sliced strawberries in a single outer ring around the crust’s edge, slightly overlapping each piece. The goal is to create a continuous red circle just inside the border of exposed crust.
- Step 2: Leave a ½-inch ring of exposed frosting next to the strawberry layer. This creates a white concentric ring.
- Step 3: In the center, pile whole blueberries to form a tight, circular blue cluster. Make sure the center layer is roughly the same thickness (¼–⅜ inch) as the outer strawberry ring.
- Step 4: Gently press berries into frosting so they adhere without sinking. The final effect is three bold rings: red strawberries, white frosting, and blue berries.
- American Flag Pattern(Ideal for a Large 12-Inch Pizza)
- Step 1: Visualize the “canton” (top left rectangle) of the flag taking up the top left quarter of the pizza. Fill this quarter with blueberries in neat rows—approximately 3–4 rows of whole blueberries, depending on crust size.
- Step 2: Next to the blueberry canton, create alternating horizontal rows of strawberries and exposed white frosting to mimic the flag’s stripes. For a 12-inch pizza, approximately seven stripes can be achieved: four red (strawberries) and three white (frosting).
- Step 3: Tip: If you need additional white stripes, spread a very thin layer of frosting in between berry rows to maintain the white stripe illusion.
- Step 4: Ensure that the bottom and right side of the flag pattern are bordered by a thin ring of exposed crust, giving a polished frame to your dessert.
- Starburst Pattern
- Step 1: In the center of the frosted crust, create a small star shape using blueberries. You can use a star-shaped cookie cutter as a guide: place it on the frosting and fill the interior with blueberries, then remove gently.
- Step 2: From the star’s points, arrange streaks of sliced strawberries radiating outward—five or six rays spaced evenly around the star.
- Step 3: Between the strawberry rays, leave frosting exposed to provide the white contrast. You can sprinkle a few white nonpareil sprinkles or shredded coconut for shimmer.
- Step 4: Press all fruit gently so they adhere without shifting during serving.
D. Chilling and Serving
- After decorating, transfer the assembled fruit pizza to the refrigerator and chill for 15–20 minutes. This helps the frosting firm up and hold the berries in place.
- For mini pizzas, you can chill on a flat tray to prevent them from tipping.
- Serve the pizzas cold. Provide a sharp pizza cutter or serrated knife (dip blade in hot water and wipe dry between cuts) for neat slices.
Variations and Customizations
1. Mini vs. Full-Sized Fruit Pizza
- Mini Fruit Pizzas
- Ideal for potlucks, bake sales, or a fun DIY station.
- Each 4-inch round is portioned for one person, allowing guests to choose their design and toppings.
- Faster bake time—10–12 minutes each—and quicker cooling.
- Arrange on tiered dessert stands for dramatic presentation.
- Full-Size Fruit Pizza
- A single 10–12 inch dessert that serves 8–12 people (depending on slice size).
- Perfect as a centerpiece dessert at a barbecue or holiday feast.
- Allows for grander design displays (flag motif, starburst).
- Cut into 12–16 triangles and arrange on a large platter.
Pros and Cons
- Minis:
- Pros: Crowd pleaser, customizable, easy to transport.
- Cons: More time rolling and cutting multiple rounds; uses more frosting (per total volume).
- Full-Size:
- Pros: Quick assembly, bold visual impact, waste reduction (only one crust).
- Cons: Requires precise design to ensure symmetry; harder to slice perfectly without specialized tools.
2. Alternative Crust Options
- Gluten-Free Crust
- Replace all-purpose flour with a 1:1 gluten-free blend (e.g., Bob’s Red Mill) or almond flour plus 1–2 tablespoons tapioca starch for binding.
- Adjust bake time slightly; gluten-free crusts may brown faster on edges.
- Ensure no cross-contamination if baking for gluten-sensitive guests.
- Graham Cracker Crust
- Combine 2 cups graham cracker crumbs (about 12 full-sheet crackers, pulsed in a food processor) with ¼ cup granulated sugar and 6 tablespoons melted butter.
- Press mixture firmly into a 9–10 inch pizza pan with a flat-bottomed glass.
- Bake at 350 °F (175 °C) for 8 minutes, then cool completely.
- The honeyed graham crust adds a deeper flavor profile that pairs beautifully with cream cheese and berries.
- Sugar-Free/Keto-Friendly Crust
- Use 2 cups almond flour, ¼ cup powdered erythritol, ½ teaspoon baking powder, pinch of salt, and 2 eggs.
- Mix until a soft dough forms; press into a pizza pan.
- Bake at 350 °F (175 °C) for 12–15 minutes, until edges turn light golden.
- The nut-based crust is moist with a hint of sweetness—perfect for low-carb gatherings.
3. Alternative Frosting Options
- Greek Yogurt Frosting
- Combine 1 cup full-fat Greek yogurt, 2 tablespoons honey (or maple syrup), and 1 teaspoon vanilla extract.
- Whip until slightly thickened.
- While tangy and light, note that it is less stable in warm temperatures, so serve immediately after assembly.
- Whipped Cream Frosting
- Use 1 cup heavy whipping cream, 2 tablespoons powdered sugar, and ½ teaspoon vanilla.
- Whip on high speed until stiff peaks form.
- The airy texture pairs well with lighter crusts, but may begin to soften if left out for more than 20 minutes on a hot day.
- Mascarpone Cheese Frosting
- Blend 4 ounces room-temperature mascarpone cheese with 2 tablespoons powdered sugar and ½ teaspoon lemon zest.
- Beat until silky smooth.
- This rich, velvety base elevates the dessert to gourmet status, perfect for upscale gatherings.
Occasion Ideas
- Fourth of July
- The quintessential patriotic dessert—pair with fireworks viewing and barbecued favorites.
- Incorporate a family “decorate your own mini pizza” station to keep kids entertained.
- Memorial Day
- Kick off summer with this centerpiece dessert at outdoor potlucks.
- The bright fruit bursts echo the start of warmer days and long weekends.
- Labor Day
- Celebrate the unofficial end of summer with a festive farewell dessert.
- Serve alongside grilled burgers, corn on the cob, and lemonade.
- Flag Day (June 14)
- Use this red-white-blue treat to honor American heritage.
- Ideal for school events, community gatherings, or family picnics.
- Veterans Day
- Offer as a sweet nod to patriotic pride in November—berries can be substituted with frozen berries if fresh are unavailable.
- Serve indoors with seasonal décor and warm drinks if weather is cooler.
Storage and Make-Ahead Tips
- Pre-Baking Crusts
- Bake cookie crusts up to 24 hours ahead. Let them cool completely, then store in an airtight container at room temperature.
- If making minis, layer parchment between rounds to prevent sticking.
- Preparing Frosting in Advance
- Mix the cream cheese frosting 1–2 hours before assembly. Store covered in the refrigerator. Before using, let sit at room temperature for 10 minutes, then rewhip for 20 seconds to restore smooth texture.
- Assembling Ahead of Time
- Fully assemble fruit pizzas up to 2 hours before serving. Place in a single layer on a flat tray and cover loosely with plastic wrap. Avoid stacking to prevent crushed berries.
- Keep refrigerated until 10–15 minutes before service to allow flavors to meld without risking soggy crusts.
- Leftovers and Shelf Life
- Store leftover slices in an airtight container in the refrigerator for up to 24 hours. Beyond that, the crust begins to soften, and berries release moisture.
- If you must save longer, deconstruct leftover slices: remove fruit and frosting, store crust separately in an airtight bag at room temperature for up to 48 hours.
- Avoiding Freezing
- Freezing isn’t recommended once assembled—the frosting can separate and berries become mushy when thawed. Instead, freeze unbaked dough in a sealed bag for up to 1 month. Thaw in the refrigerator overnight, then proceed as directed.

FAQs
- Can I use a store-bought sugar cookie dough for the crust?
Absolutely—refrigerated dough speeds up prep significantly. Simply roll out the dough to ¼ inch thickness, cut rounds (for minis) or one large circle (for a full-size pizza), and bake according to package directions. Once cooled, proceed with frosting and topping as usual. - How long can I store a fruit pizza before serving?
Once assembled, a Red White and Blue Fruit Pizza is best enjoyed within 2–3 hours. You can, however, prepare the crust and frosting separately up to 24 hours in advance. Store baked crusts in an airtight container at room temperature. Keep the frosting chilled in the fridge until you’re ready to assemble. - What’s the best way to keep blueberries and strawberries from getting watery?
- Rinse berries just before use and spread them out on paper towels to dry completely.
- Pat gently to remove excess moisture—never soak berries in water.
- If you anticipate fruit will need to sit out (e.g., at a buffet), consider placing a sheet of paper towel beneath the fruit layer to catch any drips away from the crust.
- Are there vegan/dairy-free options for the frosting?
Use a dairy-free cream cheese alternative—such as almond or cashew-based “cream cheese.” Combine with powdered sugar and vanilla extract for similar sweetness and structure. Coconut whipped cream (made from full-fat coconut milk) also works, though it’s less stable, so serve quickly after assembly.
Conclusion
From its vibrant red strawberries and deep-blue blueberries to the snowy canvas of cream cheese frosting, the Red White and Blue Fruit Pizza is the ultimate patriotic dessert. Whether you opt for mini rounds at a potluck or a grand 12-inch centerpiece at a Fourth of July celebration, this dessert captures the spirit of summer in every slice. Easy to customize—ranging from gluten-free crusts to whipped mascarpone versions, this crowd-pleasing treat invites creativity and shared moments. Gather your friends, arrange the berries, and enjoy this festive masterpiece that’s as delicious as it is beautiful.
2 thoughts on “5 Irresistible Red White and Blue Fruit Pizzas for Patriotic Celebrations”