Chocolate Pinecone Cake
What Is a Chocolate Pinecone Cake?
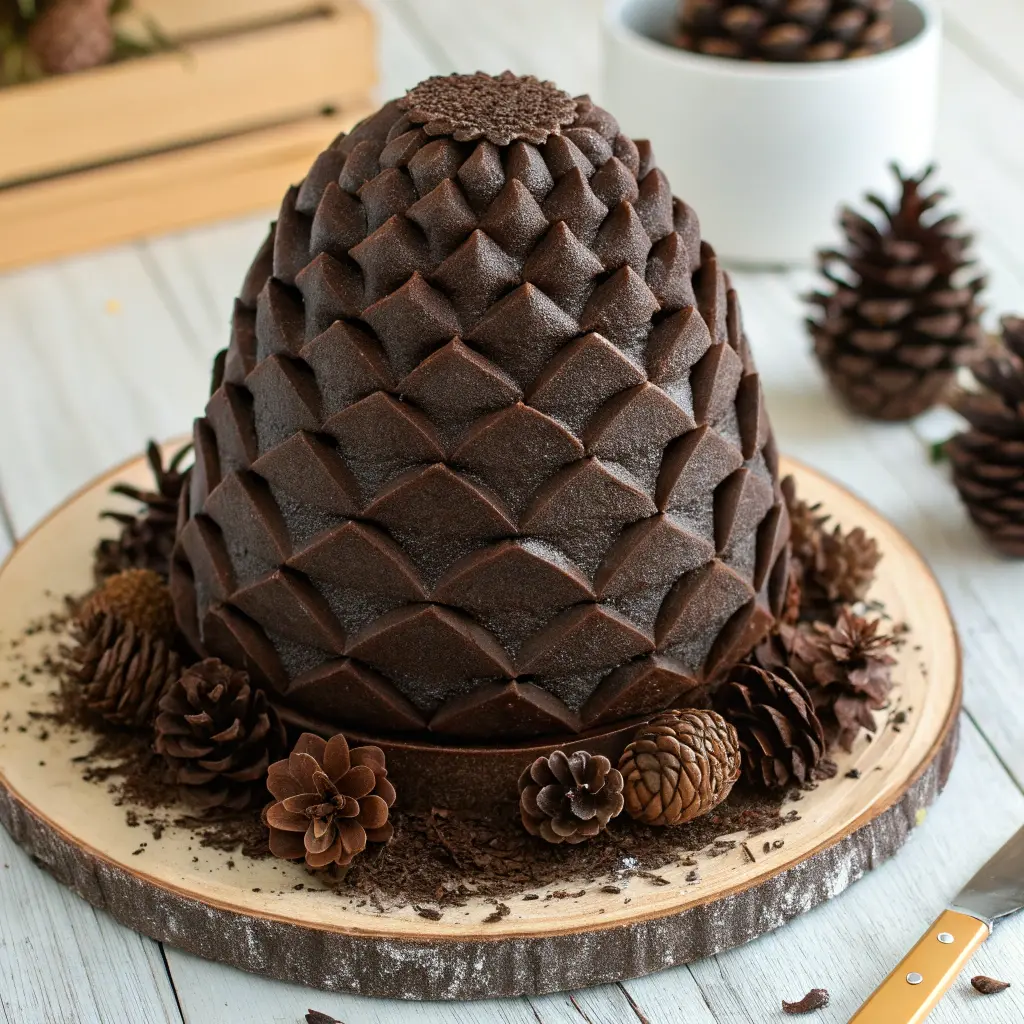
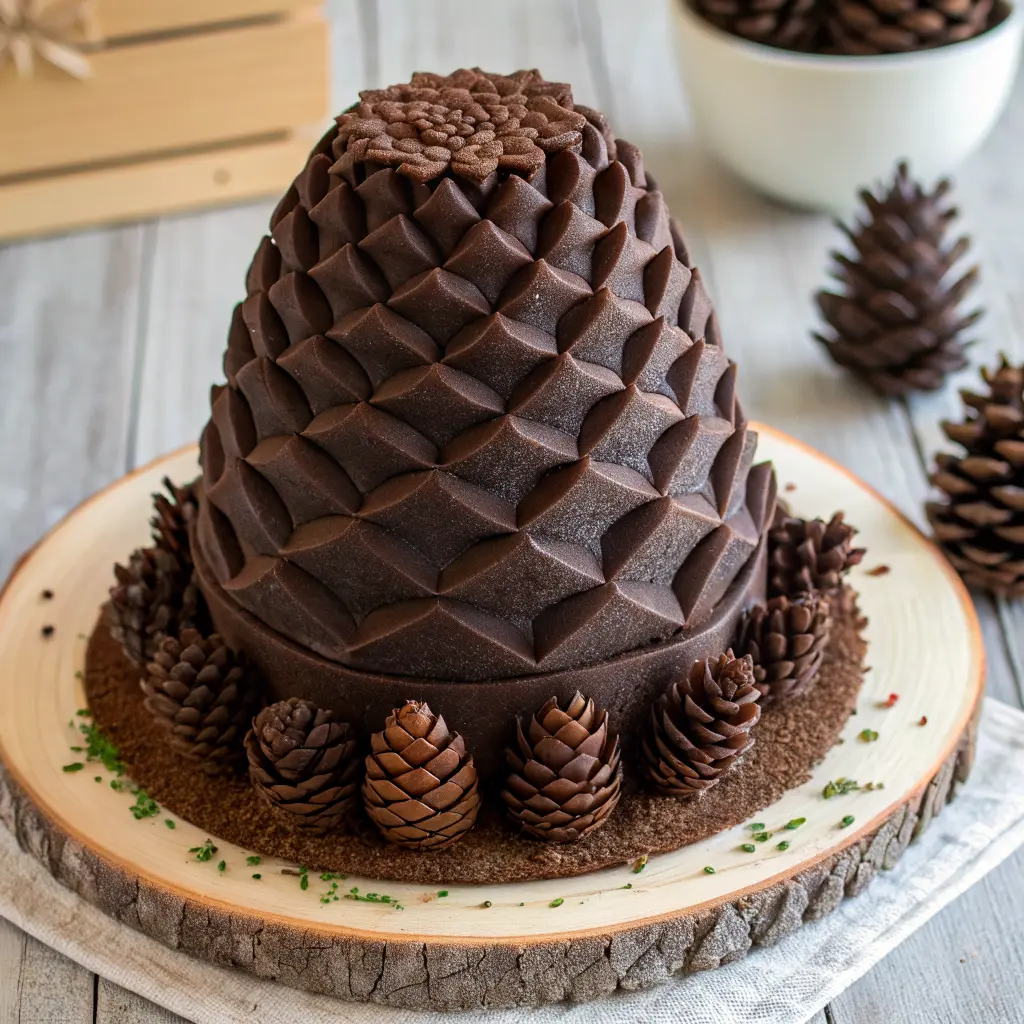
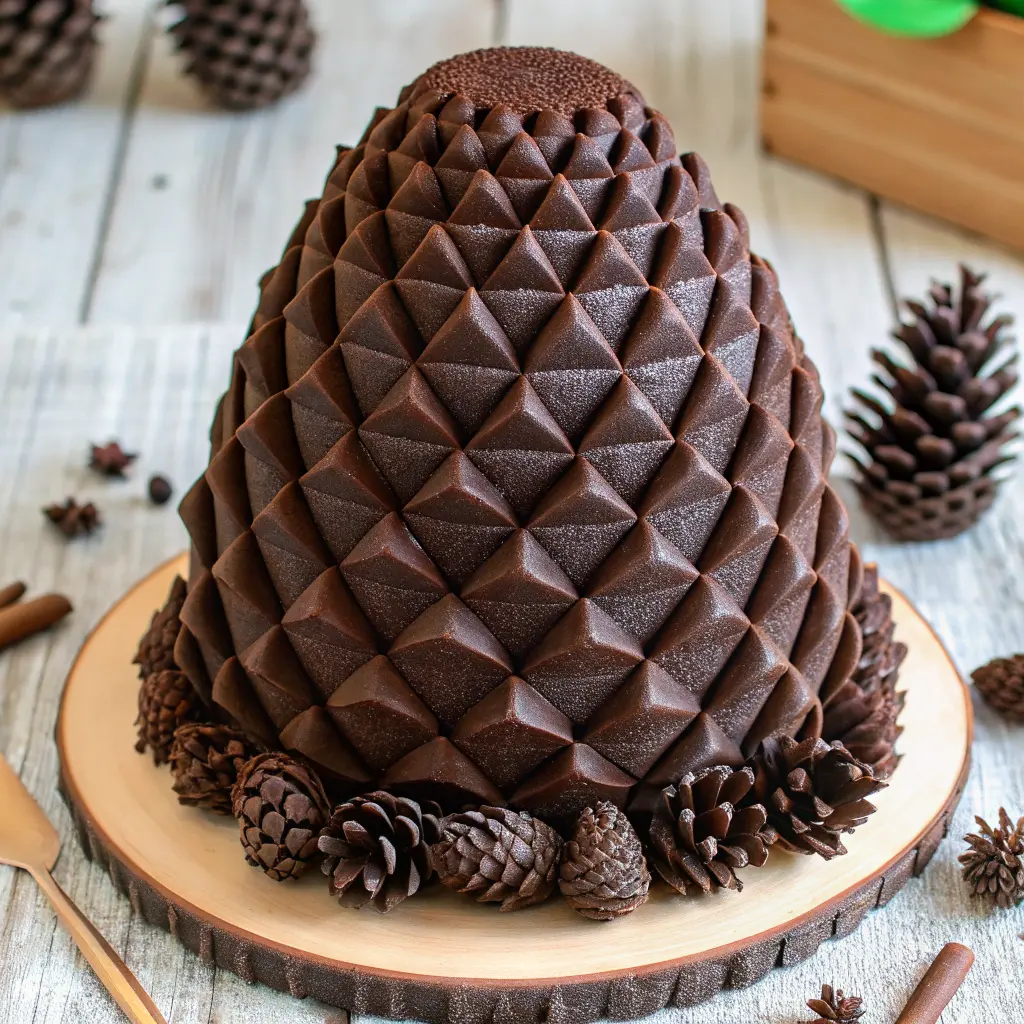
A chocolate pinecone cake is a layered or loaf-style chocolate cake decorated with realistic edible chocolate pinecones on top. Think of it as a woodland-themed centerpiece:
- A rich chocolate cake base (round, rectangular, or log-shaped)
- Covered with chocolate buttercream or chocolate ganache
- Topped with handmade chocolate pinecones made from fudge, cake-pop mixture, truffles, biscuits, or cereal
- Finished with “snowy” sugar, cocoa, and greenery like rosemary and cranberries
Some versions use a single large pinecone perched in the center of the cake. Others create a cluster of smaller pinecones, or even a wreath made from cupcakes arranged in a ring with pinecones and leaves on top. No matter the format, the star of the show is always the realistic chocolate pinecone.
Key Components of a Chocolate Pinecone Cake
Before you start baking, it’s helpful to break the project down into its main elements. A chocolate pinecone cake has three core components:
1. The Chocolate Cake Base
For the base, you want a moist, rich chocolate cake that slices cleanly and holds up under frosting and decorations. Popular choices include:
- A classic layer cake (two or three 8–9 inch rounds)
- A loaf or log-style cake, perfect for a “forest floor” look
- A sheet cake trimmed down to create a more rustic shape
Aim for a cake that is:
- Tender but sturdy
- Deeply chocolatey (cocoa plus melted chocolate or strong coffee)
- Easy to level and stack
2. The Frosting or Ganache
The cake is usually coated with:
- Chocolate buttercream – soft, creamy, great for crumb coating and textured finishes
- Chocolate ganache – smooth and glossy, perfect for sleek finishes or drip edges
You can even combine the two: a buttercream crumb coat with a ganache top layer. That combination gives you both structure and a luxurious finish.
3. The Edible Chocolate Pinecones
The pinecones are the star of this cake. They’re typically made from a dense, moldable chocolate base and decorated with “scales.” Common options include:
- Fudge rolled into cones and pressed with sliced almonds
- Cake-pop mixture shaped into cones and coated with cereal or small cookies
- Biscuit or cereal mixtures bound with chocolate or spread and decorated piece by piece
- Molded chocolate pinecones using silicone molds
Ingredients for Chocolate Pinecone Cake
For the Chocolate Cake
- 2 cups all-purpose flour
- ¾ cup unsweetened cocoa powder (natural or Dutch-process)
- 2 cups granulated sugar
- 2 teaspoons baking powder
- 1½ teaspoons baking soda
- 1 teaspoon fine salt
- 2 large eggs
- 1 cup whole milk or buttermilk
- ½ cup neutral oil (or melted butter)
- 1 cup hot coffee or hot water
- 2 teaspoons vanilla extract
For the Chocolate Buttercream
- 1 cup unsalted butter, softened
- 3 cups powdered sugar
- ½ cup cocoa powder
- 3–4 tablespoons cream or milk
- 1 teaspoon vanilla extract
For the Chocolate Pinecones (Choose One Base)
Option 1: Fudge Pinecones
- 1½ cups chocolate chips
- 1 cup sweetened condensed milk
- 2 tablespoons butter
- 1 teaspoon vanilla extract
- Pinch of salt
- 1–2 cups sliced almonds (for “scales”)
Option 2: Cake-Pop/Truffle Pinecones
- 2 cups crumbled chocolate cake or chocolate cookies
- ½ cup chocolate spread or cream cheese
- 2 tablespoons cocoa powder
- 1–2 cups mini cereal flakes, sliced almonds, or chocolate chips for “scales.”
Option 3: Biscuit/Cereal Pinecones
- 2 cups crushed biscuits, graham crackers, or chocolate cookies
- ½ cup cream cheese or chocolate spread
- ¼ cup melted chocolate
- Sliced almonds, mini oval cookies, or cereal flakes for decoration
Timing Details:
- Prep Time:
PT45M - Cook Time:
PT35M - Additional Time (Cooling + Chilling):
PT2H - Total Time:
PT3H20M
Essential Tools & Equipment
You don’t need a professional kitchen to make a chocolate pinecone cake, but a few tools do make it easier:
Baking Tools
- Cake tins (round, loaf, or log pan)
- Parchment paper
- Mixing bowls
- Whisk, hand mixer, or stand mixer
- Rubber spatulas
- Cooling racks
Decorating Tools
- Offset spatula (small and/or large)
- Bench scraper or straight edge for smoothing sides
- Cake turntable (very helpful but optional)
- Piping bags and tips (for frosting borders or adding texture)
- Small palette knife
Pinecone-Shaping Helpers
- Silicone pinecone molds (optional but convenient)
- Small tweezers or clean food-safe tongs for placing delicate “scales.”
- Small spoons or fingers for shaping the cone base
Step-by-Step: Baking the Chocolate Cake Base
Use your favorite chocolate cake recipe or adapt these general steps to your preferred formula.
Step 1: Prepare Pans and Preheat the Oven
- Preheat your oven according to your recipe (commonly 175–180°C / 350°F).
- Grease the pans with butter or spray, then line the bottoms with parchment paper.
- Lightly dust the sides with cocoa powder instead of flour for a deeper chocolate look.
Step 2: Mix the Batter
Typically, you will:
- Sift together dry ingredients:
- Flour
- Cocoa powder
- Baking powder/baking soda
- Salt
- In another bowl, whisk wet ingredients:
- Eggs
- Sugar
- Oil or melted butter
- Vanilla
- Combine the wet and dry ingredients, alternating with milk or buttermilk, stirring until just combined.
- Add hot water or coffee at the end, whisking the batter until smooth and slightly thin. This step often gives a beautifully moist, tender crumb.
Step 3: Bake and Cool
- Divide batter evenly between pans.
- Tap pans gently on the counter to release air bubbles.
- Bake until a toothpick inserted in the center comes out with a few moist crumbs.
- Remove from the oven, cool in pans briefly, then turn out onto racks and cool completely.
Step 4: Level and Prepare for Frosting
- Once fully cooled, use a serrated knife or cake leveler to trim any domed tops.
- If you like, brush layers lightly with simple syrup or coffee syrup for extra flavor.
- Wrap and chill the layers until you’re ready to assemble.
Step-by-Step: Making Edible Chocolate Pinecones
You can choose whichever method suits your mood and pantry. Here are three popular approaches.
Method 1: Fudge and Sliced Almond Pinecones
- Make the fudge base:
- Melt chocolate chips, sweetened condensed milk, and butter together until smooth.
- Stir in vanilla and a pinch of salt.
- Let cool slightly until thick but pliable.
- Shape the cones:
- Scoop small portions of fudge and roll them into oval or cone shapes.
- Place on a parchment-lined tray.
- Add the scales:
- Starting from the bottom of the cone, press sliced almonds into the fudge at a slight angle, overlapping slightly like real pinecone scales.
- Continue working upward in rows until the cone is covered.
- Chill:
- Place the tray in the fridge until the pinecones are firm and easy to handle.
Method 2: Cake-Pop or Truffle Pinecones
- Make the base mixture:
- Crumble leftover chocolate cake or cookies into fine crumbs.
- Add chocolate spread or cream cheese a spoonful at a time until the mixture holds together like dough.
- Shape the cones:
- Roll into balls, then taper one side to form a cone.
- Smooth the surface with your hands.
- Add the scales:
- Use small cereal pieces, mini cookies, or chocolate chips pressed into the cone.
- Start at the bottom and work upward in overlapping rows.
- Chill to firm:
- Refrigerate until firm and set.
Method 3: Molded Chocolate Pinecones
- Prepare the chocolate:
- Melt chocolate (tempered if possible for a good snap and shine).
- Fill molds:
- Pour or spoon melted chocolate into silicone pinecone molds.
- Tap to remove air bubbles.
- Chill until completely firm.
- Unmold and refine:
- Gently pop out the pinecones.
- If desired, brush details with cocoa powder or edible dust for dimension.
Assembling & Decorating the Chocolate Pinecone Cake
Now comes the fun part: turning your cake, frosting, and pinecones into a woodland centerpiece.
Step 1: Stack and Fill the Cake
- Place a small dollop of frosting or ganache on your cake board to anchor the first layer.
- Add the first cake layer, cut side up.
- Spread an even layer of frosting or ganache.
- Add the next layer, checking that everything is level.
- Repeat if you have more layers.
Step 2: Apply a Crumb Coat
A crumb coat is a thin layer of frosting that locks in crumbs:
- Spread a thin layer of frosting over the top and sides of the stacked cake.
- Scrape away excess with a bench scraper or spatula.
- You should see some cake peeking through; that’s normal.
- Chill the cake for at least 30 minutes, or until the frosting firms up.
This step makes the final layer of frosting much easier and cleaner.
Step 3: Final Coat & Texture
- Apply a thicker, final coat of frosting or ganache.
- Smooth the top and sides for a polished look, or use a spatula to create rustic tree bark-like textures.
- If you want a snowy forest effect, you can dust cocoa along the bottom and powdered sugar on top later.
Step 4: Position the Chocolate Pinecones
Think about composition before placing anything:
- Cluster pinecones toward one side of the cake for an asymmetrical, modern look.
- Create a central “pile” of pinecones for maximum height.
- Arrange a cascade of pinecones from the top down one side for a dramatic effect.
Step 5: Add Woodland Details
Enhance the woodland theme with simple, edible decorations:
- Whole or sugared cranberries along the base and around pinecones
- Fresh rosemary sprigs that resemble pine needles
- Chocolate shards or curls to mimic bark
- A light dusting of powdered sugar over everything for a snowy finish
Serving, Storage & Make-Ahead Tips
To keep your chocolate pinecone cake in top condition:
- If possible, add the final decorations as close to serving time as you reasonably can, especially the powdered sugar “snow.”
- Store the cake in a cool place, protected from strong odors and drafts.
- If you’ve used fresh greenery or berries, keep an eye on them and refresh if needed just before serving.
For the chocolate pinecones themselves:
- Store them on a tray in the fridge until you’re ready to decorate.
- If they feel too firm, let them sit at room temperature for a few minutes before placing them on the cake.
Troubleshooting Your Chocolate Pinecone Cake
Even experienced bakers run into small issues. Here’s how to handle the most common ones.
Pinecones Sliding or Falling Off the Cake
- Make sure your frosting or ganache is slightly soft when you attach the pinecones, so they “stick.”
- Use a dab of extra frosting or melted chocolate as glue behind each pinecone.
- Place heavier pinecones closer to the center of the cake rather than at the very edge.
Pinecones Cracking or Losing Scales
- If your base mixture is too dry, add a bit more chocolate spread or cream cheese to make it more pliable.
- Press scales gently but firmly, and avoid placing the cake in very warm areas where the base might soften too much.
- If a scale falls off, simply press a fresh one in with a bit of melted chocolate.
Frosting Issues: Crumbs, Air Bubbles, or Streaks
- Make sure you’ve chilled the crumb coat long enough before adding the final layer.
- Work with frosting that’s smooth and not overly stiff; a few drops of milk or cream can help.
- Use long, gentle strokes with your spatula or bench scraper to get a smooth finish.
Frequently Asked Questions About Chocolate Pinecone Cake
Can I make chocolate pinecones without nuts?
Absolutely. If you prefer to skip nuts, use:
- Cornflakes or other flake-style cereal
- Small oval cookies
- Chocolate chips or cereal pieces
Do I need special molds to make chocolate pinecones?
No. Chocolate pinecones can be shaped entirely by hand using fudge or cake-pop mixture. Molds are a nice bonus if you want very precise, uniform shapes, but they’re not necessary.
What kind of chocolate or cocoa powder works best?
Use a good-quality unsweetened cocoa powder and chocolate that you enjoy eating on its own. Dark or semi-sweet chocolate often gives the richest flavor, but you can mix in milk chocolate if you prefer a softer taste.
Can I freeze the cake or the pinecones?
You can freeze the cake layers (well-wrapped) and even some types of pinecones, especially fudge-based ones, as long as they’re tightly wrapped. Thaw in the fridge and then bring to room temperature before serving for the best texture.
How do I stop the pinecones from melting or going too soft?
Keep your kitchen cool while you’re decorating, and avoid placing the cake near heat sources or in direct sunlight. If the pinecones feel too soft while you’re arranging them, pop them back in the fridge for a short time to firm up.
Conclusion
Creating a chocolate pinecone cake is more than following a recipe—it’s a chance to build a stunning centerpiece that captures the magic of the winter season. From the rich chocolate layers to the handcrafted edible pinecones, every step brings your woodland-inspired vision to life. Whether you’re preparing it for a holiday gathering, a winter celebration, or simply to impress your guests, this cake delivers unforgettable charm and flavor.