
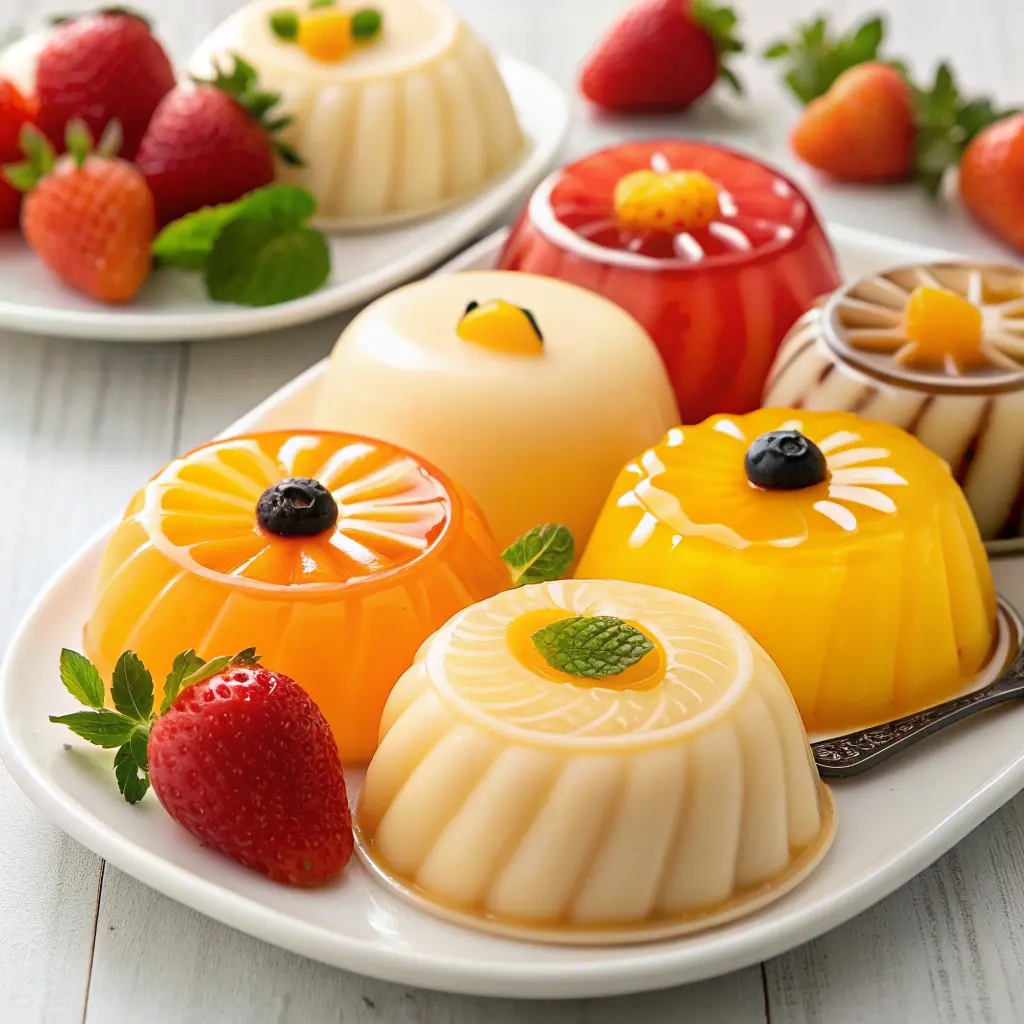
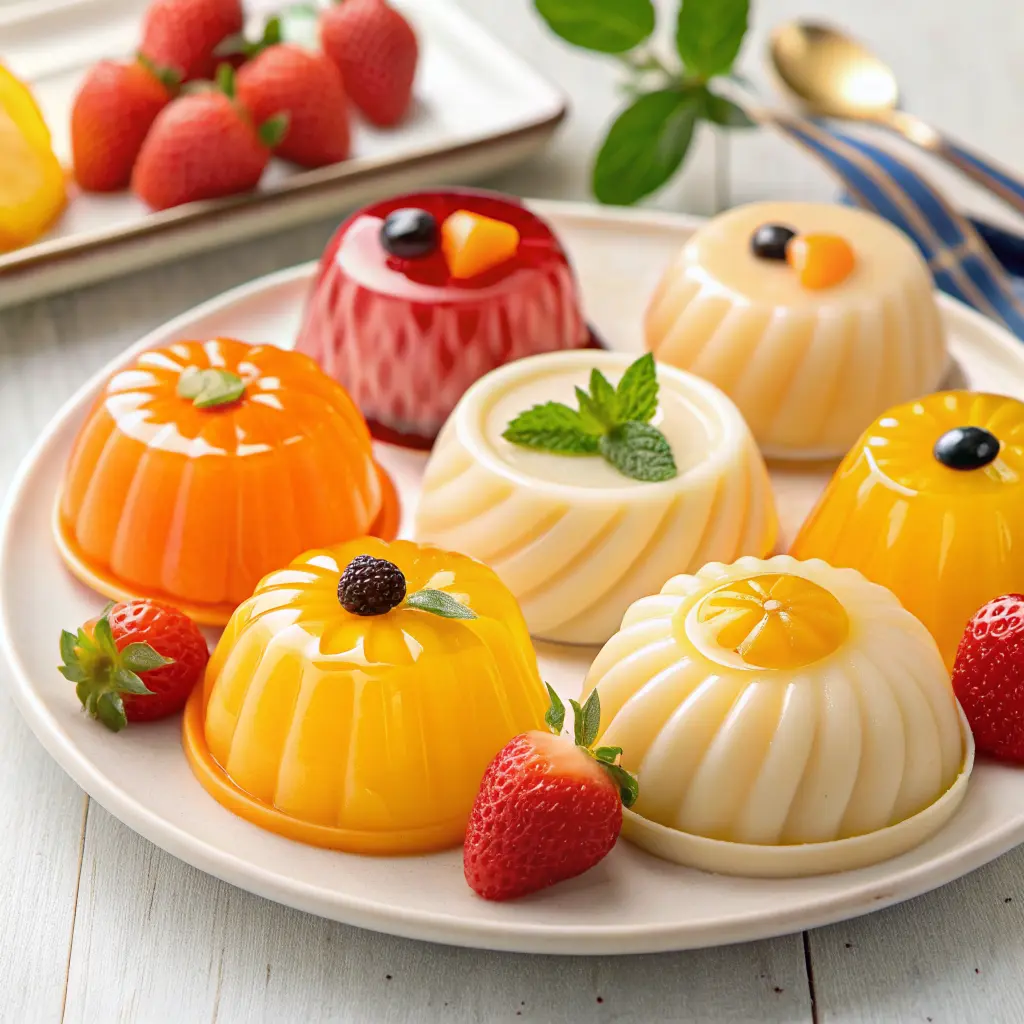
What Are Fruit-Shaped Mousse Cakes?
Fruit-shaped mousse cakes are mini entremets designed to look like realistic fruit. Instead of a standard round cake, each portion is built in a silicone mold shaped like:
- Apples
- Peaches
- Lemons or oranges
- Cherries
- Mango halves or domes
Inside, each “fruit” usually includes:
- A fruit mousse shell
- A contrasting insert (curd, gelée, compote, or cream)
- A thin sponge or crunchy base for texture and structure
Because the mousse is poured and frozen in fruit-shaped silicone molds, you get a perfectly smooth, curved surface ready for mirror glaze or velvet spray. Once coated, the cakes are decorated with stems, leaves, color gradients, or speckles to make them look like the real fruit.
Think of them as:
- Mini sculpted desserts
- Easy to portion (one mold = one serving)
- A fun way to play with color, shape, and flavor
Key Ingredients and Smart Substitutions
Fruit-shaped mousse cakes look high-end, but the ingredient list is surprisingly approachable. Here’s what you’ll need for most versions.
1. For the Fruit Mousse
- Fruit purée (mango, passion fruit, berry, citrus, etc.)
- Sugar
- Gelatin (powder or sheets) or a vegetarian alternative like agar (with adjusted method)
- Heavy cream, whipped to soft peaks
- Optional: white chocolate for extra structure, mascarpone or cream cheese for richness
The basic method:
- Heat fruit purée with sugar
- Add hydrated gelatin
- Cool slightly, then fold into whipped cream
2. For the Fruit Insert (Gelée or Curd)
The insert adds a burst of flavor and a beautiful visual center.
You can use:
- Smooth fruit gelée
- Tart citrus curd
- Chunky fruit compote
- A contrasting mousse (for layered flavors)
Usually, you’ll:
- Cook fruit purée with sugar and thickener
- Pour into small molds
- Chill or freeze solid before embedding inside the main mousse
3. For the Base: Sponge or Crunch
Every “fruit” needs a support layer so it doesn’t wobble or collapse.
Good options:
- Thin almond sponge or génoise
- Joconde, chiffon, or basic vanilla sponge
- Crisp sable cookie discs
- Feuilletine or crunchy chocolate bases for extra texture
4. For the Mirror Glaze
A classic mirror glaze for fruit shapes usually includes:
- Sugar
- Glucose or corn syrup
- Water
- Sweetened condensed milk
- White chocolate
- Gelatin
- Oil-soluble food coloring
This glaze is cooked, emulsified, cooled, then poured over frozen cakes.
5. For Velvet Spray
A typical velvet spray mixture is:
- White, milk, or dark chocolate
- Cocoa butter
- Oil-soluble food color
You melt and emulsify everything, then spray the warm mixture over frozen cakes for that signature velvety skin.
6. Substitutions (Without Getting Too Complicated)
You can:
- Swap gelatin for agar in mousse and gelée, adjusting ratios and boiling times
- Change fruit purée flavors easily: mango, raspberry, lemon, passion fruit, strawberry, etc.
- Use almond flour-based sponges or nutty dacquoise for different textures
Essential Tools & Equipment
You don’t need a professional pastry lab to make fruit-shaped mousse cakes, but a few tools will make your life much easier.
1. Silicone Fruit Molds
These are the stars of the show. Look for:
- Apple, citrus, peach, or cherry molds
- High-quality silicone (non-stick, flexible, heat- and freezer-safe)
- Molds with enough cavities for your desired yield (often 6–8 per tray)
2. Cake & Insert Tools
To build clean layers inside your “fruit,” it helps to have:
- A shallow pan or ring mold for baking your sponge
- Round cutters to punch out bases that fit the mold
- Small molds (mini hemispheres, cubes, or centers) for your fruit gelée insert
3. Glazing Setup
For mirror glaze:
- A wire rack set over a deep tray or large baking sheet
- A jug or ladle for pouring glaze
- A digital thermometer to check glaze temperature
- Offset spatulas to nudge glaze and move cakes cleanly
4. Velvet Spray or Airbrush Gear (Optional but Amazing)
For velvet spray finishes:
- A spray gun or airbrush usable with cocoa butter and chocolate
- Or canned velvet spray formulated for desserts
- A large box or spray booth to contain the overspray
- Heat-proof jugs to melt and hold the mixture
5. Basic Baking & Prep Tools
- Mixing bowls, whisks, spatulas
- Hand mixer or stand mixer for whipping cream
- Saucepan for heating fruit purée and sugar
- Piping bags for clean filling and assembly
Core Recipe: Classic Citrus Fruit-Shaped Mousse Cakes
Use this blueprint as your main fruit-shaped mousse cake recipe, then swap in different fruits and colors as you wish.
Step 1: Make the Fruit Gelée Insert
You’ll need:
- Fruit purée (e.g., passion fruit, lemon, or orange)
- Sugar
- A touch of lemon juice (for brightness)
- Gelatin or agar
Method:
- Gently heat the purée with sugar until the sugar dissolves.
- Add bloomed gelatin (or cooked agar according to package directions), whisking until fully dissolved.
- Taste and adjust the balance with more sugar or lemon juice if needed.
- Pour into small molds (mini hemispheres or cubes).
- Chill until set, then freeze until solid — frozen inserts are easier to embed in mousse.
Step 2: Prepare the Base Cake or Crunch
Options for the base:
- Thin almond sponge
- Vanilla génoise
- A chocolate sponge (for contrast with bright citrus)
- A crunchy mix (feuilletine + chocolate + nuts)
Method (for a simple sponge):
- Bake the sponge in a thin layer on a parchment-lined tray.
- Once cooled, use a cutter to punch out discs slightly smaller than the diameter of the fruit molds.
- Set aside, wrapped, until assembly time.
If you go with a crunchy base:
- Spread the mixture in a thin layer
- Chill until firm
- Cut into discs carefully with a sharp cutter or knife
Step 3: Whip the Citrus Mousse
You’ll need:
- Citrus purée (or juice + zest)
- Sugar
- Gelatin (bloomed)
- Heavy cream, whipped to soft peaks
- Optional: a little white chocolate, melted, for extra structure
Method:
- Heat citrus purée with sugar until just hot enough to dissolve the sugar.
- Remove from heat and stir in bloomed gelatin until fully dissolved.
- Add melted white chocolate if using; stir until smooth.
- Cool the mixture until just slightly warm (no longer hot, but not set).
- Fold in whipped cream in two stages:
- First, a small amount to lighten the mixture
- Then the rest, folding gently to keep the mousse airy
The goal is a pourable, fluffy citrus mousse that will hold its shape once frozen.
Step 4: Fill the Silicone Fruit Molds
- Place your clean silicone molds on a tray that fits in the freezer.
- Pipe or spoon mousse into each cavity, filling them about halfway.
- Tap the tray gently to remove air bubbles.
- Press a frozen gelée insert into the center of each cavity.
- Cover with more mousse, leaving a little space at the top for the base.
- Place a sponge or crunchy disc on top of each cavity, pressing lightly so it sits flush with the mold edge.
- Scrape excess mousse away with an offset spatula for perfectly flat backs.
- Freeze until completely solid — ideally overnight.
At this stage, your “fruits” are fully formed, just waiting for their final skin.
Step 5: Finish With Mirror Glaze
Mirror glaze is all about temperature and smoothness.
- Prepare your glaze with sugar, water, glucose, condensed milk, gelatin, and white chocolate.
- Blend with an immersion blender, avoiding air bubbles as much as possible.
- Strain the glaze through a fine sieve for extra smoothness.
- Let it cool to around 30–35°C (86–95°F) — this is the sweet spot where the glaze is fluid but not so hot that it melts the mousse.
- Unmold the frozen cakes and place them on a wire rack set over a deep tray.
- Pour the glaze in one smooth motion over each cake, making sure to cover every side.
- Let the excess drip off. You can trim the base if needed with a small knife.
Color ideas:
- Bright yellow with tiny green flecks for lemons
- Orange gradient for oranges or mandarins
- Soft pink with blush tones for peaches
- Deep glossy red for cherries
Step 6: Finish With Velvet Spray (Alternative Option)
If you prefer the look of “real fruit skin,” velvet spray is your best friend.
- Warm your chocolate + cocoa butter + color mixture to spraying temperature (often around 40–45°C / 104–113°F, depending on your setup).
- Pour into a spray gun or use a ready-made velvet spray can.
- Unmold the cakes straight from the freezer and place them on a tray inside a large box or spray booth.
- Spray from about 20–30 cm away in light, even passes, turning the tray as you go.
- Aim for a fine, even suede texture — not thick, drippy layers.
The thermal shock between warm spray and frozen cake creates that beautiful, velvety finish. Tone the color down for realism or go bold for a more graphic, stylized look.
Decorating & Finishing Techniques
Once your cakes are glazed or sprayed, the fun really begins. These small details are what make your fruit-shaped mousse cakes look truly realistic.
1. Stems, Leaves, and Details
- Use modeling chocolate or tempered chocolate to form tiny stems.
- Shape small leaves from fondant, marzipan, or modeling chocolate.
- Add a light dusting of cocoa powder or edible dust to mimic natural fruit blush.
2. Color Gradients & Blush
- Airbrush darker shades around the top or bottom of the fruit for depth.
- Add tiny speckles (with a flick of a stiff brush dipped in edible color) to imitate citrus skin or peach fuzz shadows.
3. Plating
- Serve on small gold entremet boards or white plates to make the colors pop.
- Arrange several fruits together in a “fruit bowl” for a dramatic centerpiece.
- Add a few real leaves or herbs around the base to emphasize the illusion.
Serving, Storage & Make-Ahead Tips
One of the best things about fruit-shaped mousse cakes is how well they fit into a busy schedule.
1. Defrosting for Perfect Texture
- After glazing or spraying, transfer the cakes to the fridge.
- Let them thaw gently for a few hours until the mousse is soft and creamy but still holds its shape.
- Serve slightly chilled — not rock-hard from the freezer and not warm.
2. How Long Can They Be Stored?
- Unglazed, fully frozen cakes (still in molds) can usually be stored for several days.
- Once glazed or sprayed, keep them in the fridge and aim to serve within a day or two for the best texture and appearance.
3. Transporting Without Damage
- Use snug cake boxes or containers with non-slip mats at the bottom.
- Keep them chilled during transport so the coating stays firm.
- Avoid stacking anything on top — even lightweight items can dent velvet spray or smudge mirror glaze.
Troubleshooting: Fixing Common Problems
Even advanced desserts come with hiccups. Here’s how to rescue your fruit-shaped mousse cakes.
Problem 1: Mousse Too Soft or Collapsing
Possible causes:
- Not enough gelatin or agar
- Cream was under-whipped or over-whipped
- Cakes didn’t freeze long enough before unmolding
Solutions:
- Slightly increase the stabilizer next time.
- Whip cream only to soft peaks, not stiff.
- Allow more freezing time so the shape is solid before glazing.
Problem 2: Gelée Insert Sinking or Floating
Possible causes:
- The mousse is too fluid when adding the insert
- Insert much denser or lighter than the mousse
Solutions:
- Let the mousse thicken slightly before adding the insert.
- Make sure inserts are frozen solid so they stay in place when pressed into the mousse.
Problem 3: Dull or Patchy Mirror Glaze
Possible causes:
- The glaze is too hot or too cold when poured
- Frozen cake not cold enough
- Too many air bubbles in the glaze
Solutions:
- Aim for the recommended glazing temperature (often around 30–35°C / 86–95°F).
- Make sure cakes are fully frozen.
- Blend the glaze gently and strain it; let bubbles rise and pop before glazing.
Problem 4: Uneven Velvet Spray
Possible causes:
- Spray mixture too cool or too hot
- Spraying too close or too far from the cake
- A humid environment is causing condensation
Solutions:
- Maintain a steady, warm spraying temperature.
- Practice spraying on a test surface to find the perfect distance.
- Spray in a dry environment and keep cakes well frozen.
FAQs About Fruit-Shaped Mousse Cakes
1. What exactly are fruit-shaped mousse cakes?
They’re individual mousse cakes built and frozen in fruit-shaped molds, made of layers of mousse, insert, and base, then finished with mirror glaze or velvet spray to look like realistic fruit.
2. Do I have to use special silicone molds?
Silicone fruit molds make the process much easier and more consistent, but you can experiment with:
- Hemisphere molds
- Hand-carving partially frozen mousse
- Glazing simple domes and adding stems/leaves to suggest fruit
3. Can I make them without gelatin?
Yes, but you’ll need to adjust the method:
- Use agar for gelée inserts (it needs to be boiled to set properly).
- For mousse, some recipes use agar, pectin, or other stabilizers.
- Expect a slightly different texture than classic gelatin-based mousse.
4. Why did my mousse not set properly?
Common reasons include:
- Incorrect gelatin bloom (too little water or too much)
- Adding gelatin mixture when it’s too hot or too cold
- Not chilling or freezing long enough before unmolding
5. How far ahead can I prepare fruit-shaped mousse cakes?
You can:
- Prepare and freeze the molded cakes (without glaze) several days in advance.
- Glaze, decorate, and thaw them on the day you plan to serve.
Conclusion
Fruit-shaped mousse cakes are a magical mix of pastry technique and playful illusion. Once you understand the basic structure — mousse, insert, base, and finish — you can create endless variations that look like tiny works of art.
Print
Fruit-Shaped Mousse Cakes: 7 Stunning Trompe-l’Œil Desserts You Can Make at Home
- Total Time: PT6H00M
- Yield: 8 fruit-shaped mousse cakes 1x
- Diet: Vegetarian
Description
These Fruit-Shaped Mousse Cakes are stunning, mirror-glazed entremet-style desserts crafted to look like realistic pieces of fruit—vibrant peaches, glossy apples, lemons, and pears. Each mousse cake features a velvety fruit-flavored mousse, a soft sponge or biscuit bottom, and a brilliant colored glaze.
Ingredients
For the Fruit Mousse (Choose Flavor)
(Peach, mango, raspberry, lemon, or apple flavored)
- 1 ½ cups fruit purée (peach, mango, raspberry, lemon curd, or apple purée)
- ½ cup sugar
- 2 tsp lemon juice
- 1 tbsp gelatin powder + 3 tbsp cold water
- 1 ¼ cups heavy cream (cold), whipped to soft peaks
For the Sponge Base (Optional)
- ½ cup all-purpose flour
- ½ cup sugar
- 2 eggs
- ¼ tsp baking powder
- 1 tsp vanilla extract
For the Mirror Glaze
- 1 cup sugar
- ½ cup water
- ½ cup sweetened condensed milk
- 1 tbsp gelatin powder + 4 tbsp cold water
- 8 oz white chocolate, chopped
- Gel food coloring (colors depending on fruit: yellow, red, green, peach, orange)
For Decoration
- Small chocolate sticks or pretzels (to create stems)
- Edible leaves or mint leaves
Instructions
1. Make the Fruit Mousse
- Bloom gelatin: sprinkle gelatin over cold water and let sit 5 minutes.
- Heat fruit purée, sugar, and lemon juice in a saucepan until warm.
- Add bloomed gelatin and whisk until fully dissolved.
- Let the mixture cool to room temperature.
- Fold in whipped cream until smooth and airy.
- Pipe mousse into silicone fruit-shaped molds, filling ¾ full.
- Add a small round of sponge cake (optional) to the center.
- Freeze at least 4–6 hours, or overnight.
2. Make the Sponge Base (Optional)
- Preheat oven to 350°F (175°C).
- Beat eggs and sugar until pale and fluffy.
- Add flour, baking powder, and vanilla; mix gently.
- Spread batter on a baking sheet lined with parchment paper.
- Bake 8–10 minutes, then cool and cut small discs to fit molds.
3. Prepare the Mirror Glaze
- Bloom gelatin in cold water.
- In a saucepan, heat sugar, water, and condensed milk until simmering.
- Remove from heat and add chopped white chocolate.
- Stir until melted and smooth.
- Add bloomed gelatin and whisk until fully dissolved.
- Strain to remove bubbles.
- Tint glaze with gel food coloring, depending on the fruit:
- Peach: orange + red + a touch of yellow
- Apple: red, green, or yellow
- Lemon: bright yellow
- Pear: green + yellow
- Cool glaze to 90–95°F (32–34°C).
4. Glaze the Frozen Mousse Cakes
- Remove frozen mousse shapes from molds.
- Place on a wire rack with a tray underneath.
- Pour mirror glaze evenly over each cake until fully coated.
- Add chocolate “stems” and edible leaves.
5. Serve
- Chill glazed cakes for 1 hour to set.
- Serve cold for best texture.
Notes
- Silicone fruit molds are essential for a realistic shape.
- Color blending (airbrushing or two-tone glaze) creates an ultra-realistic fruit appearance.
- Work quickly when glazing—cakes must be frozen solid.
- Prep Time: PT45M
- Cook Time: PT10M
- Category: Dessert
- Cuisine: French
Nutrition
- Serving Size: 1 mousse cake
- Calories: 310 Kcal
- Sugar: 30g
- Sodium: 60mg
- Fat: 17g
- Saturated Fat: 10g
- Unsaturated Fat: 7g
- Trans Fat: 0g
- Carbohydrates: 34g
- Fiber: 1g
- Protein: 4g
- Cholesterol: 45mg