

What Is a Hasselback Squash and Pumpkins Recipe?
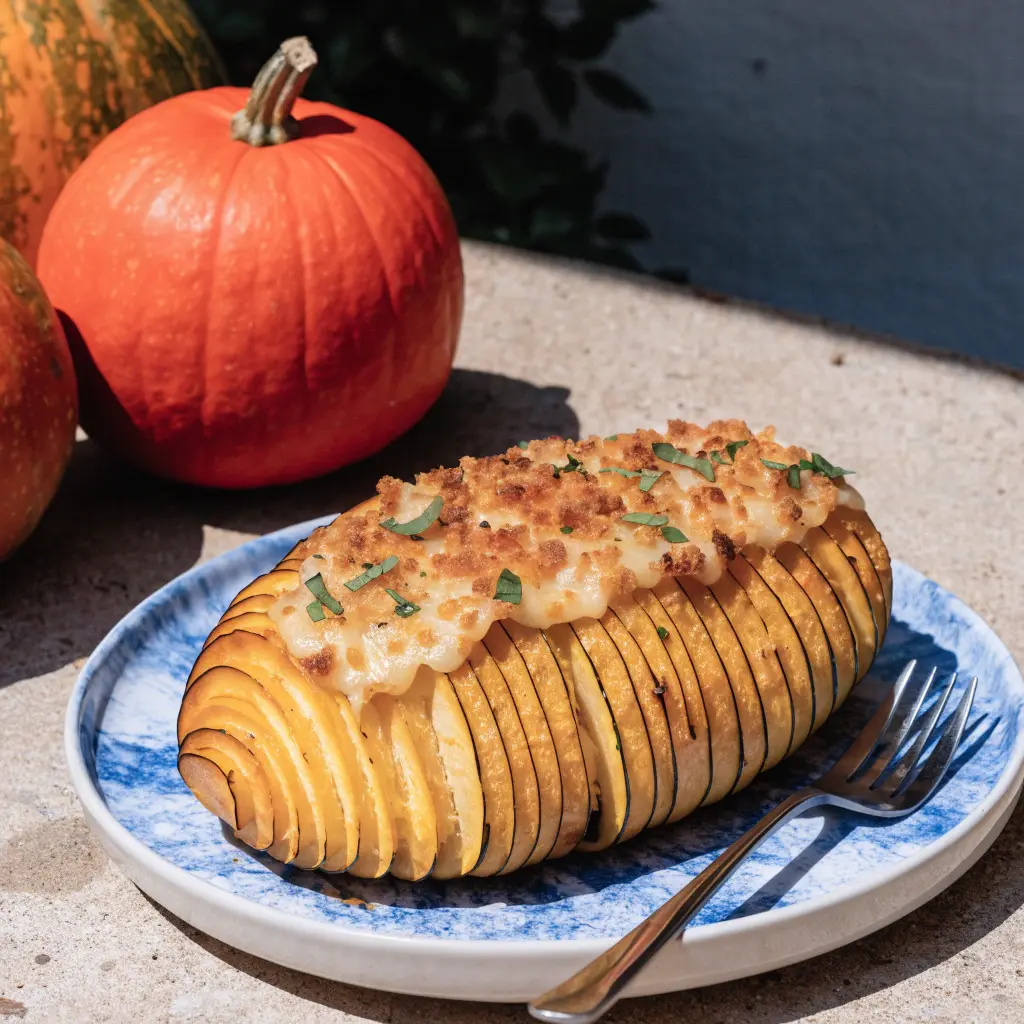
A Hasselback squash recipe uses a distinctive cutting technique in which thin, parallel slices are made across the vegetable without cutting completely through its base. The connected slices fan out slightly as the squash roasts, creating an attractive accordion-like appearance.
The technique is often associated with Hasselback potatoes, but it works beautifully with firm winter squash and suitable culinary pumpkins. The exposed edges become golden during roasting, while the thicker center remains soft and tender.
Unlike simply cubing squash and spreading it across a baking tray, the Hasselback method creates a dramatic presentation. It also provides plenty of surface area for melted butter, olive oil, garlic, and herbs to coat the slices.
For this recipe, butternut squash is an excellent starting point because its elongated shape makes it easier to prepare. Small culinary pumpkins are another lovely choice, especially when you want a seasonal centerpiece for a holiday meal.
Why You’ll Love This Hasselback Squash Recipe
There are many reasons to add this easy roasted squash recipe to your autumn cooking collection.
- Beautiful presentation: The delicate slices create a restaurant-style appearance with very little extra effort.
- Simple ingredients: Butter, garlic, olive oil, salt, pepper, and fresh herbs provide plenty of flavor.
- Easy to customize: Make the recipe sweet with maple syrup, savory with Parmesan, or aromatic with fresh rosemary and sage.
- Perfect for gatherings: The finished squash looks attractive on a serving platter and pairs well with many main courses.
- Flexible preparation: You can prepare the seasoning mixture in advance and organize the squash before guests arrive.
- Suitable for different menus: Serve it alongside roast chicken, turkey, pork, grains, or a vegetarian main course.
- Wonderful autumn flavors: Fresh herbs and gently caramelized squash make this dish especially inviting during cooler months.
Although it looks impressive, the recipe relies on straightforward preparation rather than complicated cooking techniques.
Ingredients for Hasselback Squash and Pumpkins
The ingredients are simple, and most are easy to find in an ordinary grocery store. The following quantities make approximately four servings, depending on the size of the squash and the other dishes being served.
Main ingredients
- 1 large butternut squash, approximately 2–3 pounds (900 g–1.4 kg), or a similarly sized culinary pumpkin
- 3 tablespoons unsalted butter, melted
- 2 tablespoons olive oil
- 3 garlic cloves, finely minced
- 1 tablespoon pure maple syrup, optional
- 1 teaspoon fresh thyme leaves
- 1 teaspoon finely chopped fresh rosemary
- 1 tablespoon chopped fresh sage, plus a few extra leaves for garnish
- ½ teaspoon salt, or to taste
- ¼ teaspoon freshly ground black pepper
Optional toppings
- 2 tablespoons grated Parmesan cheese
- 2 tablespoons toasted pumpkin seeds or chopped pecans
- A pinch of chili flakes
- 1 tablespoon chopped fresh parsley
- A small drizzle of balsamic glaze
Ingredient notes
Butternut squash: This is the recommended option for beginners. Its long shape makes it easier to create evenly spaced cuts, and its flesh becomes tender during roasting.
Culinary pumpkin: Choose a pumpkin intended for cooking rather than a decorative carving pumpkin. Smaller varieties often provide a more manageable shape and a pleasant roasted texture.
Butter and olive oil: Butter adds richness, while olive oil helps coat the squash and encourages browning. Using both creates a flavorful base for the herbs.
Fresh garlic: Minced garlic gives the seasoning mixture a savory character. Chop it finely so it distributes evenly across the surface.
Fresh herbs: Sage, rosemary, and thyme complement roasted squash particularly well. If fresh herbs are unavailable, use smaller quantities of dried herbs.
Maple syrup: This is optional but adds a gentle sweetness that pairs well with the natural flavor of the squash.
Parmesan and seeds: These toppings add extra texture and make the finished dish look attractive. Add them at the appropriate stage to prevent excessive browning.
Kitchen Equipment You’ll Need
Gathering your equipment before you start makes the process easier.
- A sturdy cutting board
- A sharp chef’s knife
- A rimmed baking sheet or roasting dish
- Baking parchment, if desired
- A small saucepan or microwave-safe bowl
- A pastry brush or large spoon
- Two wooden spoons or chopsticks to guide the knife
- A spoon for removing the seeds
- A serving platter
The wooden spoons or chopsticks are particularly useful because they help prevent the knife from cutting completely through the squash.
How to Make Hasselback Squash and Pumpkins Recipe: Step-by-Step Instructions
This section explains how to make tender, golden roasted squash with garlic butter and fresh herbs. Follow each step carefully, especially when creating the signature slices.
Step 1: Preheat the oven
Preheat your oven to 400°F (200°C).
Line a rimmed baking sheet with parchment paper if desired, or lightly oil a suitable roasting dish. Make sure the dish is large enough to hold the squash halves without crowding them.
A properly preheated oven helps the squash cook evenly and allows the exposed edges to develop color during roasting.
If your oven tends to brown food quickly, check the squash earlier and adjust the temperature or cooking time as needed.
Step 2: Prepare the squash
Place the prepared squash halves on a clean cutting board, with the flat cut side facing down.
Check that each half is stable before making the cuts. If the shape is uneven, carefully trim a small amount from the underside where necessary to improve stability.
For a more manageable cooking time, choose squash halves that are reasonably similar in size.
Pat the exposed flesh dry before adding the seasoning. This helps the melted butter and oil coat the surface evenly.
Step 3: Make the Hasselback cuts
Place a wooden spoon or chopstick along each side of the squash half. These guides will help stop the knife before it reaches the cutting board.
Using a sharp chef’s knife, make thin, parallel cuts approximately ⅛–¼ inch (3–6 mm) apart. Stop cutting when the blade reaches the guides so the bottom remains intact.
Repeat along the length of the squash.
The slices should be close enough to create the characteristic accordion appearance but not so thin that the squash loses its structure.
Important tip: Do not rush this step. Even slices create a more attractive result and help the squash cook consistently.
Step 4: Prepare the garlic-herb butter
Melt the butter in a small saucepan over low heat or in a microwave-safe bowl using short intervals.
Add the olive oil, minced garlic, thyme, rosemary, chopped sage, salt, and black pepper. Stir until the ingredients are evenly combined.
If you want a slightly sweeter finish, add the maple syrup and mix well.
Avoid cooking the garlic for too long. It should remain fragrant rather than turning dark brown, as burnt garlic can introduce an unpleasant bitter flavor.
Reserve a small portion of the mixture for basting during roasting.
Step 5: Season the squash
Arrange the squash halves on the prepared baking sheet with their cut sides facing up.
Brush the garlic-herb mixture over the entire exposed surface. Gently work some of the mixture between the slices, using the pastry brush or a spoon.
Take care not to force the slices apart. They should remain connected at the base.
If you are using fresh sage leaves, tuck a few between selected slices for an attractive presentation.
Make sure the squash is coated evenly, especially around the edges, where the butter and herbs will help create a golden finish.
Step 6: Begin roasting
Place the baking sheet in the preheated oven.
Roast for approximately 20–25 minutes initially, then check the surface and baste the squash with some of the reserved garlic butter.
The precise timing depends on the size, thickness, and variety of the squash. Large halves may need additional cooking time.
During this first stage, the flesh will begin to soften and the cuts will start to open slightly.
If the surface begins to brown too quickly, loosely cover the squash with foil while the center continues cooking.
Step 7: Baste and continue roasting
Return the squash to the oven and continue roasting for another 20–35 minutes, basting periodically with the remaining butter mixture.
As the squash cooks, the slices should fan out slightly. The exposed edges will gradually become golden, while the thicker portions soften.
If you are using maple syrup, monitor the surface carefully because the sugars can darken more quickly than the squash itself.
For a more deeply roasted finish, remove the foil near the end of cooking, if you used it.
Step 8: Check for doneness
Insert a small knife into the thickest part of the squash. It should slide in easily when the flesh is tender.
The outer slices should look lightly caramelized, and the center should be soft without becoming completely mushy.
If the knife meets resistance, continue roasting in short intervals of approximately 5–10 minutes, checking again after each interval.
Do not rely on browning alone to determine whether the squash is ready. A dark surface does not necessarily mean the center has finished cooking.
Step 9: Add the finishing touches
Remove the squash from the oven and allow it to rest for approximately five minutes.
Transfer the halves carefully to a serving platter, using a wide spatula if necessary.
Finish with any of the following:
- Freshly chopped parsley or sage
- Grated Parmesan cheese
- Toasted pumpkin seeds or chopped pecans
- A light drizzle of maple butter
- A small amount of balsamic glaze
- A pinch of chili flakes
Common Mistakes to Avoid
Even a simple roasted squash recipe can present a few challenges. Here is how to avoid the most common problems.
- Cutting all the way through: Use wooden spoons or chopsticks as guides and slow down when slicing near the ends.
- Making slices too thick: Aim for consistent cuts approximately ⅛–¼ inch apart.
- Using an unstable cutting board: Place a damp kitchen towel beneath the board to reduce movement.
- Adding too much maple syrup too early: Apply sweet glaze in moderation and monitor the surface as it roasts.
- Underseasoning the squash: Season the flesh evenly and work some of the mixture between the cuts.
- Removing the squash too soon: Check the thickest section with a knife before taking it out of the oven.
- Overcrowding the tray: Leave room around the halves so hot air can circulate.
- Using an unsuitable pumpkin: Choose a culinary pumpkin with firm flesh rather than one intended mainly for decoration.
- Forgetting to baste: A little reserved butter mixture helps keep the exposed surfaces flavorful during roasting.
Delicious Variations of Hasselback Squash and Pumpkins
One of the best features of this recipe is how easily you can change the seasoning to suit your menu.
Garlic Parmesan Hasselback Squash
For a savory version, keep the garlic butter base and add grated Parmesan toward the end of roasting.
Sprinkle the cheese over the squash during the final 5–10 minutes, allowing it to melt and develop a light golden color without burning.
Finish with chopped parsley and freshly ground black pepper.
Maple Butter Hasselback Pumpkin
Combine melted butter with maple syrup and a small pinch of black pepper.
Brush a little of the mixture over the squash during the later part of roasting. Add extra sage leaves for an aromatic autumn finish.
This variation is particularly attractive on a holiday serving platter.
Brown Butter and Sage Squash
For a richer, nutty flavor, gently heat butter in a small saucepan until the milk solids turn golden and the butter smells toasted.
Remove it from the heat and stir in chopped sage. Allow the mixture to cool slightly before brushing it over the squash.
Watch the butter carefully because it can move from golden to burnt very quickly.
Spicy Hasselback Squash
Add a pinch of chili flakes or smoked paprika to the garlic butter.
The gentle heat creates a pleasant contrast with the naturally sweet flavor of roasted squash. Finish with parsley or a squeeze of lemon juice if desired.
Vegan Hasselback Pumpkin
Replace the butter with additional olive oil or a suitable plant-based butter.
Combine it with garlic, rosemary, thyme, salt, and pepper. Maple syrup can be included for a sweet-savory glaze.
The same cutting and roasting technique applies, although the surface browning may vary slightly depending on the ingredients.
Mediterranean-Style Hasselback Squash
Season the squash with olive oil, garlic, thyme, and black pepper. After roasting, add crumbled feta, chopped parsley, lemon zest, and toasted almonds.
Serve on a platter with a simple lemon dressing or alongside couscous.
Sweet Cinnamon Squash
For a sweeter autumn variation, combine melted butter, a little maple syrup, and a small pinch of ground cinnamon.
Brush the mixture over the squash toward the later stages of cooking to prevent the glaze from becoming too dark.
Finish with chopped pecans if desired.
What to Serve with Hasselback Squash and Pumpkins
This roasted squash is versatile enough to accompany everyday dinners and festive meals.
Serve with roasted meats
Pair the squash with roast chicken, turkey, or pork. The garlic, herbs, and caramelized edges complement the savory flavors of roasted meat.
For a holiday dinner, arrange the squash on a large platter with fresh sage leaves and a few toasted pumpkin seeds.
Pair with vegetarian main courses
Hasselback squash works beautifully alongside lentil loaf, roasted chickpeas, stuffed peppers, or a savory mushroom dish.
You can also serve it with a grain-based main course for a colorful autumn meal.
Add grains and salads
Try serving the squash with:
- Herbed couscous
- Wild rice
- Quinoa with fresh parsley
- A crisp apple and arugula salad
- Roasted Brussels sprouts
- Green beans with garlic butter
These accompaniments create a varied plate with different textures and flavors.
Serve with a flavorful sauce
A light balsamic glaze, lemon-herb dressing, tahini sauce, or garlic yogurt sauce can complement the roasted squash.
For a festive presentation, spread a small amount of sauce across the serving platter before arranging the squash on top.
Storage, Reheating, and Freezing Instructions
If you have leftover Hasselback squash, store it carefully so it remains enjoyable when reheated.
How to store leftovers
Allow the cooked squash to cool briefly, then place it in a covered, airtight container and refrigerate it promptly.
As a general guideline, refrigerated leftovers can be used within three to four days. Avoid leaving cooked squash at room temperature for more than two hours.
For more details, consult the USDA’s leftovers and food safety recommendations.
How to reheat Hasselback squash
For the best texture, reheat the squash in an oven at approximately 350°F (175°C).
- Place the squash in a suitable baking dish.
- Cover loosely with foil if the surface is already deeply browned.
- Heat until thoroughly hot.
- Remove the foil near the end if you want to restore some of the crispness around the edges.
A microwave also works for smaller portions, although the slices may become softer.
Can you freeze cooked Hasselback squash?
Yes, cooked squash can be frozen, but the texture may become softer after thawing.
Allow the squash to cool, divide it into suitable portions, and place it in a freezer-safe airtight container. Label the container with the date.
For best quality, use frozen leftovers within approximately three to four months. Thaw in the refrigerator and reheat thoroughly before serving.
Make-Ahead Instructions for Holiday Meals
This recipe can be prepared in stages, making it easier to organize a large meal.
The day before serving:
- Purchase and inspect the squash.
- Prepare the garlic, herbs, and other seasoning ingredients.
- Mix the butter and herb mixture, then refrigerate it in a covered container.
- Wash and prepare other ingredients for your planned menu.
On the day of serving:
- Prepare the squash and make the Hasselback cuts.
- Brush it with the seasoning mixture.
- Roast until the flesh is tender and the edges are golden.
- Add fresh herbs and optional toppings just before serving.
For the most attractive presentation, roasting the squash close to serving time is ideal. If you partially roast it in advance, refrigerate it promptly and finish cooking until it is tender and thoroughly hot.
Cooking times will vary depending on the size of the squash and the temperature of your oven.
Frequently Asked Questions
1. What is the best squash for a Hasselback squash recipe?
Butternut squash is an excellent choice because its elongated shape makes it easier to cut into even slices. Small culinary pumpkins and suitable varieties of winter squash can also work well. Choose firm produce that is easy to handle.
2. Can you make Hasselback squash with pumpkin?
Yes. Choose a culinary pumpkin with firm flesh, remove the seeds, and make evenly spaced cuts without slicing through the base. Because pumpkins vary in size and density, check the thickest part regularly and adjust the roasting time as needed.
3. How do you cut squash without slicing all the way through?
Place wooden spoons or chopsticks along both sides of the squash half. Cut across the surface with a sharp knife, allowing the guides to stop the blade before it reaches the bottom. This keeps the slices connected and creates the signature Hasselback appearance.
4. Do you need to peel butternut squash before roasting?
Peeling is often preferred for Hasselback butternut squash because the skin can remain firm after roasting. Remove the skin with a sturdy vegetable peeler before slicing. For other varieties, check whether their skin becomes tender enough to enjoy after cooking.
5. What temperature is best for roasting Hasselback squash?
An oven temperature of 400°F (200°C) is a useful starting point. It allows the squash to soften while the exposed edges develop a golden color. If the surface browns too quickly, cover it loosely with foil and continue roasting until tender.
Conclusion
This Hasselback Squash and Pumpkins Recipe transforms a simple seasonal vegetable into an impressive roasted side dish with garlic butter, fresh herbs, and beautifully caramelized edges. With straightforward preparation, flexible seasonings, and a few practical cutting tips, it is a lovely addition to autumn dinners and holiday gatherings.