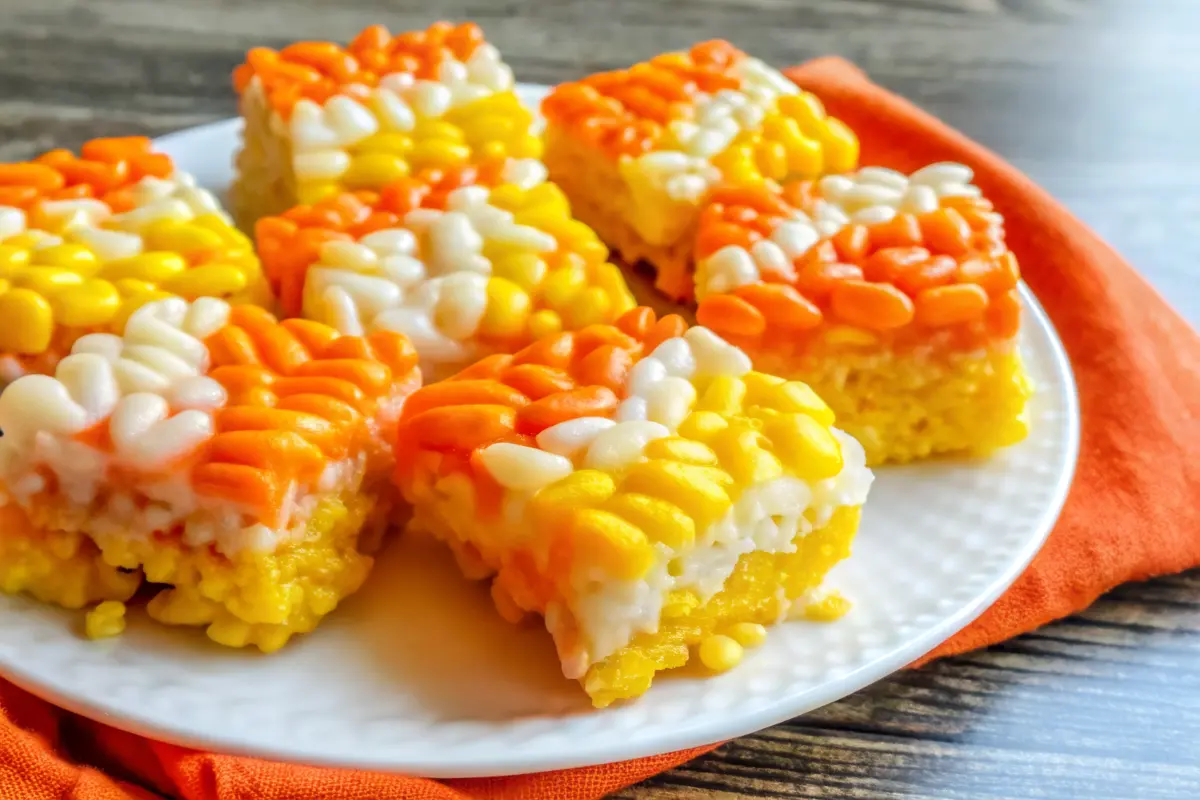
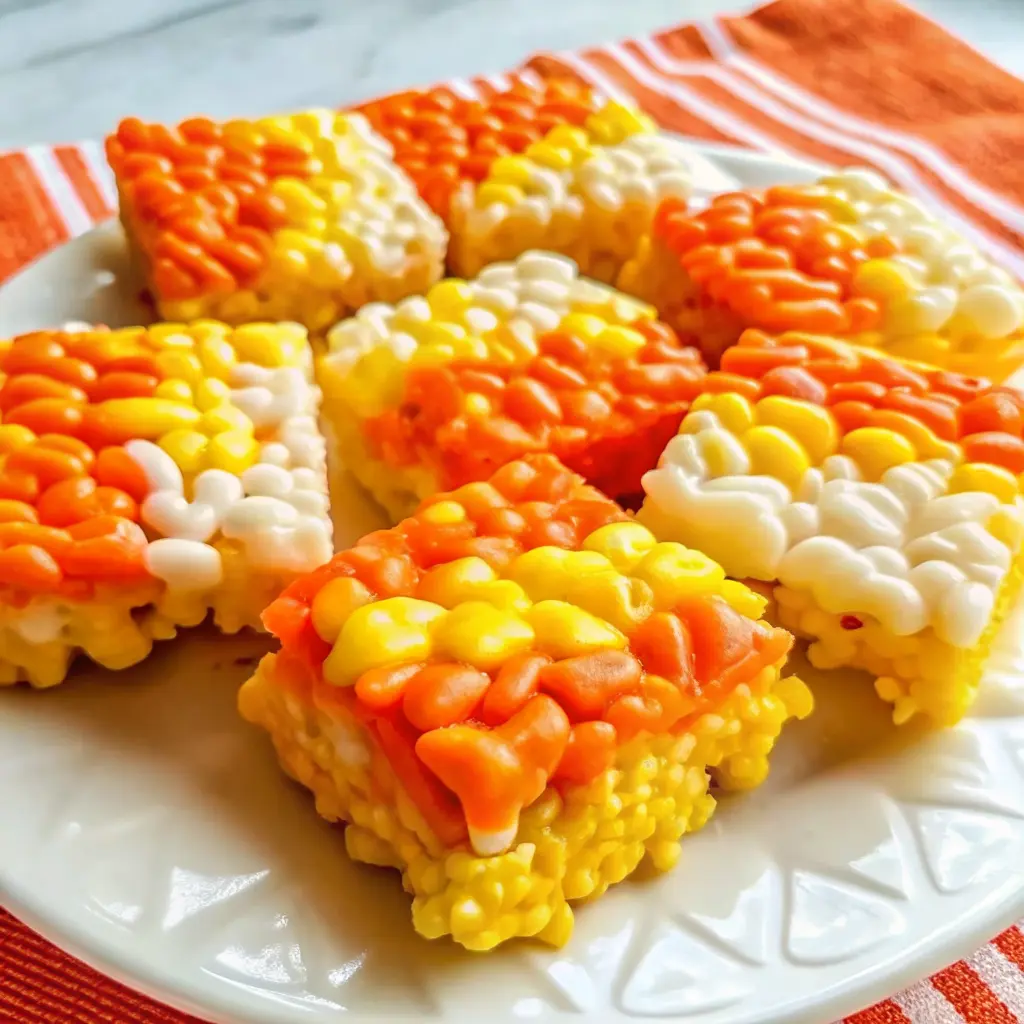
Candy Corn Rice Krispies Treats Recipe is the crowd-pleasing, no-bake dessert that turns a nostalgic cereal bar into a bright, layered centerpiece for spooky snack boards, bake sales, and classroom parties. In this complete guide, you’ll learn the exact ratios for a soft-chewy bite, the cleanest way to make those iconic white-orange-yellow layers, and pro cutting and dipping techniques for sharp, candy-corn triangles—without any complicated equipment.
If you’re brand-new to coating or drizzling with candy melts, skim a quick primer on melting technique so your finishes set glossy and smooth. A reliable place to start is Wilton’s how-to on Candy Melts—handy for microwave or double-boiler methods. → melt Candy Melts smoothly
Why You’ll Love These Candy Corn Rice Krispies Treats Recipe
- Fast & no-bake: From first melt to set slices in under an hour.
- Kid-friendly project: Pressing colorful layers is tactile and fun.
- Portable & party-ready: Wedges or triangles stack neatly for trays or treat bags.
- Eye-catching: The white-orange-yellow pattern reads “candy corn” at a glance.
- Flexible: Make them wedge-style in a round pan, or triangle bars from a rectangle.
What Exactly Are Candy Corn–Style Krispie Treats?
At heart, you’re making ultra-chewy Rice Krispies treats—but tinting portions of the marshmallow base to create the candy corn look. You can build concentric rings (yellow → orange → white) in a round pan and slice into wedges, or pack colored layers in a loaf or 9×13 pan, then cut triangles and dip the tips for clean color pops. The secret to a truly satisfying bite is gentle heat (to keep marshmallows supple) and a slightly “marshmallow-forward” ratio.
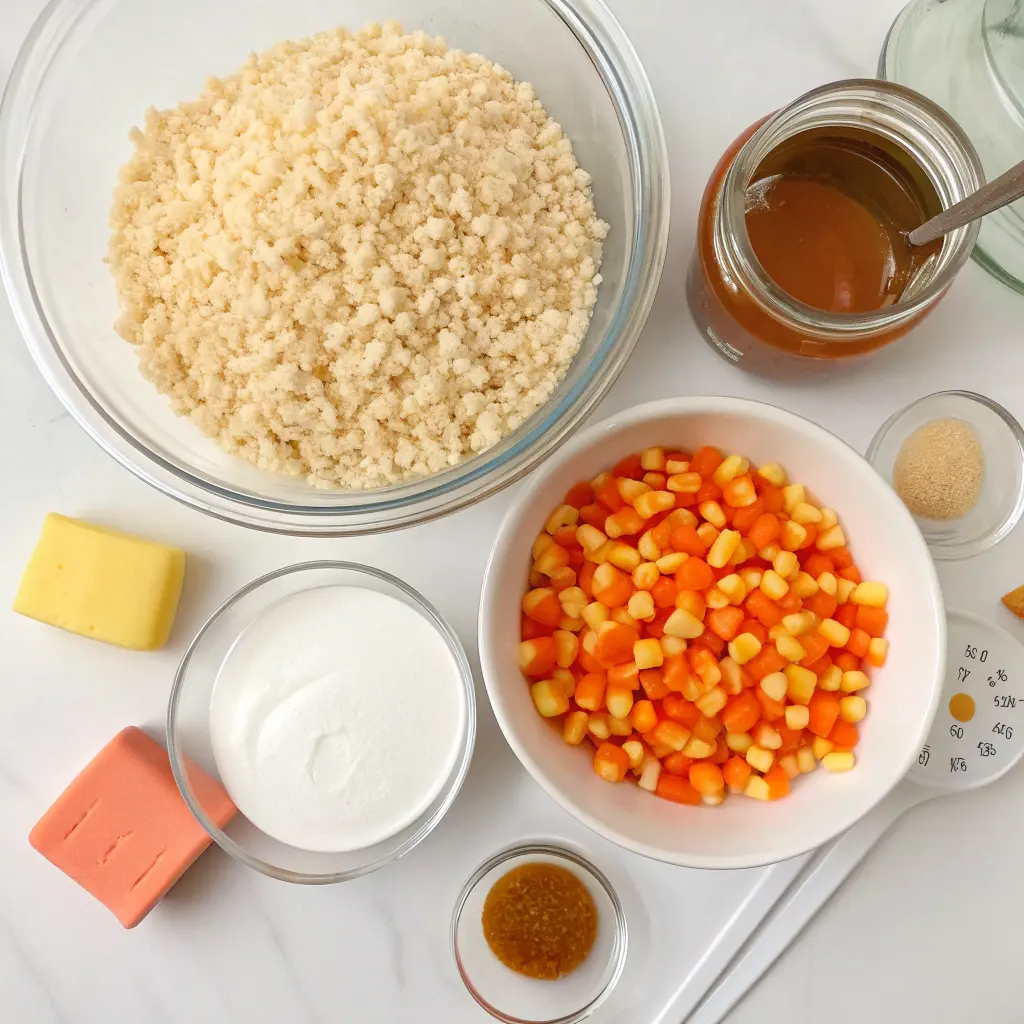
Ingredients for Candy Corn Rice Krispies Treats Recipe
- Crispy rice cereal:
- Use a fresh, recently opened box for best snap.
- Generic is fine; choose your favorite brand’s flavorless, plain variety.
- Marshmallows:
- Mini marshmallows melt faster and more evenly.
- For extra goo, reserve a small handful to stir in at the very end so a few pieces stay semi-whole.
- Butter:
- Unsalted gives you control.
- For deeper flavor, brown the butter until it’s toasty and nutty (amber with tiny brown flecks). Cool 2–3 minutes before adding marshmallows.
- Flavor boosters:
- Vanilla extract is classic; a few drops of almond extract push a candy-bar vibe.
- A pinch of fine salt enhances sweetness and balances the marshmallow.
- Food coloring:
- Gel colors deliver bright saturation with minimal liquid.
- You’ll want yellow and orange; the “white” portion stays uncolored.
- Candy corn (optional mix-in or garnish):
- Rough-chop and sprinkle lightly; large pockets can make slicing ragged.
- For a “payday” twist, add salted peanuts and a few candy corn pieces on top.
- Candy melts / white coating:
- For dipping triangle tips or drizzling stripes.
- Thin with a tiny bit of coconut oil if needed (follow your coating’s instructions).
Tools & Pan Options
- Heavy-bottom pot or deep skillet
- Silicone spatula (non-stick, heatproof)
- Large mixing bowl
- Measuring cups/spoons
- Pans:
- 9-inch round (for wedge “pie” presentation)
- 9×13 rectangle (for triangle bars)
- 8½×4½ loaf pan (compact, easy layers)
- Parchment paper + non-stick spray
- Optional: instant-read thermometer (helpful if you tend to overheat marshmallows), disposable gloves for pressing colored layers
How to Make Candy Corn Rice Krispies Treats Recipe
Step 1: Prep the pan
Line a 9×13-inch pan with parchment (leave overhang) and mist with non-stick spray. Set out a large saucepan, a spatula, a big mixing bowl, and all ingredients measured. Lightly oil the spatula (and your hands) to prevent sticking.
Step 2: Melt the Butter (Low & Slow)
Add butter to the saucepan over low heat. Melt gently, stirring occasionally. If it starts to brown and you don’t want that flavor, lift the pan off heat briefly, then return to low.
Step 3: Melt the Marshmallows
Add mini marshmallows to the butter. Stir on low until glossy and just smooth—tiny lumps are fine; residual heat will finish them. Remove from heat and stir in vanilla and a pinch of salt.
Step 4: Fold in the Cereal
Tip the warm marshmallow mixture into the large bowl (or add cereal straight to the pot if it’s roomy). Fold in the crispy rice cereal until every piece is evenly coated—no dry pockets.
Step 5: Add Candy Corn (Half Now)
Gently mix in half the candy corn so the pieces are dotted throughout. (Tip: chop large candy corn pieces for cleaner slices.)
Step 6: Press Into the Pan
Scrape the mixture into the prepared pan. Using the oiled spatula or lightly oiled hands, press gently just until level—don’t compact or the bars will firm up too much.
Step 7: Finish & Set
Sprinkle the remaining candy corn over the top and press lightly so it adheres. Let the slab cool at room temperature until set, 20–30 minutes. Lift out with the parchment and cut into neat squares (or triangles) with a lightly oiled knife.
Serve on a platter for parties or stash in an airtight container for grab-and-go treats.
Flavor Variations
- Browned Butter & Peanut “Payday”: Brown the butter and fold in chopped salted peanuts; finish with a light sprinkle of crushed peanuts on the orange layer.
- Mini Chocolate Chip Freckle: Stir mini chips into the white layer; keep the other layers plain for contrast.
- Pumpkin-Spice Whisper: Stir a light dusting of warm baking spices into the orange layer.
- Citrus Zest Spark: Very finely zested orange or lemon in the white layer to lift the sweetness.
- Crunch Meets Chew: A few pretzel bits in the yellow layer for a salty counterpoint.
- Drizzle Party: Top with thin lines of white coating plus a few orange/yellow nonpareils.
Troubleshooting
- Hard:
- Heat was too high or you cooked too long.
- You pressed the mixture too firmly into the pan.
- Marshmallows were stale.
- Fix for next time: lower heat, stop melting at “just smooth,” and press gently.
- Too Sticky / Won’t Set:
- Ratio is too marshmallow-heavy or the room is very warm.
- Fix: slightly increase cereal next batch; let the pan sit a little longer before cutting; dust your hands/tools with non-stick spray while shaping.
- Crumbly / Dry:
- Not enough marshmallow or mix cooled too much before pressing.
- Fix: move faster; consider warming the bowl briefly (10–15 seconds) to regain pliability; verify your marshmallow quantity.
Storage, Make-Ahead
- Room temp, airtight is best (2–3 days for peak texture).
- Layer with wax paper or parchment in containers to protect the finish.
- Avoid refrigeration (the coating and marshmallow layer can firm too much).
- For gifting, slide wedges onto treat sticks or bag triangles in cellophane with ribbon.
- For transport, a snug-fitting lidded box with parchment between layers prevents smearing.
Serving Ideas & Pairings
- Arrange triangles around a bowl of candy corn for a playful platter.
- Add to a Halloween dessert board with cookies, caramel popcorn, and chocolate pretzels.
- Skewer wedges on treat sticks for a lollipop-style display.
- Roll the dipped tip in nonpareils or sanding sugar before it sets for sparkle.
FAQ: Candy Corn Rice Krispies Treats Recipe
Q1: How do I keep the treats soft and chewy?
Use low heat to melt butter and marshmallows, remove from heat at “just melted,” and don’t press hard when packing into the pan. A touch more butter and a slightly marshmallow-forward ratio maintain a supple bite.
Q2: Can I make them without artificial coloring?
Yes. Keep the base white and decorate with candy melts or sprinkles on the tips. For subtle color, use concentrated natural tints (e.g., a tiny amount of turmeric for yellow, a micro-pinch of paprika for orange).
Q3: How do I achieve perfect layers that don’t smear?
Work with warm (not hot) mixtures, build the first layer, and let it rest for 2–3 minutes. Then, add the next layer and press only enough to adhere. Grease your gloves and spatula to prevent sticking.
Q4: What pan gives the most “candy corn” look?
A 9-inch round creates concentric rings that slice into unmistakable wedges. A 9×13 is best for high-yield triangle bars with dipped tips.
Q5: Can I add candy corn or nuts to the inside of the bars?
Yes—add small, chopped pieces to avoid choppy cuts. For a sweet-salty crunch, fold in salted peanuts or press a few on top.
Conclusion
With their bold white–orange–yellow layers and soft-chewy bite, Candy Corn Rice Krispies Treats Recipe turn a nostalgic classic into a festive showpiece that’s effortless to make and easy to share. Keep the heat low, press lightly, and stage your layers for crisp lines—those three habits guarantee picture-perfect wedges and triangles every time. From bake sales to Halloween dessert boards and school parties, these bars pack beautifully, slice cleanly, and always disappear fast.
Print
Foolproof 3-Color Candy Corn Rice Krispies Treats Recipe
- Total Time: PT1H00M
- Yield: 16 squares 1x
- Diet: Vegetarian
Description
Candy Corn Rice Krispies Treats Recipe are a fun and festive twist on the classic marshmallow treat! These layered, chewy squares are made to look like candy corn — bright, buttery, and irresistible. Perfect for parties, bake sales, or an easy Halloween dessert that kids and adults both love.
Ingredients
- 5 Tbsp unsalted butter (brown it for extra flavor, optional)
- 10 oz mini marshmallows (about 6 cups), plus a small handful reserved
- 1 tsp vanilla extract (and/or ⅛ tsp almond extract)
- Pinch fine salt
- 6 cups crispy rice cereal
- Gel food coloring: yellow & orange
- Optional finish: white candy melts for dipping/drizzling; 1–2 tsp coconut oil for thinning if needed
Instructions
- Prep: Line a 9-inch round pan with parchment; mist lightly.
- Melt: In a heavy pot on low, melt butter (brown it if desired; cool 2 minutes). Add marshmallows; stir until just melted and glossy. Remove from heat; stir in vanilla and a pinch of salt.
- Fold: Quickly fold in cereal until evenly coated. Stir in the reserved handful of minis for goo pockets.
- Divide & Tint: Portion the warm base into 3 bowls. Leave one white, tint one orange, and one yellow (add gel a little at a time).
- Press Rings: In the pan, press yellow around the outer edge, orange in the middle ring, and white at the center. Press lightly and level.
- Set & Slice: Cool 20–30 minutes. Lift out, transfer to a board, and cut into 12–16 wedges.
- Optional Finish: Dip or drizzle with white candy melts. Let’s set and serve.
Method (9×13 Triangles)
- Line the pan; build white → orange → yellow layers (or reverse), chill briefly, cut bars, then cut diagonally into triangles. Dip the broad end or tip in coating and dry on parchment.
Pro Tips
- Keep heat low, and stop melting at “nearly smooth.”
- Don’t compact—use a light hand.
- For brighter hues, add a toothpick-dab more gel, not drops of liquid color.
- Use oiled gloves for picture-perfect surfaces.
- Prep Time: PT15M
- Cook Time: PT45M
- Category: Desserts
- Method: Stovetop
- Cuisine: American
Nutrition
- Serving Size: 1 treat
- Calories: 160 kcal
- Sugar: 15g
- Sodium: 90mg
- Fat: 4g
- Saturated Fat: 2g
- Unsaturated Fat: 1g
- Trans Fat: 0g
- Carbohydrates: 30g
- Fiber: 0g
- Protein: 1g
- Cholesterol: 10mg
1 thought on “Foolproof 3-Color Candy Corn Rice Krispies Treats Recipe”