Chocolate Cheesecake Recipe: The Ultimate Guide
Delight in a decadent dessert that marries a creamy texture with deep cocoa intensity. In this comprehensive guide, you’ll learn everything from the fascinating origins of chocolate cheesecake to pro-level baking techniques, troubleshooting tips, and stunning presentation ideas. Ready to impress your guests? Let’s dive in.
Introduction
Imagine a slice of silky chocolate cheesecake crowned with glossy ganache and artfully arranged berries, each bite a perfect balance of richness and smoothness. Whether you’re celebrating a special occasion or simply craving an indulgent treat, mastering this dessert will elevate your baking game.
In this article, you will discover:
- The storied history behind cheesecake and its chocolatey evolution
- Popular variations to suit every taste and skill level
- Key ingredients, smart substitutions, and quality tips
- Essential equipment and bakeware recommendations
- Step-by-step instructions for crust, filling, and ganache
- Cooling, chilling, storage, and make-ahead strategies
- Expert troubleshooting for flawless results
- Presentation and pairing suggestions
- Answers to frequently asked questions
By following these detailed sections, you’ll gain the confidence to create a sumptuous chocolate cheesecake that wows at any gathering. Let’s embark on this culinary journey and unlock the secrets to the perfect slice.
History & Origin of the Chocolate Cheesecake Recipe
Cheesecake has ancient roots, with the earliest versions appearing in Greece around 200 BCE. Classical cheesecakes combined simple ingredients—fresh cheese, honey, and grains—into a hearty cake served at weddings and athletic events. The Romans later spread the recipe across Europe, adding their twists like eggs and butter, transforming cheesecake into a richer dessert loved by many.
The concept of integrating chocolate into cheesecake emerged in the mid-19th century, as cocoa became more accessible and bakers sought bolder flavors. The first documented chocolate cheesecake recipe called for grated chocolate mixed into the batter, resulting in a dense, fudge-like texture. As cream cheese rose to prominence in the early 20th century, the filling achieved a lighter, creamier consistency, and chocolate variants evolved accordingly.
For an in-depth look at this transformation, explore the cheesecake history resource. Modern pastry chefs continue to innovate, incorporating single-origin chocolates, flavored ganaches, and creative crusts. From New York to Tokyo, every region adds its flair—whether it’s a matcha swirl in Japan or a dulce de leche drizzle in Argentina.
Understanding this rich background not only deepens your appreciation of chocolate cheesecake but also inspires you to honor tradition while experimenting with your gourmet twists. In the next section, we’ll explore popular variations that cater to different occasions and dietary preferences.
Popular Chocolate Cheesecake Recipe Variations
Chocolate cheesecake comes in countless forms, each uniquely showcasing the chocolate’s depth. Here are some crowd-pleasing styles:
- No-Bake Chocolate Cheesecake
- Set in the refrigerator—ideal for hot days
- Silky, mousse-like texture without turning on the oven
- Flourless Chocolate Cheesecake
- Dense and fudgy, perfect for gluten-free diets
- Intensely chocolaty, often made with dark or bittersweet chocolate
- Marbled or Swirled Cheesecake
- Combines vanilla and chocolate batters for visual drama
- Achieved by gently folding the two mixtures together
- White Chocolate Cheesecake
- Uses white chocolate for a sweeter, creamier profile
- Often paired with tart fruit toppings like raspberry or passion fruit
- Layered Cheesecake
- Alternates chocolate and flavored layers (e.g., coffee, salted caramel)
- Offers a multi-textural experience in every bite
Key to many of these variations is mastering the art of melting and incorporating chocolate without seizing. For expert guidance, consult this chocolate tempering techniques overview. Properly tempered chocolate yields a glossy finish and smooth texture in your ganache or swirls.
By selecting a style that aligns with your event and audience, whether a casual brunch or formal dinner, you set the stage for an unforgettable dessert. Next, we’ll break down the essential ingredients and suggest smart substitutions, so you can adapt the recipe to what you have on hand.
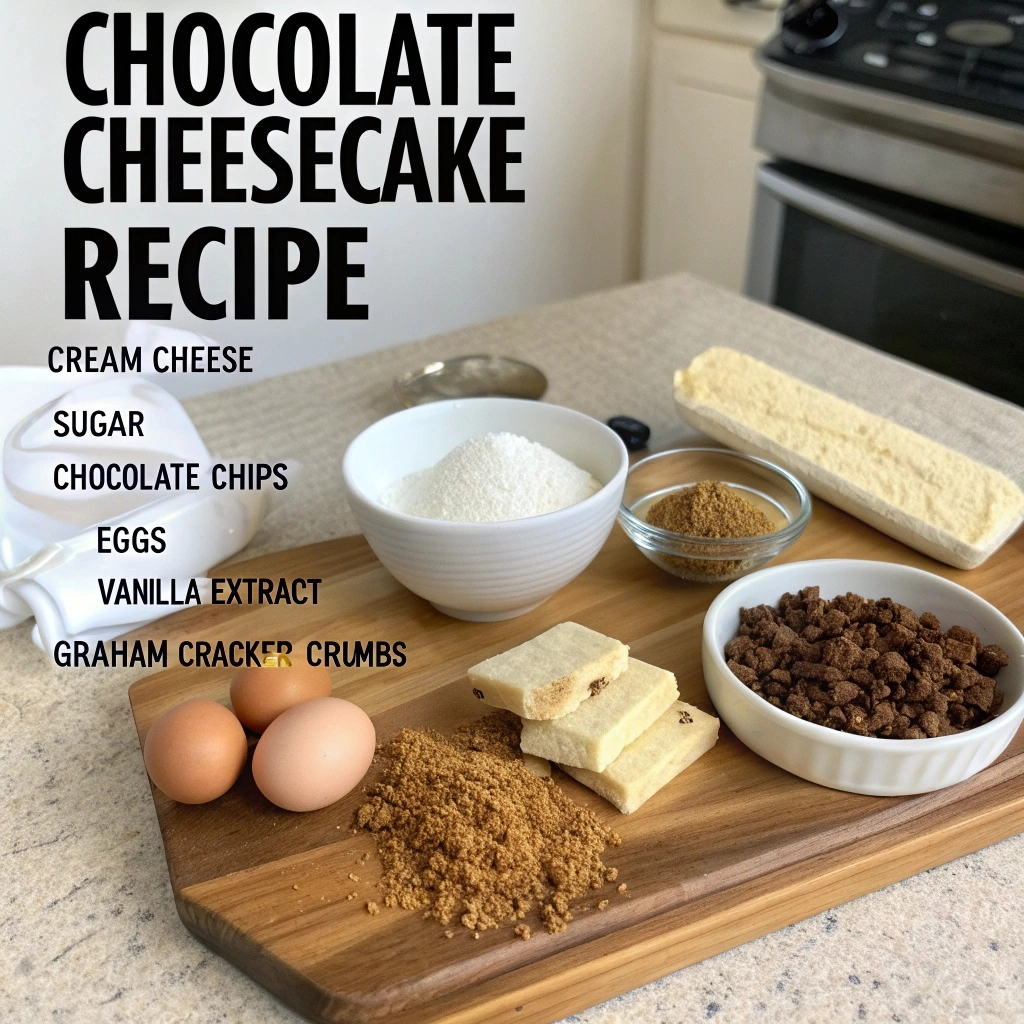
Essential Ingredients for Your Chocolate Cheesecake Recipe & Smart Substitutions
High-quality ingredients lay the foundation for an outstanding chocolate cheesecake. Here’s what you need:
- Cream Cheese
- Use full-fat brick-style for optimal richness
- Avoid low-fat or whipped varieties (they contain more water)
- Chocolate
- Semisweet or bittersweet (60–70% cocoa) for depth
- Milk chocolate for a milder taste
- White chocolate for a sweeter, creamier approach
- Eggs
- Large, room temperature—ensures smooth blending
- Sugar
- Granulated or superfine for even dissolution
- Sour Cream or Heavy Cream
- Adds moisture and tanginess to the batter
- Vanilla Extract
- Enhances the chocolate’s complexity
Smart Substitutions
- Dairy-Free
- Swap cream cheese with vegan cream cheese
- Use full-fat coconut cream instead of heavy cream
- Gluten-Free
- Replace graham crackers with almond flour or gluten-free cookie crumbs
- Lower-Sugar
- Substitute half the sugar with erythritol or stevia blend
- Egg-Free
- Use silken tofu or aquafaba (chickpea water) as binders
Crust Variations
- Graham Cracker Crust
- Classic and buttery, with a hint of cinnamon
- Chocolate Cookie Crust
- Crush chocolate sandwich cookies for an extra cocoa punch
- Nut-Based Crust
- Ground almonds, pecans, or hazelnuts mixed with butter
Pro Tip: Always bring refrigerated ingredients to room temperature before mixing. This prevents lumps and ensures a lusciously smooth filling. Now that you’ve assembled your ingredients, let’s review the tools you’ll need.
Equipment & Bakeware Guide
Equipping your kitchen properly paves the way for success:
- Springform Pan (8–9″)
- Removable sides simplify release and slicing
- Roasting Pan for Water Bath
- Prevents direct heat and promotes even cooking
- Electric Mixer (Stand or Hand)
- Ensures smooth, lump-free batter
- Spatulas (Rubber & Offset)
- For scraping bowls and smoothing the surface
- Instant-Read Thermometer
- Confirms optimal internal temperature (~150°F/65°C)
- Aluminum Foil
- Wrap the pan’s bottom and sides to prevent water leaks
Why a Water Bath?
- Maintains gentle, moist heat
- Reduces the risk of cracks
- Yields a silky, consistent texture
With these tools at hand, you’re ready to build a sturdy crust. Let’s move on to preparation.
Preparing the Crust
A well-made crust provides contrast to the velvety filling. Follow these steps:
- Measure & Crush
- Combine 1¾ cups of your chosen crumbs (graham, cookie, or nut).
- Mix with ¼ cup melted butter and 2 tablespoons sugar.
- (Optional) Stir in 1 teaspoon cocoa powder for extra depth.
- Press & Shape
- Transfer the mixture into the bottom of a springform pan.
- Use a flat-bottomed measuring cup or glass to press evenly, covering the base and about ½ inch up the sides.
- Bake & Set
- Preheat oven to 350°F (175°C).
- Bake crust for 8–10 minutes until fragrant and slightly firm.
- Cool on a wire rack for 5 minutes before adding filling.
- Chill (Optional)
- For ultra-clean edges, chill the crust in the fridge for 10–15 minutes.
Key Tips:
- Press firmly to avoid a crumbly crust when slicing.
- Avoid overheating; an over-toasted crust can taste bitter.
- Pre-baking prevents sogginess and ensures crispness.
Your crust is now a perfect foundation for the sumptuous chocolate batter. Next, we’ll craft the filling itself.
Crafting the Chocolate Filling
Creating a smooth, rich filling is the heart of the process:
- Melt & Cool Chocolate
- Chop 8 oz of high-quality chocolate.
- Melt in a double boiler or microwave in 30-second intervals, stirring until just smooth.
- Cool to 90–95°F to prevent cooking the eggs.
- Cream Cheese Base
- Beat 24 oz of room-temperature cream cheese on low speed until fluffy.
- Gradually add 1 cup of sugar and mix until no lumps remain.
- Add Eggs
- Add 3 large eggs, one at a time, on low speed.
- Scrape bowl sides after each addition—overmixing introduces air, which can cause cracks.
- Incorporate Chocolate & Flavorings
- Pour in melted chocolate and 1 teaspoon vanilla extract.
- Beat until uniform in color.
- Fold in ½ cup sour cream or heavy cream for extra creaminess.
- Final Blend
- Mix on low until fully combined—avoid high speed to keep air pockets minimal.
- The batter should be glossy, thick, and pourable.
- Pour & Smooth
- Transfer the batter into your pre-baked crust.
- Use an offset spatula to level the surface for an even bake.
This sumptuous chocolate batter is now ready for the oven. We’ll explore precise baking techniques next.
Baking Techniques & Water Bath Methods
Proper baking is key to a luxurious texture free of cracks:
- Preheat & Prep
- Preheat oven to 325°F (160°C).
- Position the rack in the lower third of the oven.
- Water Bath Setup
- Place the filled springform pan inside a larger roasting pan.
- Carefully pour hot water into the outer pan until it reaches ½ inch up the springform sides.
- Cover the Pan
- Tent a sheet of aluminum foil over the top to prevent browning and retain moisture.
- Bake Time
- Bake for 60–75 minutes.
- The center should still jiggle slightly when gently shaken.
- Temperature Check
- Insert an instant-read thermometer into the center—aim for 150°F (65°C).
- Initial Cool
- Turn off the oven and crack the door open.
- Let the cheesecake rest inside for 30 minutes to cool gradually.
Why It Works:
- The water bath delivers consistent, moist heat.
- Gentle temperature changes prevent the filling from seizing or cracking.
- Covering the pan ensures the top remains smooth and unblemished.
Avoid opening the oven door frequently—this can cause temperature swings. By the end of baking, you’ll have a creamy, evenly set cheesecake.
Cool-Down & Chilling Process
A gradual cooling process ensures a flawless texture:
- Oven Cooling
- After baking, leave cheesecake in the turned-off oven with the door ajar for 1 hour.
- Room Temperature Rest
- Remove the pan and let it sit on the countertop for 30 minutes.
- Refrigerator Chill
- Wrap the springform pan loosely with plastic wrap.
- Chill for at least 6 hours, ideally overnight, to firm up the filling.
- Freeze for Make-Ahead
- For long-term storage, freeze the wrapped cheesecake up to 1 month.
- Thaw in the fridge overnight before serving.
Key Benefits:
- Slow cooling prevents the filling from sinking or cracking.
- Extended chill time deepens flavor and texture.
- Proper chilling yields clean slices and a dense, yet creamy consistency.
By allowing patience to work its magic, you guarantee a perfectly set chocolate cheesecake every time.
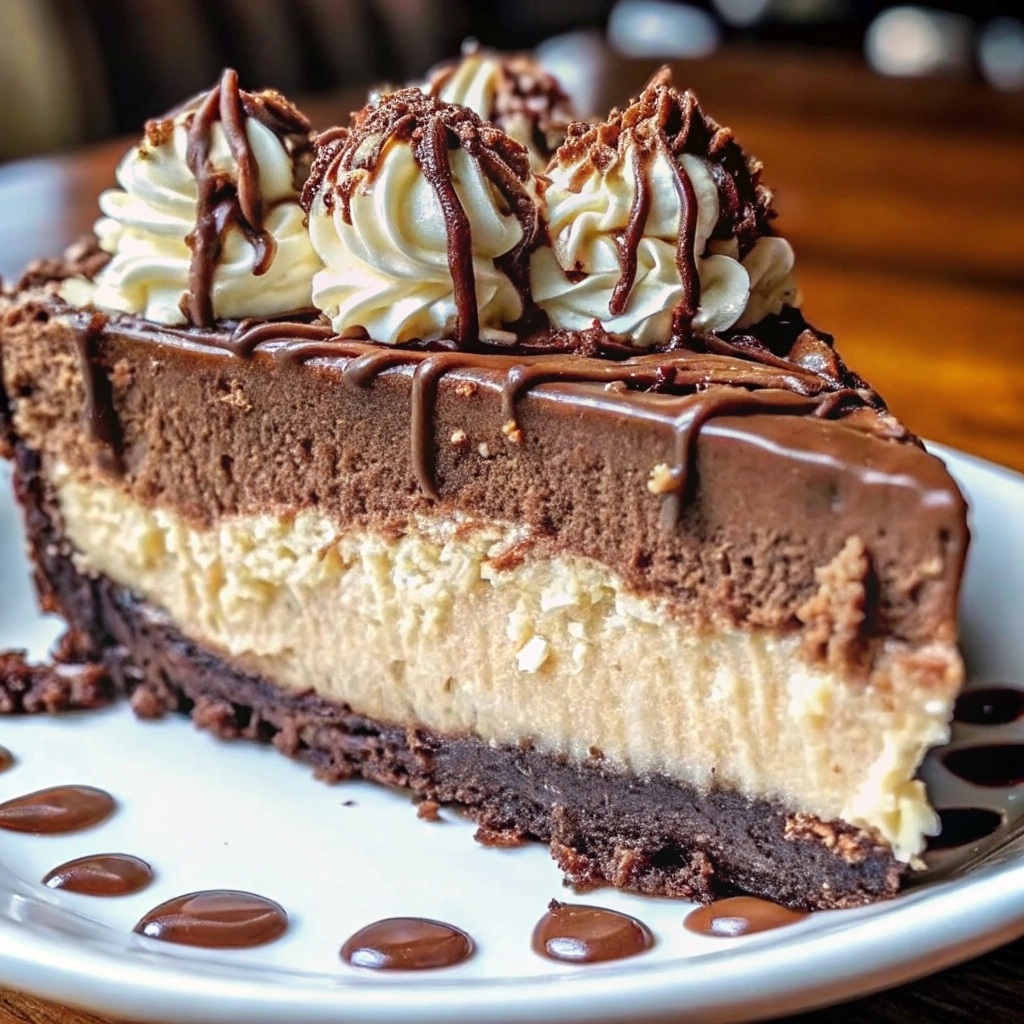
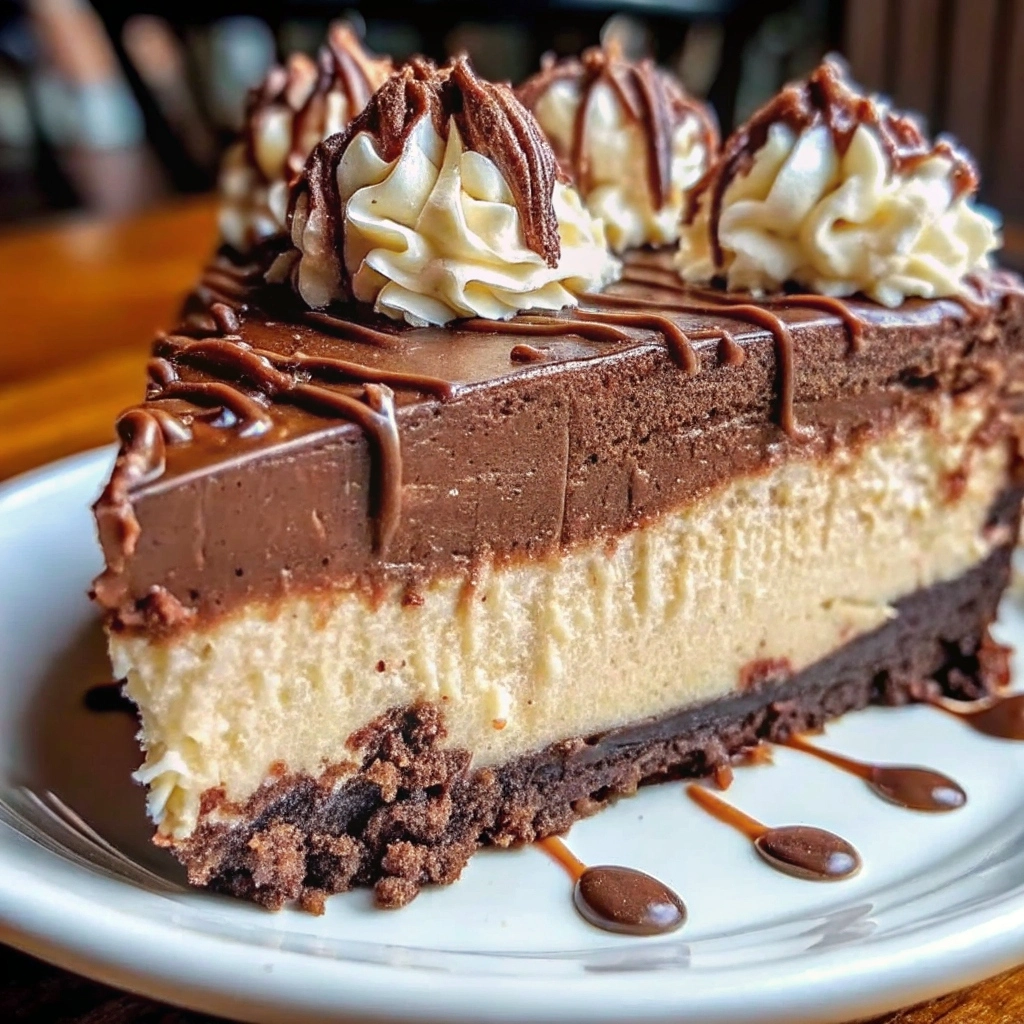
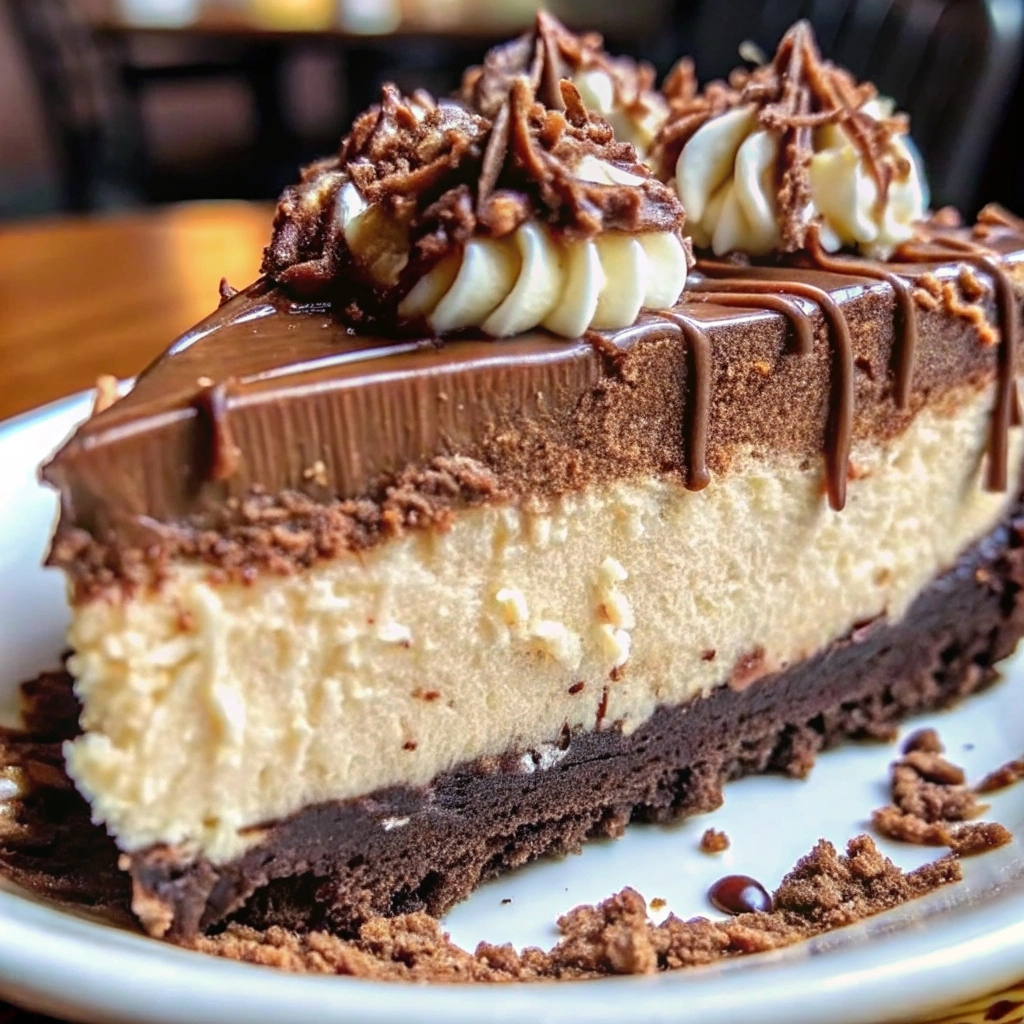
Adding Chocolate Ganache & Luxurious Toppings
A decadent ganache and artful toppings take your cheesecake to the next level:
Simple Ganache Recipe
- Ingredients:
- ½ cup heavy cream
- 4 oz chopped semisweet chocolate
- Method:
- Heat cream until it just simmers.
- Pour over the chocolate in a heatproof bowl.
- Wait 2 minutes, then stir until smooth and glossy.
- Cool slightly before pouring over chilled cheesecake.
Topping Ideas
- Chocolate Shavings:
- Use a vegetable peeler on a solid chocolate bar for elegant curls.
- Fresh Berries:
- Raspberries, strawberries, or blueberries for a pop of color.
- Whipped Cream Rosettes:
- Pipe around the edge with a star tip for a classic look.
- Edible Gold Leaf:
- Add a touch of luxury for special occasions.
- Nut Crumble:
- Toasted pecans or hazelnuts for crunch and contrast.
Assembly Tips
- Pour ganache in the center; gently tilt the cake to encourage natural drips down the sides.
- Scatter shavings or berries immediately before serving to maintain freshness.
- For an extra flair, dust the plate with cocoa powder or powdered sugar.
These additions not only enhance the rich chocolate flavors but also create a stunning visual centerpiece that beckons guests.
Presentation & Serving Suggestions
How you slice and serve your chocolate cheesecake affects first impressions:
- Clean Cuts:
- Dip a sharp knife in hot water, wipe dry, and slice. Repeat between cuts for pristine edges.
- Plate Styling:
- Spoon a berry coulis or fruit compote beside each slice.
- Drizzle extra ganache or caramel sauce on the plate.
- Add a sprig of mint for contrast.
- Pairings:
- Coffee: Bold espresso or creamy cappuccino balances sweetness.
- Dessert Wine: Ports, late-harvest Riesling, or Tokaji complement chocolate’s depth.
- Fresh Fruit Salad: Lightens the palate between rich bites.
- Serving Temperature:
- Serve chilled, but allow slices to rest at room temperature for 10 minutes before eating. This releases full aroma and silky consistency.
By paying attention to these details, you elevate your dessert from homemade to gourmet.
Storage, Freezing & Make-Ahead Tips
To keep your cheesecake pristine:
- Refrigerator:
- Store covered in plastic wrap or an airtight container for up to 5 days.
- Freezer:
- Slice and wrap individual pieces in plastic wrap, then foil.
- Freeze up to 1 month; thaw overnight in the fridge.
- Make-Ahead Strategy:
- Bake up to 2 days before serving; add ganache and toppings on the day.
- Shortens prep time for events and holidays.
Label your packaging with dates to track freshness. Proper wrapping prevents freezer burn and preserves that sumptuous chocolate flavor.
Frequently Asked Questions
- Can I make this cheesecake ahead of time?
Yes—bake up to 2 days in advance, chill, and add ganache right before serving for peak freshness. - How do I prevent cracks?
- Use a water bath to maintain steady moisture.
- Mix on low speed to limit air incorporation.
- Cool slowly—start in the oven with the door ajar.
- What’s the best chocolate to use?
- Aim for 60–70% cocoa semisweet or bittersweet chocolate for balanced sweetness and intensity.
- High-quality brands yield smoother texture and richer flavor.
- Can I freeze slices for later?
- Absolutely. Wrap slices tightly and freeze up to 1 month.
- Thaw overnight in the fridge to preserve texture.
- Why is my crust shrinking?
- Press more firmly into the pan and chill briefly before baking to help it hold its shape.
2 thoughts on “Chocolate Cheesecake Recipe: Ultimate 10-Step Guide to Silky Decadence”