
Introduction
Creating a No-Bake Mango Cheesecake is the perfect way to celebrate the vibrant flavors of ripe mangoes in a luscious, creamy dessert that requires minimal effort. This dessert marries a buttery crust with a velvety filling infused with tropical mango puree, making it an ideal treat for warm afternoons and special gatherings. With no need to preheat an oven, you can enjoy a delicious, refrigerator-set cake that highlights the best of summer produce. Whether you’re hosting a backyard barbecue, celebrating a birthday, or simply craving a refreshing sweet ending to a meal, this recipe delivers on both taste and presentation, check out Mango & Passion Fruit Cheesecake
Why Choose a No-Bake Mango Cheesecake?
Opting for a No-Bake Mango Cheesecake offers several advantages. First, you avoid heating up the kitchen—especially welcome on hot days. Second, the simple process makes it accessible even for beginner bakers. Third, its smooth texture and bright mango flavor distinguish it from traditional, baked versions. For those curious about the roots of cheesecake itself, check out the history of cheesecake. This background provides context for how a no-bake version became a summer favorite without sacrificing classic appeal.
Ingredients Overview to No-Bake Mango Cheesecake
To create an unforgettable No-Bake Mango Cheesecake, gather the following:
- Crust Ingredients
- Graham crackers (or digestive biscuits): 1½ cups, crushed
- Melted butter (or coconut oil for a lighter option): 6 tablespoons
- Optional: 2 tablespoons sugar or finely ground cookie crumbs for extra sweetness
- Filling Ingredients
- Cream cheese: 16 ounces, room temperature
- Heavy cream (or whipped coconut cream): 1 cup (cold)
- Sweetened condensed milk: ¾ cup
- Pureed ripe mango: 1½ cups (about 2–3 large mangoes)
- Unflavored gelatin: 2 teaspoons, plus 4 tablespoons cold water (or agar-agar for a vegetarian alternative)
- Topping/Glaze Ingredients
- Reserved mango puree: ½ cup (sweeten as needed)
- Additional gelatin: 1 teaspoon, plus 2 tablespoons cold water (optional)
- Garnishes: fresh mango cubes, mint leaves, coconut flakes, or a hint of lime zest
Equipment Needed
- 6–8 inch springform pan (recommended) or individual serving glasses
- Mixing bowls (medium and large)
- Hand mixer or stand mixer (for smooth, lump-free filling)
- Food processor or blender (to crush crackers, puree mango)
- Saucepan (to dissolve gelatin)
- Offset spatula (for smoothing layers)
- Plastic wrap (to cover cheesecake while chilling)
Step-by-Step Recipe
Prepare the Crust
- Crush the graham crackers
- In a food processor, pulse 1½ cups of graham crackers until they become fine crumbs. Alternatively, place crackers in a sealed plastic bag and hammer them with a rolling pin until finely crushed.
- Combine crumbs and butter
- Transfer the crumbs to a mixing bowl. Add 6 tablespoons of melted butter (or coconut oil). If you prefer a slightly sweeter crust, sprinkle in 2 tablespoons of sugar or finely ground cookie crumbs.
- Stir until the crumbs are evenly coated and hold together when pressed between your fingers.
- Press into pan
- Line the bottom of a 6–8 inch springform pan with parchment paper (optional for easy release). Firmly press the crumb mixture into the base of the pan, using the bottom of a measuring cup to compact it into an even layer. For a slightly taller crust, press a bit up the sides (about ¼ inch).
- Chill to set
- Place the pan in the refrigerator for at least 10–15 minutes. This chilling step allows the crust to firm up, ensuring it supports the filling without becoming soggy.
Prepare the Mango Puree
- Select ripe mangoes
- Choose mangoes that yield slightly to gentle pressure and emit a sweet, fruity aroma at the stem end. Varieties like Alphonso, Kent, or Ataulfo work beautifully for their intense flavor and smooth texture.
- Peel, cube, and reserve
- Peel 2–3 large mangoes. Cut the flesh away from the pit, then cube the flesh. Reserve about ½ cup of small mango cubes for garnish.
- Blend to puree
- Place the remaining mango cubes in a blender or food processor. Blend until silky smooth. If additional liquid is needed to help blending, add a splash of lime juice (this brightens the flavor without making it runny).
- Strain if needed
- If your puree seems fibrous, pass it through a fine-mesh sieve to remove any stringy bits. You want a silky consistency so the filling holds perfectly.
Make the Cheesecake Filling
- Beat the cream cheese
- In a large mixing bowl, beat 16 ounces of room-temperature cream cheese on medium speed until completely smooth (about 2–3 minutes). Ensure no lumps remain.
- Incorporate sweetened condensed milk
- With the mixer on low, gradually add ¾ cup of sweetened condensed milk, scraping down the bowl as needed. Beat until the mixture is creamy and well combined.
- Whip the heavy cream
- In a separate bowl, use clean beaters to whip 1 cup of cold heavy cream to soft peaks (the cream should just hold its shape but remain silky). Stop before it becomes stiff to maintain a light texture.
- Fold whipped cream into cream cheese
- Gently fold the whipped cream into the cream cheese mixture using a spatula. This folding (rather than beating) preserves the airiness.
- Bloom and dissolve gelatin
- Sprinkle 2 teaspoons of unflavored gelatin over 4 tablespoons of cold water in a small bowl. Let it sit for 2–3 minutes until the gelatin blooms (absorbs water and swells).
- Transfer the bloomed gelatin to a small saucepan over low heat. Stir constantly until fully dissolved (about 1–2 minutes). Remove from heat immediately—do not let it boil.
- Temper gelatin into filling
- Spoon 2–3 tablespoons of the cream cheese mixture into the dissolved gelatin. Stir briefly to temper. Then pour the tempered gelatin back into the remaining cake filling, folding gently until uniformly combined.
- Incorporate mango puree
- Add 1½ cups of mango puree to the batter. Gently fold until the filling turns a consistent pale orange-yellow hue, ensuring no streaks remain.
- Layer filling over crust
- Remove the chilled crust from the refrigerator. Pour the mango cheesecake filling over the set crust, using an offset spatula to smooth the top. Lightly tap the pan on the counter to release any trapped air bubbles.
Assemble and Chill
- Cover and refrigerate
- Loosely cover the pan with plastic wrap, ensuring it doesn’t touch the surface of the filling.
- Refrigerate for at least 6–8 hours, ideally overnight, so the cheesecake can set completely. A well-chilled filling yields the smoothest, cleanest slices.
- Check firmness
- Before proceeding with the topping, gently press the center of the filling; it should feel firm to the touch. If it still jiggles, give it a few more hours in the refrigerator.
Prepare the Mango Topping
- Sweeten the reserved mango puree
- Take ½ cup of mango puree reserved earlier. Taste and add 1–2 tablespoons of sugar or a small drizzle of sweetened condensed milk if extra sweetness is needed.
- Bloom and dissolve topping gelatin
- Sprinkle 1 teaspoon of unflavored gelatin over 2 tablespoons of cold water. Allow to bloom for 2–3 minutes.
- Gently warm the bloomed gelatin over low heat until fully dissolved. Do not let it boil.
- Cool the gelatin mixture
- Let the dissolved gelatin mixture cool slightly—until it’s warm but not hot. If poured too hot, it could seep into the cheesecake layer and cause the vibrant color to bleed.
- Combine gelatin and puree
- Stir the cooled gelatin into the reserved mango puree until completely uniform. You’ll have a glossy, thick mango glaze.
- Pour gently over cheesecake
- Remove the set cheesecake from the refrigerator. Slowly pour the mango glaze over the surface, starting at the center and letting it gently spread to the edges. Use an offset spatula to smooth and create an even layer.
- Chill until firm
- Return the cheesecake to the fridge for another 1–2 hours, or until the topping is set and slightly springy to the touch.
Final Assembly and Garnish
- Release from springform pan
- Run a thin knife along the inside edge of the pan to loosen any slight adhesion. Unlock and remove the side of the springform.
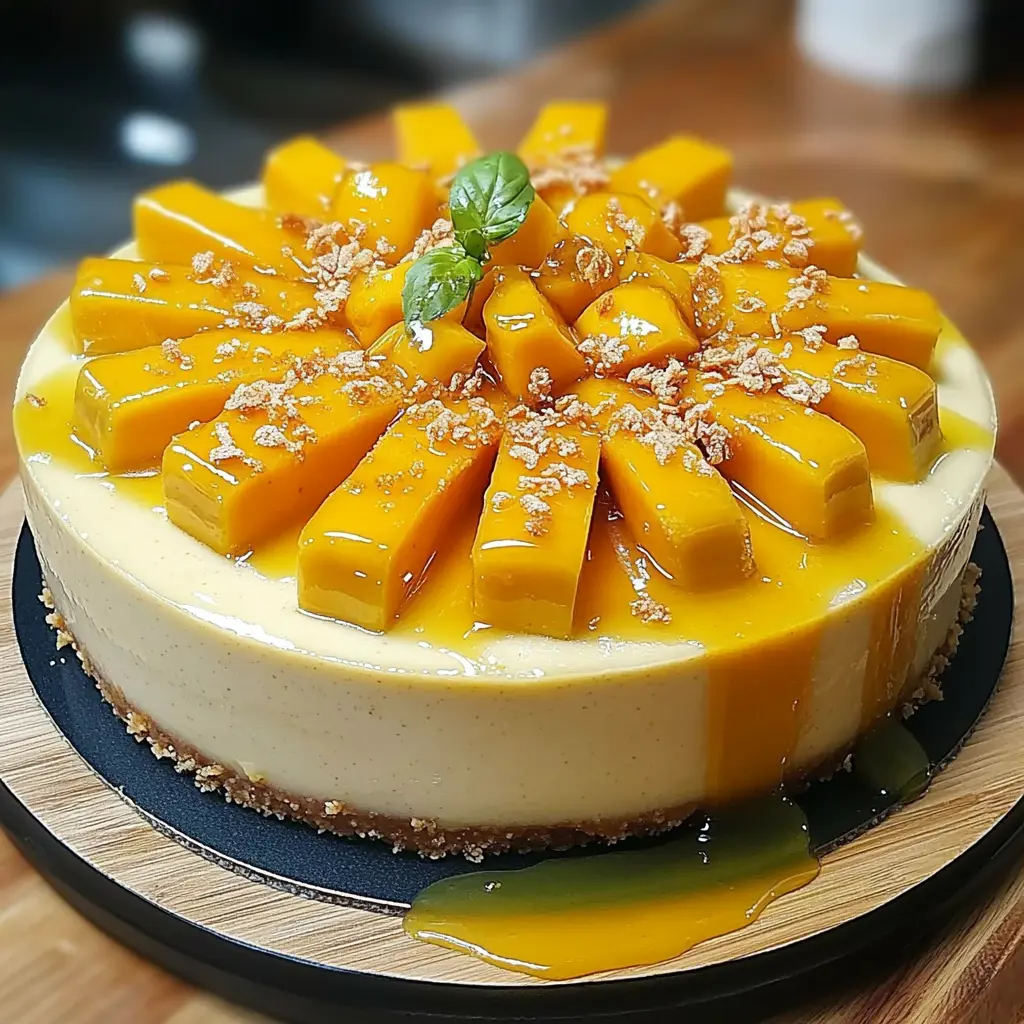
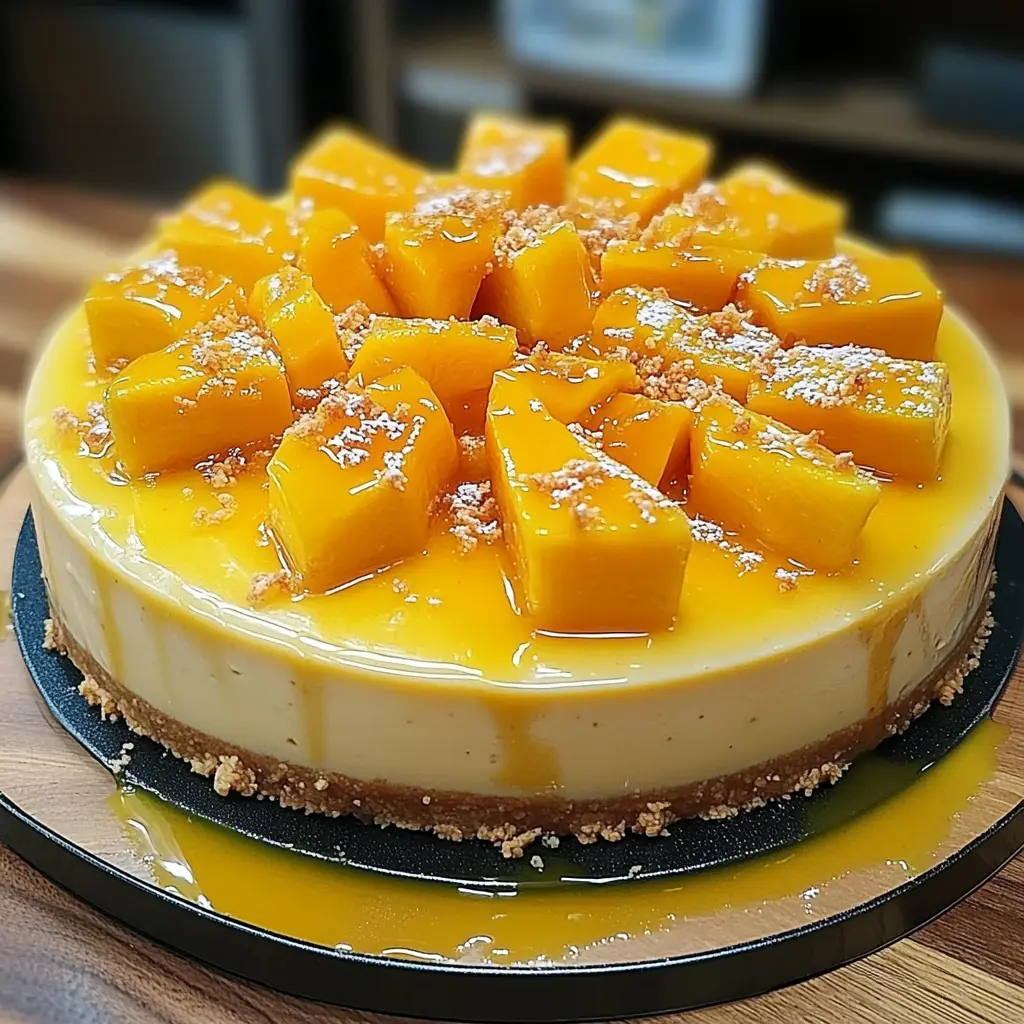
- Garnish with fresh mango cubes
- Arrange the reserved fresh mango cubes or thin mango slices in an attractive pattern on top of the glazed layer, such as a circular fan or scattered cubes.
- Add finishing touches
- Sprinkle a handful of toasted coconut flakes around the edge or scatter small mint leaves for a pop of color. A light grating of lime zest adds a hint of brightness and visual contrast.
- Slice and serve
- For a clean cut, warm a sharp knife under hot water, dry it, and slice the cheesecake in one smooth motion. Wipe the knife blade between cuts. Serve immediately or keep chilled until plating.
Variations and Flavor Twists
- Tropical Fruit Combos
- Create a “Mango-Pineapple Swirl” by blending half the puree with pineapple chunks. Layer alternately in the filling for a marbled effect.
- Try a “Mango-Passion Fruit” version by replacing ½ cup of mango puree with passion fruit pulp. The tangy seeds add texture and a burst of color.
- Vegan/Dairy-Free Option
- Substitute cream cheese with vegan cream cheese (made from cashews or tofu).
- Replace heavy cream with chilled coconut cream whipped to soft peaks.
- Use agar-agar powder (1 teaspoon per cup of liquid) instead of gelatin—simmer agar-agar with liquid until fully dissolved, then cool slightly before folding into the filling.
- Gluten-Free Crust
- Swap graham crackers for gluten-free cookies or almond flour: combine 1½ cups almond flour with 6 tablespoons melted butter and press into pan.
- Add ¼ cup toasted coconut flakes to the crust mixture for extra crunch.
- Crunchy Layer
- After pouring the filling, sprinkle a thin layer of toasted chopped nuts (macadamia, almonds, or pistachios) before chilling. The nuts provide a delightful contrast to the smooth filling.
- Alternatively, add a ¼-inch layer of semi-sweet or white chocolate ganache between crust and filling for a decadent twist.
- Mini Mason Jar Cheesecakes
- Scale down the recipe to mini portions by using 4–6 ounce mason jars or small dessert cups. Layer crust, filling, and topping accordingly. Reduce chilling time to about 4 hours total.
Serving Suggestions and Presentation
- Serve each slice on a chilled dessert plate, garnished with a small drizzle of leftover mango puree around the plate’s perimeter.
- For individual servings, spoon into pretty dessert glasses or mini trifle bowls. Layer crust, filling, and topping—finish with a fresh mint sprig.
- Pair with a scoop of coconut sorbet or passion fruit sorbet for a complementary tropical flair.
- Lightly sprinkle toasted coconut flakes or finely chopped pistachios along the rim of each plate to add visual appeal.
- Offer small ramekins of extra mango puree or passion fruit coulis so guests can customize each bite.
Storage and Make-Ahead Tips
- Refrigerator Storage
- Cover the cheesecake tightly with plastic wrap or place in an airtight container. Store for up to 3–4 days.
- If possible, slice just before serving; pre-sliced cheesecakes can dry out around the exposed edges.
- Freezing
- Once fully set (with topping), slice the cheesecake. Wrap each slice individually in plastic wrap, then in foil. Freeze for up to 1 month.
- Thaw in the refrigerator overnight before serving; avoid thawing at room temperature to maintain texture.
- Make-Ahead Plan
- Prepare the crust and filling up to 2 days in advance, keeping each layer chilled separately. On the day of serving, add the fresh mango topping and final garnishes.
- If you’re traveling with the dessert, freeze overnight and transfer to a cooler for transport. Thaw only when you arrive to preserve shape and texture.
FAQs
Q1: How do I choose the best mangoes for this recipe?
Look for mangoes that yield slightly to gentle pressure and have a sweet, fruity aroma at the stem end. Varieties such as Alphonso, Kent, or Ataulfo provide the richest flavor and the smoothest texture, making them ideal for puree.
Q2: Can I use canned mango puree instead of fresh mangoes?
Yes. High-quality canned mango puree works well if you can’t find ripe fresh mangoes. Strain the puree through a fine-mesh sieve to remove fibers, then adjust sweetness as needed. Canned versions may be sweeter, so taste before adding sugar.
Q3: What’s the best way to dissolve gelatin without lumps?
First, sprinkle the recommended gelatin over cold water and let it bloom (absorb) for 2–3 minutes. Then, gently heat on low—stirring constantly—until fully dissolved. Never let the gelatin mixture come to a boil, as overheating can reduce its setting power.
Q4: My filling still feels slightly jiggly after chilling overnight. Is that normal?
A slight jiggle in the very center can occur, but the edges should be firm. If it’s very runny or doesn’t hold shape when gently pressed, return it to the refrigerator for another 2–4 hours. Gelatin-based fillings often firm up further as they chill.
Q5: Can I make individual servings instead of one large cheesecake?
Absolutely. Use 4–6 ounce mason jars or small dessert glasses. Layer crushed crust, filling, and topping. Reduce chilling time to about 4–6 hours, as smaller portions set faster. These grab-and-go portions are perfect for parties.
Conclusion
A No-Bake Mango Cheesecake stands out as a show-stopping dessert that balances ease of preparation with a delightfully vibrant presentation. By combining a buttery graham cracker crust with a smooth, mango-infused cheesecake filling and a glossy fruit topping, this recipe delivers a tropical escape to your table. Whether made in a single springform pan for slicing or in individual dessert glasses for personalized servings, its adaptability makes it perfect for casual get-togethers, festive occasions, or simply an indulgent treat to savor at home.
2 thoughts on “Delicious No-Bake Mango Cheesecake: A Refreshing Tropical Dessert”