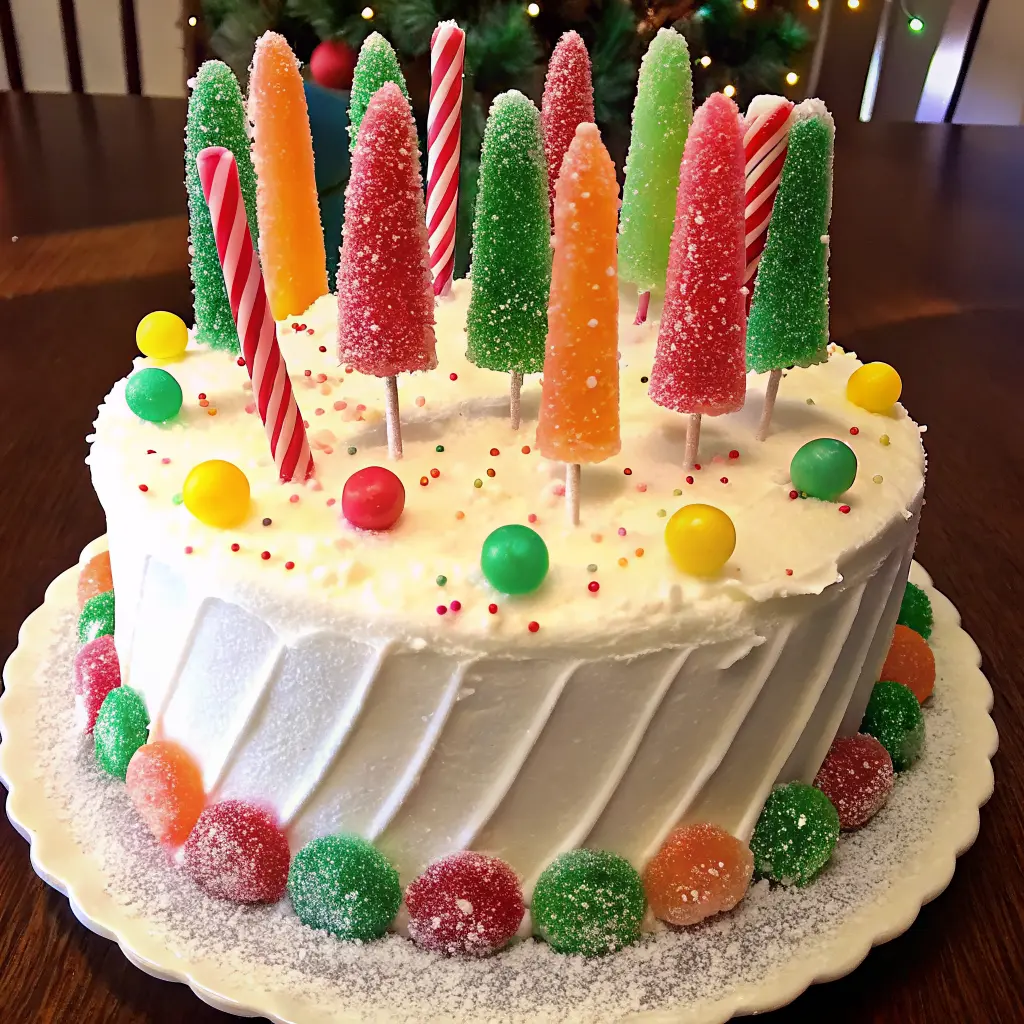
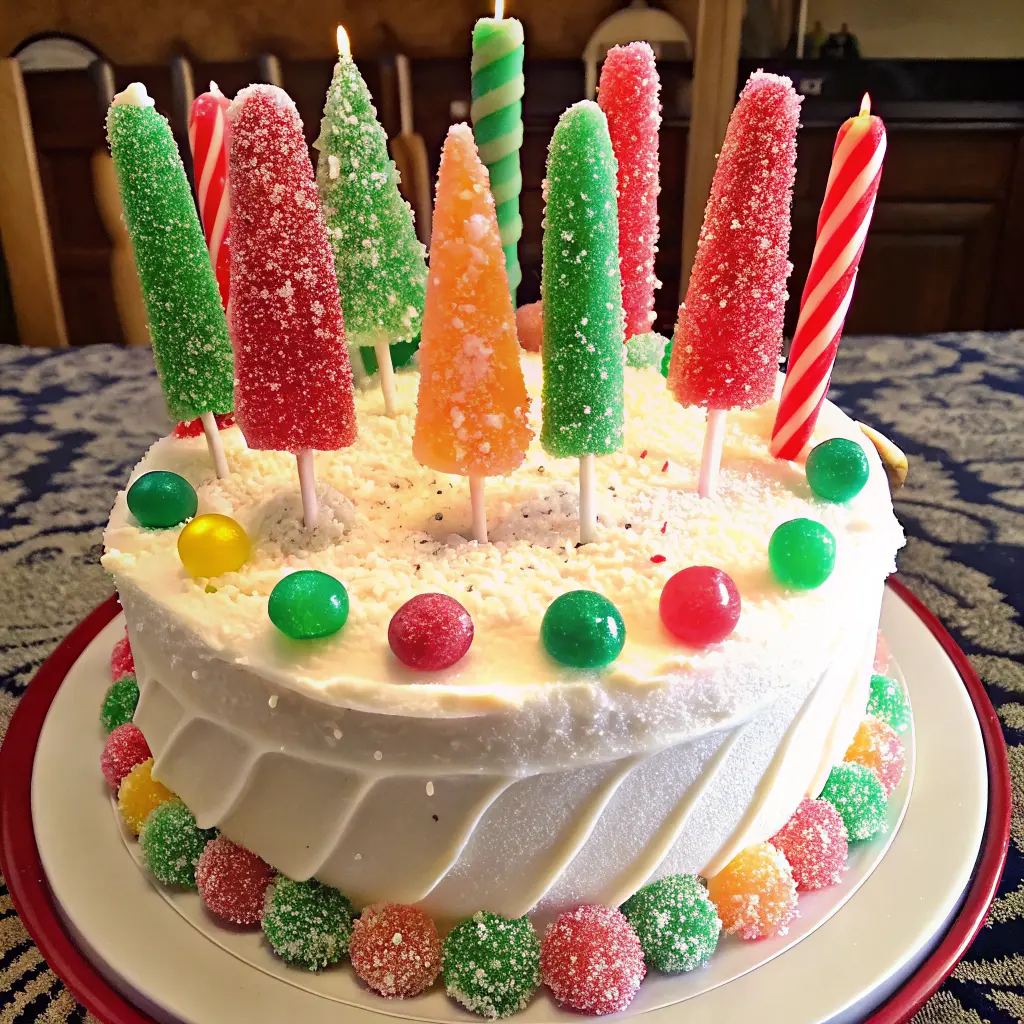
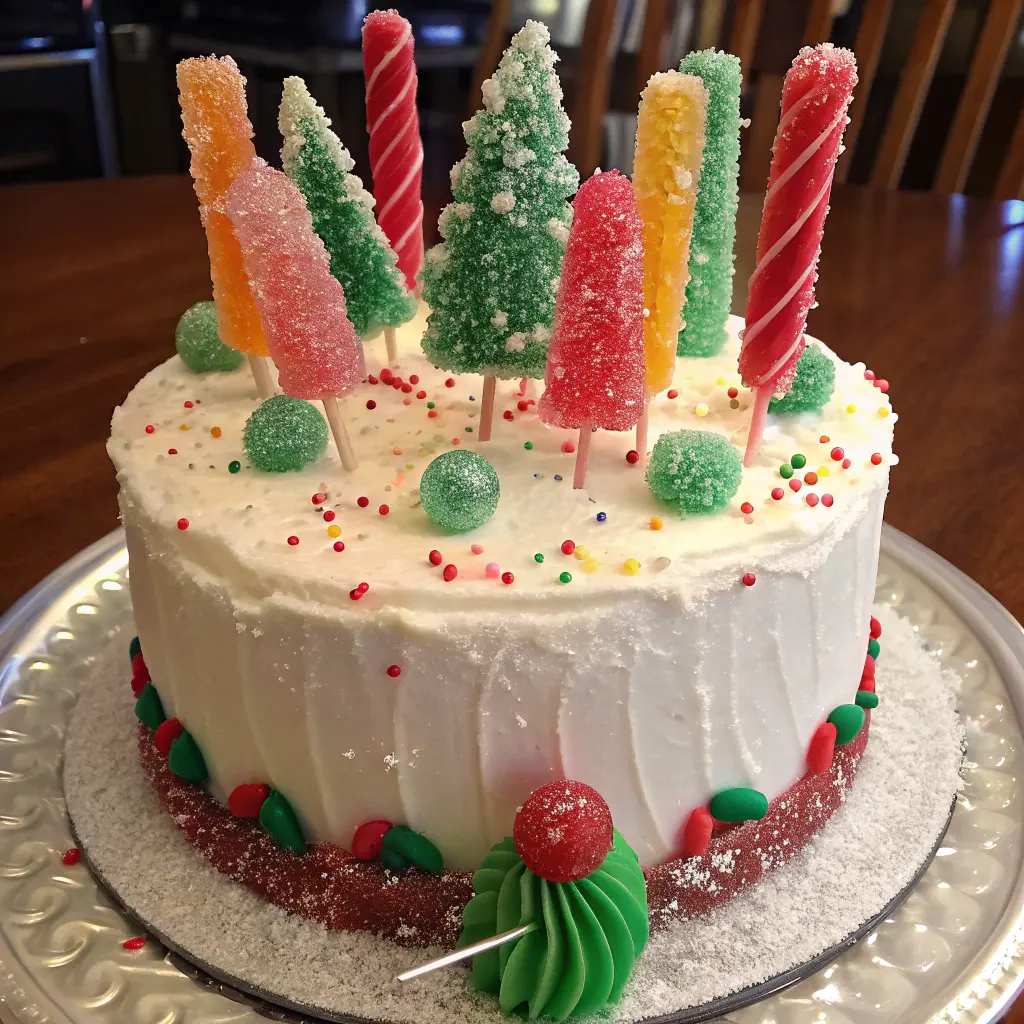
If there’s one dessert that looks like it walked straight out of a Christmas movie, it’s a Rock Candy Christmas Cake. Picture tall layers of fluffy cake in festive colors, wrapped in white buttercream and coated in shimmering rock candy crystals that catch every light on your tree. It’s dramatic, playful, and surprisingly achievable in a home kitchen.
What Is a Rock Candy Christmas Cake?
A Rock Candy Christmas Cake is essentially a layered celebration cake, usually:
- Built from 3–4 tall layers of white, vanilla, or red velvet cake
- Frosted with a generous coat of buttercream (often whipped vanilla or classic American buttercream)
- Covered in rock candy crystals around the sides, on top, or in a geode-style cut-out
The result is a cake that:
- Sparkles like a pile of gemstones
- Feels magical for kids and adults
- Becomes the instant centerpiece of your Christmas party
Unlike complicated fondant sculptures, this design relies on simple techniques—pressing rock candy into slightly tacky buttercream—so it’s a fantastic “wow” cake even if you don’t decorate cakes every weekend.
Why Choose Rock Candy for Christmas?
There are plenty of traditional Christmas cakes: fruit cakes, yule logs, and gingerbread cakes. So why choose a Rock Candy Christmas Cake?
Because rock candy gives you three big advantages:
- Eye-catching sparkle – Sugar crystals catch and reflect light from candles and fairy lights.
- Easy color customization – You can match any Christmas palette, from classic red and green to icy blues and metallics.
- Instant texture and height – Tall rock candy clusters, especially around the top, give your cake incredible dimension.
Ingredient & Equipment Checklist
To keep things organized, lay out all your ingredients and tools before you start.
Cake Ingredients
For a standard 3-layer (8-inch) Rock Candy Christmas Cake, you’ll need:
- White or vanilla cake batter for 3–4 layers (from scratch or box mix)
- Eggs, butter or oil, sugar, flour, leavening, etc. (if baking from scratch)
- Flavorings:
- Vanilla extract
- Optional: almond extract or peppermint extract for a festive twist
- Gel food coloring:
- Red and green for a classic holiday cake
- Or your chosen winter palette (blue, teal, silver, etc.)
Buttercream or Frosting
You’ll need a generous amount of frosting—this cake often uses a double batch. Popular choices:
- American buttercream – Easy to make, sweet, and stable.
- Whipped vanilla buttercream – Light and fluffy, very popular on rock candy cakes.
- Cream cheese buttercream – Great for red velvet versions (ensure it’s firm for decorating).
Basic ingredients:
- Unsalted butter (softened)
- Powdered sugar
- Vanilla and/or almond extract
- A pinch of salt
- Milk or heavy cream to adjust consistency
Rock Candy Elements
You can use:
- Store-bought rock candy
- Rock candy sticks
- Bags of loose rock sugar crystals
- Homemade rock candy (if you want full control over color and flavor)
You’ll want a mix of:
- Big chunks for focal areas
- Medium pieces for the main coverage
- Small shards to fill in gaps
Tools & Equipment
- 3 or 4 × 8-inch (or 9-inch) cake pans
- Parchment paper circles
- Non-stick spray or butter + flour
- Stand mixer or hand mixer
- Mixing bowls and spatulas
- Rotating cake stand
- Offset spatula for frosting
- Bench scraper for smoothing sides
- Serrated knife or cake leveler
- Piping bags (optional)
- Zip-top bags + rolling pin or small hammer (for crushing rock candy)
- Cake board or sturdy cake stand
Baking the Festive Cake Layers
Prepare the Pans
- Preheat your oven according to your cake recipe or box mix.
- Grease and line your pans:
- Spray or butter the sides and bottom.
- Place parchment circles on the bottom to prevent sticking.
Mix the Batter
- Follow your chosen recipe, focusing on:
- Beating butter and sugar until light and fluffy (if using a butter-based cake).
- Add eggs one at a time.
- Alternating dry ingredients with milk or buttermilk.
- Avoid over-mixing once flour is added to keep the crumb soft.
Color the Batter
Divide the batter into separate bowls:
- Bowl 1: Tint red (gel food coloring gives a strong color without thinning the batter).
- Bowl 2: Tint green.
- Bowl 3: Leave plain or tint a very light neutral shade (if you want white layers).
Stir in color gently until evenly distributed, adding more as needed for vibrant tones.
Bake & Cool
- Pour each color into a prepared pan, smoothing the top.
- Bake until:
- Tops are springy
- A toothpick comes out with just a few moist crumbs
- Let layers cool in pans for 10–15 minutes, then turn onto wire racks.
- Once completely cool, wrap and chill them—cold layers are much easier to stack and frost.
Choosing & Making the Perfect Frosting
The frosting on a Rock Candy Christmas Cake does more than taste good: it acts as the “glue” that holds your crystals in place.
Which Frosting Works Best?
Consider:
- American buttercream
- Very stable
- Great for a smooth finish
- Whipped vanilla buttercream
- Fluffy and light, perfect for a snow-white finish
- Cream cheese buttercream
- Lovely on red velvet, but make sure it’s firm enough to support rock candy.
You want a frosting that:
- Smooths easily
- Firms up in the fridge
- Stays slightly tacky when chilled, so crystals adhere without sliding
Basic Buttercream Method
- Beat softened butter until pale and fluffy (3–5 minutes).
- Gradually add powdered sugar, mixing on low at first.
- Add vanilla extract and a pinch of salt.
- Add cream or milk, a tablespoon at a time, until you get a smooth, spreadable consistency.
- For the final coat, you can slightly thicken the frosting with a bit more sugar for extra stability.
Coloring the Buttercream
You can:
- Keep the outside bright white to contrast with colorful rock candy.
- Tint the frosting in subtle tones that match your rock candy (for example, a minty green for a green and white theme).
- Use striped piping bags for candy-cane swirls on top if you want an extra decorative touch.
Prepping Rock Candy for Decorating
Even if you buy your crystals ready-made, a little prep goes a long way.
Coloring Rock Crystals
If you mostly have clear or pale crystals, you can customize them:
- Place rock crystals in a zip-top bag.
- Add a pinch of edible dust (such as pearl or metallic shimmer) plus a few drops of clear alcohol (like vodka or a flavoring alcohol).
- Shake until crystals are evenly coated, adding more dust for deeper color.
For an ombré effect, tint several batches with increasing amounts of color and mix them when decorating.
Crushing & Sorting
Use a rolling pin or small hammer to break larger pieces into varied sizes:
- Large shards – For dramatic focal clusters
- Medium pieces – For covering most of the cake sides
- Small bits and sugar dust – For filling tiny gaps and softening edges
Sort into bowls so you can easily grab what you need as you decorate.
Keeping Candy Crisp
Rock candy can absorb moisture from the air and lose its sparkle. To keep it crisp:
- Store prepared crystals in airtight containers until you’re ready to decorate.
- Avoid high-humidity environments if possible.
- Aim to attach the rock candy on the day you plan to serve the cake or the evening before.
Stacking, Filling & Crumb-Coating the Cake
Level the Layers
Once chilled, check your cake layers:
- If they’re domed, use a serrated knife or cake leveler to trim the tops flat.
- Even layers mean a stable, tall Rock Candy Christmas Cake that’s less likely to lean.
Add the Filling
- Place the first layer on your cake board or stand.
- Spread a generous, even layer of buttercream.
- Optional fun additions:
- A thin layer of jam or ganache
- Christmas sprinkles or mini chocolate chips in the center
- Top with the next layer, making sure it’s centered.
- Repeat until all layers are stacked.
Crumb Coat & Chill
- Apply a thin layer of frosting over the entire cake—just enough to catch crumbs.
- Smooth roughly, then chill until the buttercream is firm (20–30 minutes).
This crumb coat keeps your final layer neat and ensures crumbs don’t get dragged through your outer frosting or caught behind the rock candy.
Final Frosting Coat: Creating a Smooth Base
After the crumb coat is firm, add the final frosting layer.
Apply the Final Coat
- Add a thicker coat of buttercream to the top and sides.
- Use an offset spatula to spread evenly.
- Hold a bench scraper against the side while turning the cake stand to achieve smooth, straight sides.
Decide on Texture
You have choices:
- Super smooth – For a sleek, modern look where rock candy stands out.
- Soft swirls – Give a snowy, cloud-like effect if you don’t fully encrust the cake.
Once smoothed, chill the cake again just until the frosting is firm but still slightly tacky—this is the perfect stage for applying rock candy. If it’s too cold, crystals won’t stick; too warm, and they may slide.
Decorating: Classic Rock Candy Christmas Cake Look
Now for the fun part: turning a frosted cake into a shimmering Rock Candy Christmas Cake.
Pressing Rock Candy onto the Sides
- Work over a tray or parchment to catch falling pieces.
- Start at the bottom, pressing medium-sized crystals gently into the frosting.
- Move upward in sections, filling most of the surface with medium pieces.
- Use small shards and sugar dust to:
- Fill the gaps between larger crystals
- Create a more natural, gemstone-like texture
Decorating the Top Edge
Options:
- Crystal crown: Arrange taller shards around the rim of the cake.
- Full top coverage: Completely cover the top with a mix of sizes for a glittering “crystal mine” look.
- Crescent design: Place a heavy cluster of rock candy on one side of the top for an asymmetrical, modern finish.
Optional Metallic Touches
For extra luxury:
- Use edible gold or silver luster dust on a few crystals.
- Lightly dust certain areas to mimic real geodes or gemstones.
Make-Ahead, Storage & Transport Tips
A Rock Candy Christmas Cake is party-friendly because many steps can be spread out over several days.
- Up to 1 month ahead:
- Bake cake layers, cool completely, wrap tightly, and freeze.
- Up to 3 days ahead:
- Prepare buttercream and store in an airtight container in the fridge. Bring to room temperature and re-whip before using.
- 1–2 days ahead:
- Stack, fill, crumb coat, and apply final frosting coat.
- Same day or night before serving:
- Attach rock candy crystals to keep them crisp and shiny.
For storage:
- Chill the decorated cake if your environment is warm.
- Before serving, let it sit at room temperature just long enough for the cake and frosting to soften slightly (while the rock candy stays firm).
For transport:
- Chill the cake thoroughly so the frosting and crystals are firm.
- Place on a non-slip mat inside a tall cake box.
- Keep it level and out of direct sunlight.
Troubleshooting Common Rock Candy Cake Issues
Even experienced bakers run into small hiccups. Here’s how to handle them:
Rock Candy Sliding Off
Causes:
- Frosting too soft or warm
- Cake not chilled enough
Fixes:
- Chill the cake until the frosting is firm before pressing on the crystals.
- If needed, pipe a small bead of fresh buttercream wherever crystals are sliding and press them into that.
Crystals Getting Sticky or Melting
Causes:
- High humidity
- Cake left out for many hours
- Rock candy was applied too early
Fixes:
- Decorate as close to serving time as possible.
- Store in a cool, dry place.
- Keep the cake boxed when possible to minimize moisture exposure.
Uneven Coverage
Causes:
- Only using large pieces
- Not enough variety in crystal sizes
Fixes:
- Crush some rock candy into smaller shards and sugar dust.
- Fill in gaps with small pieces to create a fuller, more polished look.
Cake Leaning
Causes:
- Uneven layers
- Very soft filling
- Extremely tall cake without support
Fixes:
- Make sure layers are level.
- Chill between stacking and crumb coating.
- For very tall cakes, insert a few dowels or straws for support.
Serving, Slicing & Styling Your Rock Candy Christmas Cake
Best Serving Temperature
You want the cake and frosting to be pleasantly soft while the rock candy is still firm. That usually means:
- Remove the cake from the fridge 20–40 minutes before serving (depending on room temperature).
How to Slice Through Rock Candy
- Use a long, sharp knife.
- For very thick crystals, gently remove some of the largest clusters before slicing.
- Wipe the knife clean and warm it under hot water between cuts if needed.
Styling the Dessert Table
Make your Rock Candy Christmas Cake the focal point:
- Place it on a festive cake stand (red, green, white, or metallic).
- Surround the base with:
- Fairy lights
- Ornaments
- A dusting of edible glitter or powdered sugar “snow” on the table
- Add small jars of extra rock candy so guests can nibble or use it to garnish their plates.
Rock Candy Christmas Cake FAQs
Can I put rock candy on buttercream, or will it melt?
Yes, you can put rock candy directly on buttercream. Over many hours in a very humid environment, the crystals can soften slightly, so it’s best to attach them the day you plan to serve the cake.
How far in advance can I decorate a cake with rock candy?
Ideally, decorate your Rock Candy Christmas Cake within 12–24 hours of serving. For cooler, drier climates, you might get slightly more time, but fresh is best for maximum sparkle.
What kind of cake is best for a Rock Candy Christmas Cake?
Choose a cake that’s sturdy enough to stack, such as:
- White or vanilla sponge
- Butter cake
- Red velvet
Very delicate or crumbly cakes are harder to stack and cover in rock candy.
Do I have to make my own rock candy?
Not at all. Many bakers use store-bought rock sugar or rock candy sticks and crush them to size. Homemade rock candy is fun if you enjoy the process or want exact colors, but it isn’t required.
Conclusion
A Rock Candy Christmas Cake is more than just a dessert – it’s a sparkling centerpiece that sets the tone for your entire holiday celebration. With its colorful layers, fluffy frosting, and glittering rock candy crystals, this cake turns your table into a festive display that guests will talk about long after the last slice is gone.
Print
Rock Candy Christmas Cake Recipe
- Total Time: PT1H00M
- Yield: 12 servings 1x
- Diet: Vegetarian
Description
This Rock Candy Christmas Cake is a show-stopping holiday dessert featuring a soft vanilla or almond cake layered with fluffy frosting and decorated with sparkling rock candy “crystals.” The candy adds magical holiday sparkle—like frosty ice, shimmering gemstones, or a winter wonderland.
Ingredients
For the Cake
- 2 ½ cups all-purpose flour
- 2 cups sugar
- 1 cup unsalted butter, softened
- 4 large eggs
- 1 cup whole milk
- 2 tsp baking powder
- ½ tsp salt
- 1 tbsp vanilla extract
- ½ tsp almond extract (optional, but gives a holiday bakery flavor)
For the Buttercream Frosting
- 1 ½ cups unsalted butter, softened
- 5 cups powdered sugar
- 3–4 tbsp milk or heavy cream
- 2 tsp vanilla extract
- Pinch of salt
For Decoration
- Assorted rock candy sticks or crushed rock candy (clear, red, green, blue, etc.)
- Edible glitter or snow sprinkles (optional)
- Gel food coloring for tinting frosting (optional)
Instructions
1. Make the Cake
- Preheat oven to 350°F (175°C).
- Grease and flour two 8-inch round cake pans.
- Cream butter and sugar until light and fluffy.
- Add eggs one at a time, mixing well.
- Mix in vanilla and almond extract.
- In a separate bowl, whisk flour, baking powder, and salt.
- Add dry ingredients to wet ingredients, alternating with milk.
- Divide batter between pans.
- Bake 28–32 minutes, or until a toothpick comes out clean.
- Cool completely.
2. Make the Frosting
- Beat butter until creamy (2 minutes).
- Add powdered sugar gradually.
- Add vanilla, salt, and milk until fluffy and spreadable.
- Tint frosting if desired.
3. Assemble the Cake
- Level cake layers if needed.
- Spread frosting between the two cakes.
- Apply a thin crumb coat and chill for 20 minutes.
- Frost the outside smoothly or with texture.
4. Decorate with Rock Candy
- Press crushed rock candy or crystals along the sides or top.
- Create a “geode” look by forming a cluster in a carved-out section.
- Mix colors for a magical winter effect.
- Add edible glitter or snowflake sprinkles.
5. Serve
- Slice with a warm knife to cut smoothly through rock candy.
- Enjoy immediately or store covered.
Notes
- Rock candy adds crunch—place mostly on the outside for the best eating experience.
- Use clear rock candy for an icy winter theme.
- Add red and green candy for a classic Christmas look.
- Prep Time: PT20M
- Cook Time: PT30M
- Category: Christmas Cakes
- Method: Baked
- Cuisine: American
Nutrition
- Serving Size: 1 slice
- Calories: 430 Kcal
- Sugar: 54g
- Sodium: 260mg
- Fat: 18g
- Saturated Fat: 11g
- Unsaturated Fat: 7g
- Trans Fat: 0g
- Carbohydrates: 65g
- Fiber: 0.5g
- Protein: 4g
- Cholesterol: 85mg