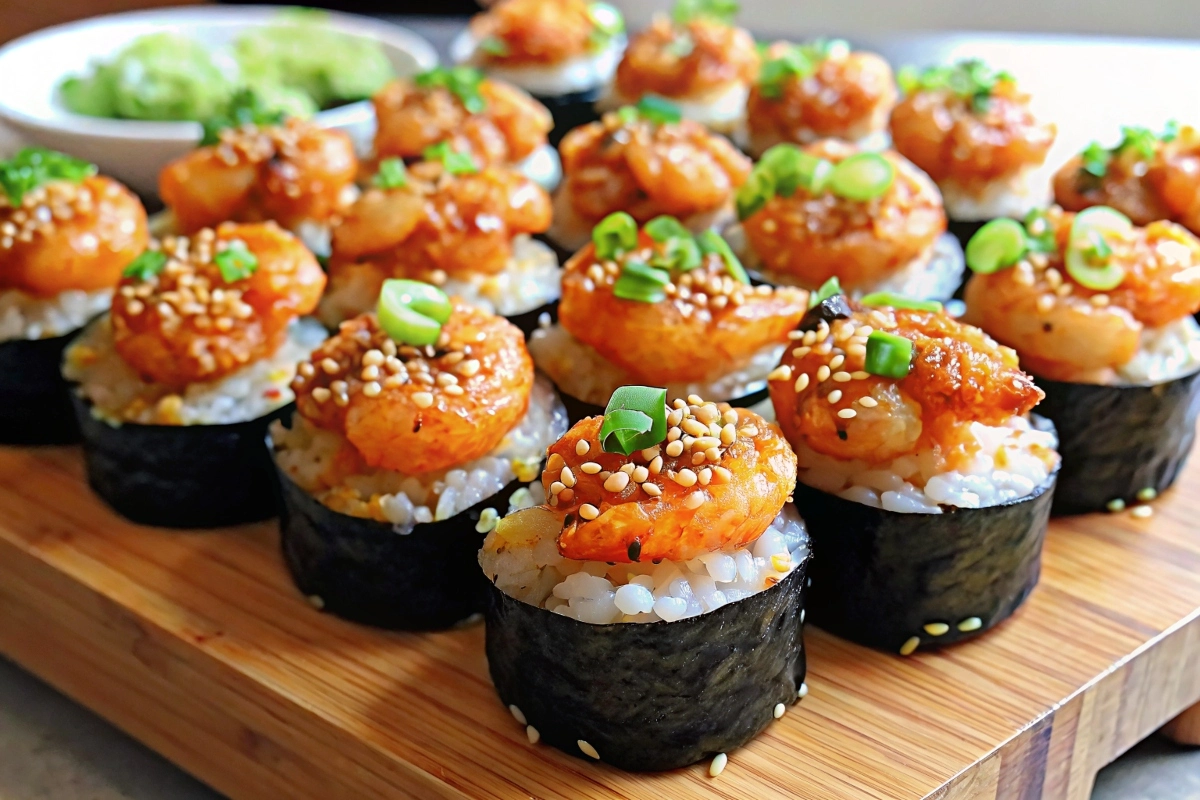
Savor the flavors of deconstructed sushi in every bite with these irresistible Shrimp Sushi Bake Cups. Perfect for parties, weeknight dinners, or anytime you crave a fun twist on sushi, these little cups deliver big taste with minimal fuss.
Introduction to Shrimp Sushi Bake Cups
Over the past few years, the sushi bake trend has taken social media by storm. Originating in home kitchens and quickly spreading to restaurants, this dish layers seasoned rice with a creamy seafood mixture, then broils it until golden and bubbly. But why stop at a casserole? Enter Shrimp Sushi Bake Cups—individual servings baked in muffin tins or silicone cups, making sharing easier and presentation more festive.
By transforming the classic sushi bake into bite‑sized cups, you get:
- Crisp edges from direct contact with the pan
- Customizable toppings for each guest
- Easier portion control and serving
In this comprehensive guide, we’ll dive into everything you need to know to master Shrimp Sushi Bake Cups: from origins and ingredients to assembly, baking tips, variations, and FAQs. Let’s get started!
Origins & Inspiration
The concept of sushi bake began as a home‑cooking hack in Hawaii, where enthusiasts adapted traditional sushi flavors into an oven‑baked dish. By layering seasoned rice and seafood salad under a blanket of mayonnaise-based sauce, cooks created a convenient, shareable format that tasted like sushi without the rolling.
Key milestones in the evolution:
- Hawaiian Home Kitchens: Early creators experimented with sheet pans and casseroles.
- Social Media Boom: TikTok and Instagram amplified the trend with viral recipe videos.
- Cup Transformation: Bakers discovered that using muffin tins yields crispier edges and built‑in portion control.
Shrimp naturally rose to prominence in this format due to its delicate sweetness, firm texture, and ease of preparation. Plus, it pairs beautifully with classic sushi seasonings like rice vinegar, nori flakes, and furikake.
Key Ingredients Breakdown
Crafting perfect Shrimp Sushi Bake Cups starts with high‑quality components. Below are the essentials:
1. Sushi Rice & Seasoning
- Short‑grain Japanese rice: Provides the ideal stickiness.
- Rice vinegar: Balances sweetness and tang.
- Sugar & salt: Enhance flavor and preserve texture.
- Preparation tips:
- Rinse rice until the water runs clear.
- Let it rest covered for 10 minutes after cooking.
For a deep dive on cooking flawless sushi rice, check out this perfect sushi rice guide.
2. Shrimp Selection & Preparation
- Fresh vs. frozen: Both work; thaw frozen in cold water.
- Size: Medium (31–40 count) offers a balance between texture and cost.
- Cleaning: Devein and remove shells, leaving tails on for presentation.
- Cooking methods:
- Poach in seasoned water until opaque.
- Sauté briefly in butter and garlic for extra flavor.
3. Flavorful Toppings & Mix‑Ins
- Japanese mayonnaise (e.g., Kewpie): Creamy base.
- Sriracha or chili mayo: Adds heat.
- Furikake seasoning: Umami boost from seaweed and sesame.
- Tobiko or masago: Pops of color and briny crunch.
- Scallions & microgreens: Fresh garnish.
Equipment & Tools You’ll Need
Having the right gear ensures smooth assembly and perfect baking:
- Muffin tin: Standard 12‑cup size.
- Silicone baking cups: Nonstick, easy removal.
- Ramekins (optional): For individual serving flair.
- Parchment liners: Prevent sticking and ease cleanup.
- Piping bag (or zip‑top bag): For neat sauce application.
Step‑by‑Step Recipe Method
Follow these detailed steps to assemble and bake your Shrimp Sushi Bake Cups.
1. Prepping Rice & Shrimp
- Cook the rice
- Rinse 2 cups of sushi rice until the water runs clear.
- Combine with 2½ cups water in a rice cooker; cook.
- Transfer to a wooden bowl, gently fold in ¼ cup rice vinegar, 2 tbsp sugar, and 1 tsp salt.
- Prepare the shrimp
- Bring a pot of water to a simmer with 1 tsp salt.
- Add 1 lb deveined shrimp; cook until just opaque (2–3 minutes).
- Drain and pat dry; chop into bite‑sized pieces.
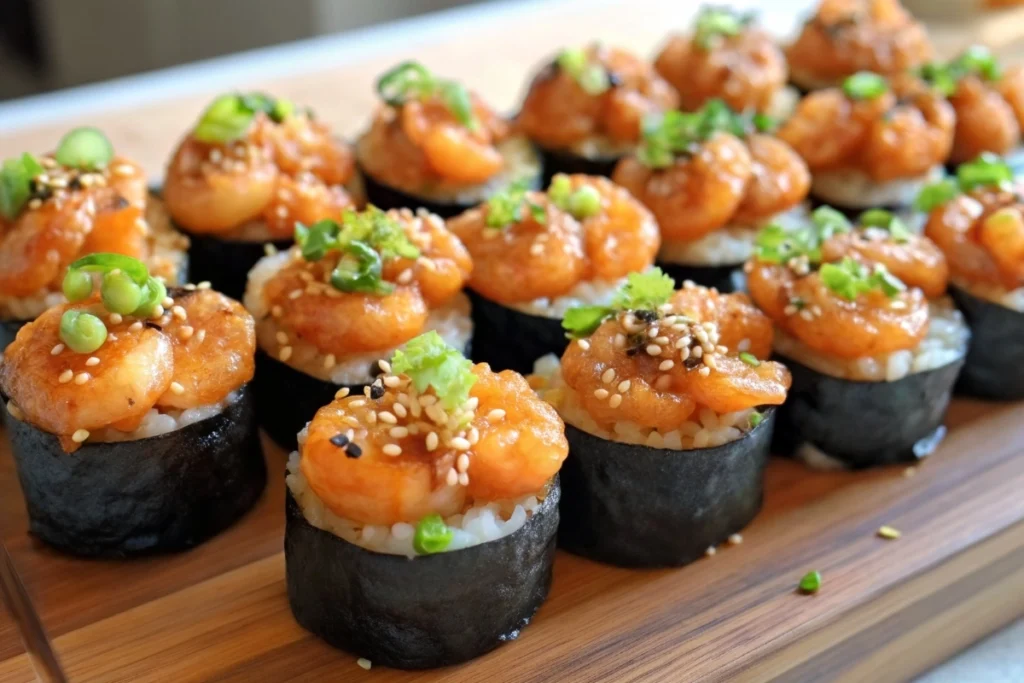
2. Assembling the Cups
- Line and grease
- Preheat oven to 375°F (190 °C).
- Grease the muffin tin or line with silicone cups.
- Layer the rice
- Press 2 tablespoons of seasoned rice into each cup, creating a firm base.
- Use the bottom of a measuring cup for even compression.
- Mix the shrimp filling
- In a bowl, combine shrimp pieces, ½ cup Japanese mayo, 1 tbsp sriracha, and 1 tsp furikake.
- Adjust sriracha to taste for the desired spice level.
- Pipe or spoon
- Spoon or pipe the shrimp mixture over the rice in each cup, filling to the rim.
3. Baking & Broiling
- Bake
- Place cups on a baking sheet.
- Bake at 375°F for 10 minutes to heat through.
- Broil
- Switch oven to broil on high.
- Broil for 2–3 minutes, watching closely until the tops are golden and bubbly.
- Cool slightly
- Remove from oven; let rest 2 minutes to set.
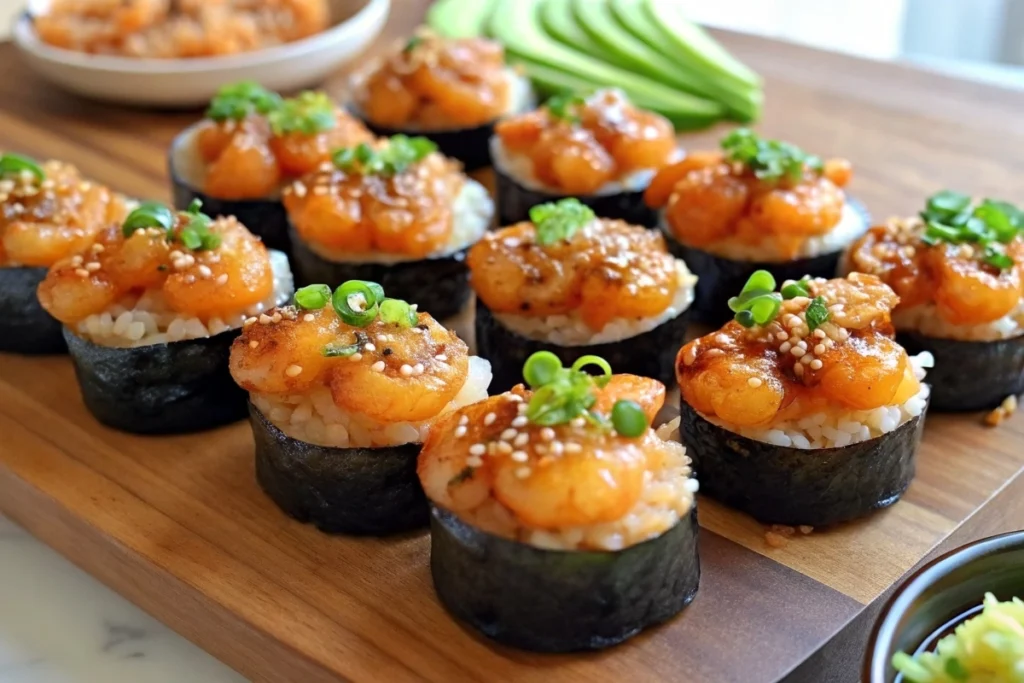
4. Finishing Touches
- Drizzle additional Japanese mayo and sriracha in a zig‑zag pattern.
- Sprinkle with extra furikake, tobiko, and chopped scallions.
- Garnish with microgreens or nori strips for color contrast.
Variations & Customizations
Make these cups your own by experimenting with:
- Seafood swaps:
- Imitation crab or real crab meat
- Flaked salmon or tuna
- Vegetarian: mashed avocado and tofu
- Flavor profiles:
- Teriyaki mayo: mix mayo with teriyaki sauce
- Wasabi kick: blend wasabi paste into mayo
- Dietary adaptations:
- Gluten‑free: ensure tamari or gluten‑free soy sauce
- Keto: swap rice for cauliflower rice
Serving Suggestions & Pairings
Elevate your Shrimp Sushi Bake Cups experience with complementary sides and drinks:
- Sides:
- Miso soup with scallions
- Edamame lightly salted
- Pickled ginger and daikon
- Beverages:
- Chilled sake or plum wine
- Jasmine green tea
- Crisp lager or pilsner
Storage & Make‑Ahead Tips
Enjoy these cups at your convenience:
- Refrigeration:
- Store in an airtight container up to 2 days.
- Reheat in a 350°F oven for 5–7 minutes.
- Freezing:
- Freeze unbaked cups on a tray, then transfer to a freezer bag.
- Bake from frozen; add 3–4 minutes to bake time.
- Assembly line:
- Prepare rice and shrimp mix ahead; assemble and bake on event day.
Troubleshooting Common Issues
- Rice is too dry or clumpy
- Ensure correct water ratio; fluff rice gently after cooking.
- Shrimp overcooked
- Remove from heat as soon as they turn opaque.
- Cups sticking
- Use silicone liners or grease tins liberally.
- Toppings slide off
- Let the cups cool briefly so the sauce sets before garnishing.
FAQs
1. What is sushi bake?
Sushi bake is a casserole‑style dish layering seasoned sushi rice with a creamy seafood or vegetable topping, baked and then scooped to serve. It delivers sushi flavors in a more casual, shareable format.
2. Can you make sushi bake ahead of time?
Yes! Assemble the rice and topping mixture, then refrigerate for up to 24 hours. When ready, bake and broil as directed.
3. How do you store sushi bake?
Keep leftover cups in an airtight container in the fridge for up to 2 days. Reheat in the oven to preserve crisp edges.
4. What is the difference between sushi bake and regular sushi?
Unlike rolled sushi, sushi bake uses baked layers and is served hot. It requires no rolling mats and offers a deconstructed, casserole‑style presentation.
5. How do you prevent soggy bottoms?
Press rice firmly into cups and bake at the correct temperature. Using a hot oven helps form a slight crust.
Conclusion
There you have it: a complete guide to making show‑stopping Shrimp Sushi Bake Cups that are sure to impress. Whether you’re hosting a party or simply craving a fun twist on sushi, these bite‑sized cups deliver flavor, convenience, and visual appeal.
Ready to dive in? Gather your ingredients, preheat your oven, and let your creativity shine with toppings and variations. Don’t forget to share your creations and tag us on social media!
Happy baking and sushi‑making!
Print
Shrimp Sushi Bake Cups: Easy Bite‑Sized Deconstructed Sushi Recipe
- Total Time: 30 minutes
- Yield: 12 sushi bake cups 1x
Description
Make crowd‑pleasing Shrimp Sushi Bake Cups with seasoned rice, creamy shrimp topping, and crispy edges. Perfect party appetizer!
Ingredients
For the Rice Base:
- 2 cups cooked sushi rice
- 1 tbsp rice vinegar
- 1 tsp sugar
- ½ tsp salt
For the Shrimp Filling:
- 1 cup cooked shrimp, finely chopped
- ¼ cup Kewpie mayo (or regular mayo)
- 1 tbsp sriracha (adjust to taste)
- 1 tsp soy sauce
- 1 tsp sesame oil
- 1 tbsp cream cheese (optional, for extra creaminess)
- 1 tsp green onions, finely chopped
Instructions
Step 1: Prep Rice
Mix rice vinegar, sugar, and salt into the warm sushi rice.
Let cool slightly.
Step 2: Prepare Shrimp Filling
In a bowl, combine chopped shrimp, mayo, sriracha, soy sauce, sesame oil, cream cheese, and green onions.
Mix until creamy and well combined.
Step 3: Assemble in Muffin Tin
Preheat oven to 375°F (190°C) and grease a 12-cup muffin tin.
Line each cup with a square of nori or press in a small spoonful of sushi rice to form a base.
Press about 1–2 tablespoons of rice into each cup and sprinkle with furikake.
Top with a generous spoonful of the shrimp mixture.
Step 4: Bake
Bake for 10–12 minutes, until the tops are lightly golden and the shrimp filling is bubbly.
Let cool slightly before removing from the tin.
Step 5: Garnish & Serve
Top with avocado slices, extra sriracha or mayo drizzle, green onions, or sesame seeds.
Notes
- Calories and fat mostly come from the shrimp, mayo, and cream cheese.
- Swap Kewpie for light mayo or Greek yogurt to reduce fat.
- Use brown rice or cauliflower rice for a fiber or low-carb option.
- Prep Time: 20 Minutes
- Cook Time: 10 minutes
Nutrition
- Serving Size: 12 cups
- Calories: 150 kcal
- Sugar: 1 g
- Sodium: 200 mg
- Fat: 6g
- Saturated Fat: 1,5g
- Trans Fat: 0g
- Carbohydrates: 12g
- Fiber: 1g
- Protein: 6g
- Cholesterol: 45 mg
Keywords: Shrimp Sushi Bake Cups
2 thoughts on “Shrimp Sushi Bake Cups: Easy Bite‑Sized Deconstructed Sushi Recipe”