Introduction to Sushi Bliss Balls
The culinary world is constantly buzzing with innovative mashups, and Sushi Bliss Balls stand out as one of the most exciting creations to hit snack time. Combining the artful precision of sushi with the convenience of bite-sized bliss balls, this trend offers a playful twist on two beloved treats. In this article, you’ll discover everything you need to know—from essential ingredients and step-by-step instructions to creative variations and expert tips—so you can master these irresistible morsels.
What Are Sushi Bliss Balls? A Fusion of Sushi and Energy Bites
At their core, Sushi Bliss Balls are a harmonious blend of sweet-and-savory flavors rolled into perfectly portable bites. Imagine taking the seasoned grains of sushi rice, adding classic nori flakes and a hint of rice vinegar, then molding everything into small, round delights reminiscent of your favorite energy snack.
For a deep dive into cooking the ideal sushi rice every time, check out How to Make Perfect Sushi Rice. This guide walks you through grain selection, washing techniques, and seasoning ratios to ensure the foundation of your bliss balls is spot on.
Why You’ll Love Sushi Bliss Balls: Benefits & Occasions
Whether you’re planning a casual lunch, an elegant appetizer spread, or an on-the-go treat, Sushi Bliss Balls shine in every setting. Here’s why:
- Versatility: Serve them at parties, pack them for work, or arrange them on a picnic board—these bites adapt to any occasion.
- Unique Texture: The chewiness of sushi rice paired with the crunch of nuts and the crispness of nori flakes delivers an unforgettable mouthfeel.
- Flavor Fusion: Experience the perfect balance of tangy rice vinegar, umami-rich seaweed, and a hint of natural sweetness.
For more on shaping Japanese-style rice bites, explore Onigiri (Japanese Rice Balls).
Essential Ingredients Breakdown
Every great Sushi Bliss Ball starts with quality components. Here’s what you’ll need:
- Base Ingredients
- Medjool dates (pitted) for natural sweetness and binding
- Raw nuts or seeds (almonds, cashews, sunflower seeds) for structure
- Shredded coconut to enhance cohesion and add a subtle tropical note
- Sushi-Inspired Components
- Sushi rice vinegar or a drizzle of rice syrup for authentic tang
- Pressed nori flakes to infuse seaweed flavor
- Toasted sesame seeds for nutty undertones
- Flavor Enhancers
- Soy sauce powder for an extra umami kick
- Wasabi paste (optional) for a gentle heat
- Pickled ginger bits to introduce a pop of brightness
Equipment and Prep
Before diving in, gather these essentials:
- Tools
- Food processor to blend dates and nuts into a smooth paste
- Rice cooker or heavy-bottomed pot for perfect sushi rice
- Silicone mat or parchment paper for effortless rolling
- Small bowls for coatings and mix-ins
- Prep Steps
- Cook the rice according to your preferred method and season with vinegar.
- Soak the dates in warm water for 10 minutes to soften.
- Chop the nori into fine flakes or purchase pre-crushed sheets.
Step-by-Step Recipe: Making the Bliss Ball Base
- Process Dates & Nuts
- Drain soaked dates and add to the food processor.
- Pulse in raw nuts or seeds until a coarse paste forms.
- Incorporate Dry Ingredients
- Add shredded coconut and soy sauce powder.
- Pulse briefly to combine, ensuring you don’t over-process.
- Season the Mix
- Spoon in sushi rice vinegar one teaspoon at a time.
- Continue pulsing until the mixture holds together when pinched.
- Test Consistency
- Pinch a small amount; if it crumbles, add more vinegar or a splash of rice syrup.
- If it’s too sticky, sprinkle in extra coconut or crushed nuts.
Infusing Sushi Flavors: Seasonings and Fillings
Elevate your base with authentic Japanese accents:
- Evenly Distribute Vinegar
- Drizzle sushi rice vinegar over the mixture and pulse in short bursts to avoid a soggy texture.
- Fold-In Options
- Flaked smoked salmon for a savory surprise.
- Creamy avocado puree hidden at the center for a silky mouthfeel.
- Coating Ideas
- Press nori flakes onto each ball for a sea-kissed crust.
- Roll in toasted sesame seeds for a classic finish.
Rolling, Shaping, and Coating Styles
- Shapes
- Classic spheres for easy snacking.
- Onigiri triangles for a nod to traditional rice balls.
- Techniques
- Press method: Compress mixture firmly between your palms.
- Roll method: Gently shape and rotate for smooth edges.
- Presentation
- Drizzle eel sauce or teriyaki glaze in fine lines.
- Top with microgreens or edible flowers for a gourmet touch.
Creative Variations & Add-In Ideas
Revamp your Sushi Bliss Balls with these twists:
- Vegan Options
- Swap smoked salmon for toasted tofu flakes.
- Use gluten-free tamari powder instead of soy sauce powder.
- Sweet-Savory Fusion
- Create a mango-ginger swirl by stirring in dried mango bits and pickled ginger.
- Add yuzu zest for a bright citrus note.
- Spicy Kick
- Mix in a pinch of Sriracha powder or chili oil.
- Garnish with thinly sliced jalapeño rings.
Presenting & Serving Sushi Bliss Balls
- Plating
- Arrange in mini bento boxes with dividers for sauces.
- Stack on slate boards with bamboo picks for a modern look.
- Dipping Sauces
- Soy-ginger dip: Combine soy sauce, grated ginger, and a hint of lime.
- Spicy mayo: Whisk mayo with Sriracha and a squeeze of lemon.
- Garnishes
- Sprinkle furikake seasoning or toasted sesame seeds.
- Add micro cilantro for color contrast.
Storage, Freezing & Shelf-Life Tips
- Refrigeration
- Store in an airtight container for up to five days.
- Freezing
- Flash-freeze on a tray, then transfer to a freezer bag to prevent clumping.
- Thawing
- Let sit at room temperature for 15–20 minutes before serving.
Troubleshooting Common Issues
- Dry or Crumbly
- Increase rice vinegar or add a splash of rice syrup.
- Overly Sticky
- Incorporate extra coconut flakes or ground nuts to absorb moisture.
- Unbalanced Flavor
- Adjust the ratio of vinegar to sweet binder in small increments.
- Difficulty Rolling
- Chill the mixture for 10 minutes to firm up before shaping.

Frequently Asked Questions (FAQs)
- Can I use brown rice instead of sushi rice?
- Yes, but soak it longer and season generously with vinegar.
- How long will they keep in the fridge?
- Up to five days in an airtight container.
- Can I make them nut-free?
- Swap nuts for sunflower or pumpkin seeds.
- What’s the best way to serve them at a party?
- Present on skewers or in mini bento sections with dipping sauces.
- Can I bake these instead of storing raw?
- Baking will alter the texture; raw preparation retains the classic bliss ball chew.
Conclusion
By mastering the art of Sushi Bliss Balls, you’ve unlocked a versatile treat that’s as fun to make as it is to enjoy. Feel free to experiment with flavors, from fiery wasabi accents to tropical fruit swirls, and share your creations online. Tag your posts with #SushiBlissBalls and inspire others to roll into this delicious fusion trend!
Print
Sushi Bliss Balls
- Total Time: 45 minutes
- Yield: 16 balls 1x
Description
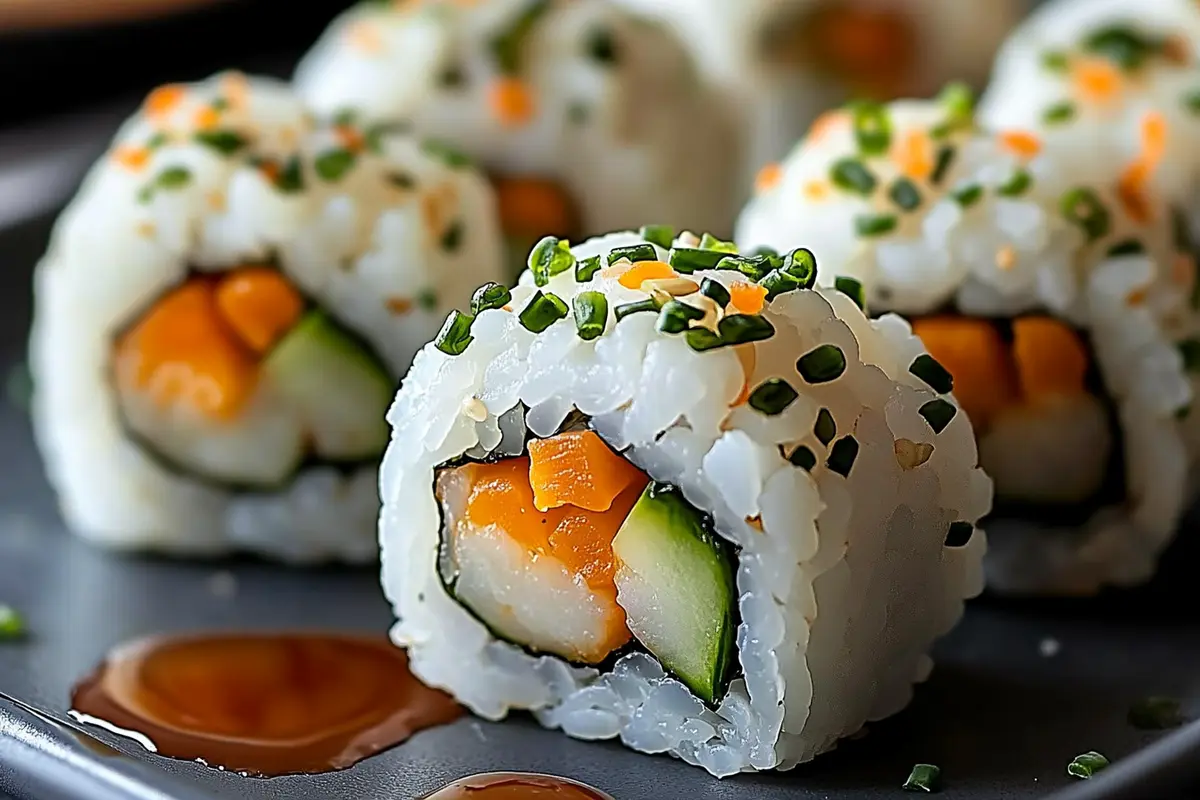
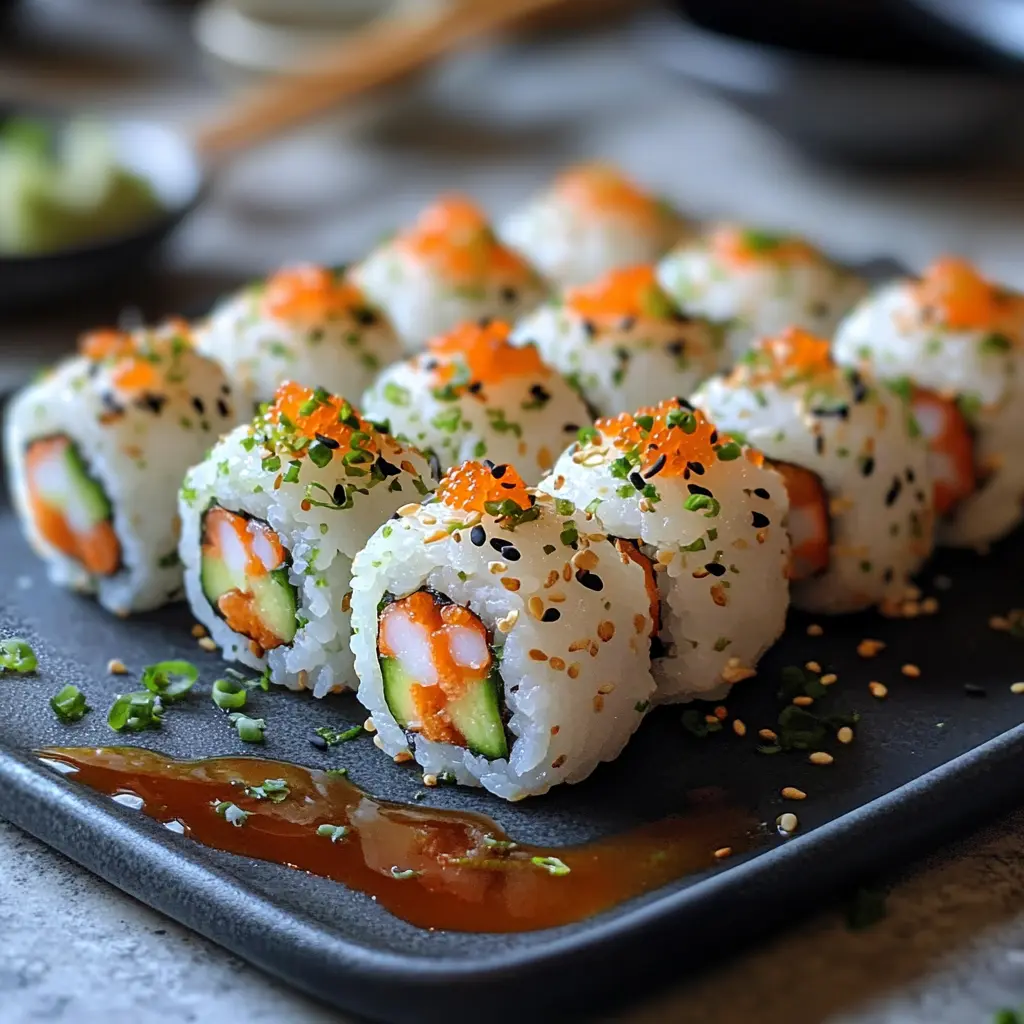
“Sushi” Bliss Balls pack all the flavors of your favorite rolls into easy, hand-held spheres. Tender sushi rice meets nori, avocado, cucumber, and a hit of wasabi-seasoned fish or tofu, then they’re rolled in sesame seeds for a crunchy finish.
Ingredients
For the Rice
- 1 cup sushi rice
- 1¼ cups water
- 2 tbsp rice vinegar
- 1 tbsp sugar
- ½ tsp salt
Fillings & Flavorings
- 4 sheets nori (seaweed), shredded or finely cut
- 1 avocado, diced
- ½ cucumber, seeded and diced
- 4 oz sashimi-grade salmon* or smoked salmon (or tofu for vegetarian)
- 1 tsp wasabi paste (or to taste)
- 1 tbsp soy sauce (or tamari for GF)
Coating & Garnish
- 2 tbsp black and/or white sesame seeds
- Optional: pickled ginger, extra soy sauce for dipping, sriracha mayo
Instructions
- Cook & Season the Rice
- Rinse rice under cold water until water runs clear.
- Combine rice and water in a saucepan; bring to a boil, reduce to low, cover and cook 12–15 min. Let rest 10 min off heat.
- Meanwhile, warm vinegar, sugar and salt until dissolved. Gently fold into cooked rice; let cool slightly.
- Mix Flavorings
- In a bowl, combine shredded nori, diced avocado, cucumber, chopped salmon (or tofu), wasabi and soy sauce.
- Form the Bliss Balls
- With damp hands, scoop about 2 tbsp rice and flatten into your palm.
- Place about 1 tbsp filling in center, then top with another 2 tbsp rice.
- Gently press and roll between your palms to form a tight ball.
- Coat & Chill
- Roll each ball in sesame seeds to coat.
- Chill in fridge for 10–15 min to set.
- Serve
- Arrange on a platter with pickled ginger and small bowls of soy and sriracha mayo for dipping.
Notes
- Employ a melon baller or small cookie scoop to ensure each ball is perfectly uniform.
- Incorporate diced avocado or finely chopped pickled ginger to introduce exciting new flavor dimensions.
- Store the bliss balls chilled and serve them on the day they’re made for optimal texture and taste.
- Prep Time: 20 minutes
- Cook Time: 15 minutes
- Category: Fusion Snacks
- Method: No-Bake
- Cuisine: Japanese Fusion
Nutrition
- Serving Size: 1 slice
- Calories: 80 kcal
- Sugar: 1 g
- Sodium: 150 mg
- Fat: 3 g
- Saturated Fat: 8 g
- Trans Fat: 0 g
- Carbohydrates: 12 g
- Fiber: 1 g
- Protein: 2 g
- Cholesterol: 5 mg
2 thoughts on “Irresistible Sushi Bliss Balls: Bite-Sized Fusion Snacks You’ll Love”