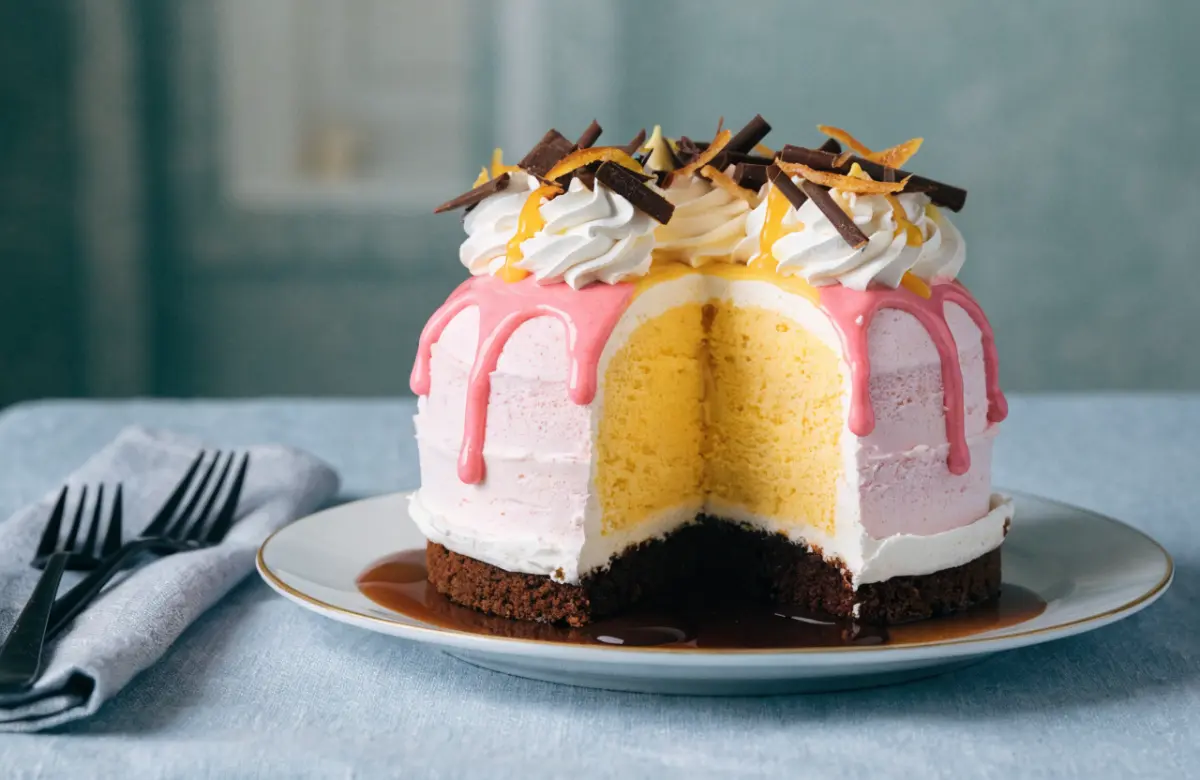
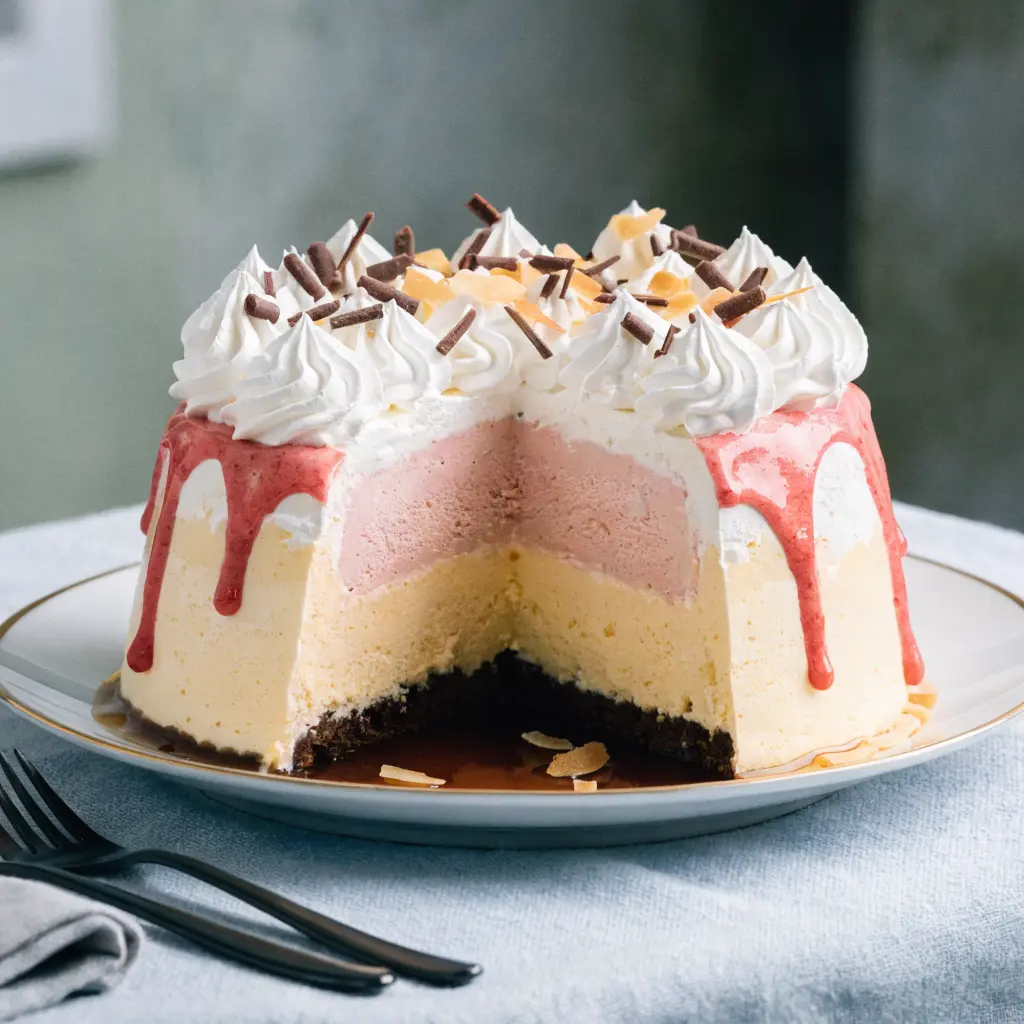
What Is Neapolitan Baked Alaska Recipe?
A Neapolitan Baked Alaska is a frozen layered dessert made with three classic ice cream flavors—chocolate, vanilla, and strawberry—covered entirely in fluffy meringue and quickly baked or torched until golden brown.
At first glance, the dessert almost seems impossible. How can frozen ice cream survive the oven?
The answer lies in the meringue. Thick layers of whipped egg whites act as insulation, helping protect the frozen center while the exterior browns beautifully.
The History of Baked Alaska
The original Baked Alaska dessert dates back to the 1800s and gained popularity thanks to its theatrical presentation.
Its name was inspired by the purchase of Alaska by the United States, symbolizing something frozen surrounded by warmth. Over time, pastry chefs experimented with countless versions, introducing different cakes, frozen fillings, and decorative meringues.
Today, one of the most beloved variations remains the Neapolitan baked Alaska, thanks to its familiar and crowd-pleasing flavors.
Why Choose a Neapolitan Version?
Classic Neapolitan ice cream already offers flavor variety in one package. Turning it into Baked Alaska simply elevates the experience.
Why people love it:
- Three flavors in one dessert
- Gorgeous layered presentation
- Nostalgic and elegant at the same time
- Ideal for birthdays and celebrations
- Easier than it looks
It also gives guests options. Some people love chocolate, others prefer vanilla or strawberry—and this dessert satisfies everyone.
Ingredients for Neapolitan Baked Alaska Recipe
For the Ice Cream Layers
- 1 pint chocolate ice cream (slightly softened)
- 1 pint vanilla ice cream (slightly softened)
- 1 pint strawberry ice cream (slightly softened)
For the Cake Base
- 1 small sponge cake or pound cake (store-bought or homemade)
- 1 teaspoon vanilla extract (optional for extra flavor)
For the Meringue Topping
- 4 large egg whites (room temperature)
- 1 cup granulated sugar
- ¼ teaspoon cream of tartar
- 1 teaspoon vanilla extract
- Pinch of salt
Optional Garnishes
- Fresh strawberries
- Chocolate drizzle
- Chocolate curls or shavings
- Sprinkles
- Fresh mint leaves
- Crushed cookies or toasted nuts
Optional Equipment for Finishing
- Kitchen torch (for browning the meringue)
OR - Oven preheated to 475°F (245°C) for the traditional baking method
Kitchen Equipment You’ll Need
This recipe becomes easier when you prepare your tools beforehand.
You don’t need fancy bakery equipment—just the basics.
Essential Equipment
- Mixing bowls
- Hand mixer or stand mixer
- Rubber spatula
- Plastic wrap
- Loaf pan or dome mold
- Offset spatula
- Baking sheet
- Freezer-safe container
- Serrated knife
- Kitchen torch (optional)
How to Prepare the Ice Cream Layers
Step 1: Soften the Ice Cream Properly
Never use rock-hard ice cream straight from the freezer.
Instead:
- Let each flavor soften for 5–10 minutes
- Stir gently for smoother spreading
- Avoid melting completely
Step 2: Layer the Chocolate Ice Cream
Line your mold with plastic wrap first.
Then:
- Add softened chocolate ice cream
- Spread evenly
- Smooth the surface
Aim for even thickness throughout.
Once finished:
- Freeze for 20–30 minutes
This step prevents layers from mixing together.
Step 3: Add the Vanilla Layer
Next comes vanilla.
Spread gently over the frozen chocolate layer.
Tips for success:
- Use an offset spatula
- Smooth carefully
- Avoid pressing too hard
Step 4: Finish with Strawberry Ice Cream
Finally, add strawberry ice cream.
Smooth the surface evenly.
Cover tightly with plastic wrap and freeze until completely solid.
Ideally:
- Freeze at least 4–6 hours
- Overnight is even better
The firmer the layers become, the easier assembly will be later.
Preparing the Cake Base
Choosing the right cake matters more than many people realize.
The cake provides stability while adding texture.
Choosing the Best Cake
Both sponge cake and pound cake work beautifully.
Sponge Cake Pros
- Lightweight
- Traditional
- Soft texture
Pound Cake Pros
- Rich flavor
- Better structure
- Easier slicing
For beginners, pound cake is often more forgiving.
Cutting the Cake to Fit
Place your mold over the cake and trace around it.
Then:
- Cut slightly smaller than the mold
- Trim edges neatly
- Test fit before freezing
You want a snug fit—not oversized.
Freeze the Cake Layer
Before assembly:
- Place cake in freezer
- Chill for 20–30 minutes
Cold cake helps keep the dessert stable during assembly.
Step-by-Step Meringue Instructions for Neapolitan Baked Alaska
The secret behind a successful Neapolitan baked Alaska recipe is a thick, glossy meringue. This fluffy coating protects the frozen center while creating that signature toasted finish.
Although meringue may seem intimidating at first, it becomes easy once you understand the process.
French vs Swiss Meringue: Which Is Better?
You can use either style for Baked Alaska, but most home bakers prefer Swiss meringue because it tends to be more stable.
French Meringue
Made by whipping raw egg whites with sugar.
Pros:
- Faster to make
- Light texture
- Beginner-friendly
Cons:
- Less stable
- Can deflate more easily
Swiss Meringue
Made by gently warming egg whites and sugar before whipping.
Pros:
- Smooth and glossy
- More stable
- Better for decorative peaks
Cons:
- Slightly more effort
For this recipe, Swiss meringue delivers the most reliable results.
Step 1: Prepare Your Mixing Bowl
Before starting, ensure everything is spotless.
Even a tiny amount of grease can stop egg whites from whipping properly.
Make sure your:
- Mixing bowl is dry
- Whisk attachment is clean
- Measuring tools are ready
Room-temperature egg whites whip more efficiently.
Step 2: Heat Egg Whites and Sugar
Fill a saucepan with a little water and bring it to a gentle simmer.
Place a heatproof bowl on top (without touching the water).
Add:
- Egg whites
- Sugar
Whisk continuously until the sugar dissolves.
The mixture should feel smooth, not grainy.
Step 3: Whip Until Glossy Peaks Form
Transfer the warm mixture to a stand mixer or use a hand mixer.
Beat for 6–10 minutes.
You’re looking for:
- Thick texture
- Glossy finish
- Firm peaks
How to test:
Lift the whisk.
If the tip stands upright without collapsing, it’s ready.
Avoid overmixing.
Overbeaten meringue may become dry and difficult to spread.
Step 4: Add Flavoring
Once fluffy:
Add:
- Vanilla extract
- Tiny pinch of salt
Whip briefly until combined.
Now your meringue topping is ready.
How to Assemble Neapolitan Baked Alaska
Assembly is where everything finally comes together.
Take your time and work quickly to prevent melting.
Step 1: Remove Ice Cream from Mold
Remove the frozen layered ice cream from the freezer.
Use plastic wrap to gently lift it out.
If stuck:
- Let sit for 30 seconds
- Gently loosen edges
Avoid waiting too long or melting may begin.
Place the ice cream dome onto a lined baking tray.
Step 2: Add the Cake Base
Take your frozen cake layer and position it against the bottom of the ice cream.
It should fit snugly.
The cake becomes the dessert’s foundation.
Why this matters:
- Easier slicing
- Better structure
- Improved presentation
Return everything to the freezer for 10–15 minutes before adding meringue.
Step 3: Cover Completely with Meringue
This step is critical.
Using a spatula, spread meringue over the entire dessert.
Completely seal every inch.
There should be:
- No exposed ice cream
- No visible gaps
- Thick, even coverage
Think of the meringue as insulation.
Create Decorative Peaks
For a bakery-style finish:
- Use the back of a spoon
- Swirl the meringue
- Create pointed peaks
These tips toast beautifully in the oven.
The texture instantly transforms the dessert into something elegant.
Step 4: Freeze Before Baking
Once covered:
Freeze again for:
30–60 minutes
This extra chill time helps keep everything stable during baking.
Skipping this step often leads to melting.
Pro Tips for the Best Neapolitan Baked Alaska Recipe
Want bakery-quality results?
Follow these expert tricks.
Freeze Between Every Step
This cannot be skipped.
Freezing helps maintain clean layers.
Use Dense Ice Cream
Premium ice cream works best.
It melts more slowly and slices cleaner.
Chill Your Knife Before Cutting
Run a knife under hot water and wipe dry.
Repeat between slices.
You’ll get beautiful clean layers.
Create Meringue Peaks
Textured meringue browns more attractively than flat surfaces.
Make It Ahead
You can assemble everything a day or two beforehand.
Toast only before serving.
Common Mistakes to Avoid
Even experienced bakers make errors.
Here are the most common ones.
Skipping Freezer Time
The biggest mistake.
Soft ice cream equals disaster.
Always freeze thoroughly.
Thin Meringue Layer
Thin coverage allows heat inside too quickly.
Be generous.
Thicker is safer.
Using Melted Ice Cream
Soft, soupy ice cream creates uneven layers.
Aim for spreadable—not melted.
Overbaking
Long oven exposure defeats the purpose.
High heat + short time = success.
Delicious Variations of Neapolitan Baked Alaska
Berry Lover’s Alaska
Swap classic flavors for:
- Raspberry
- Strawberry
- Blackberry
Top with fresh berries.
Triple Chocolate Alaska
Perfect for chocolate lovers.
Use:
- Chocolate cake
- Chocolate ice cream
- Chocolate drizzle
Add dark chocolate curls for drama.
Tropical Version
For a sunny flavor twist:
- Mango ice cream
- Coconut ice cream
- Pineapple cake
A fun summer dessert idea.
Serving Suggestions
A Neapolitan baked Alaska recipe deserves a memorable presentation.
Serve immediately after browning.
Best Occasions
This dessert shines at:
- Birthday parties
- Holiday dinners
- Family gatherings
- Dinner parties
- Summer celebrations
Pairing Ideas
Serve alongside:
- Espresso
- Coffee
- Fresh strawberries
- Chocolate sauce
- Vanilla bean sauce
Keep pairings simple so the dessert remains the star.
Storage and Make-Ahead Tips
One of the best things about Baked Alaska is flexibility.
Can You Make It Ahead?
Absolutely.
Assemble:
- Ice cream
- Cake
- Meringue
Then freeze.
Toast right before serving.
How Long Does It Last?
Wrapped properly:
- Up to 1 week in freezer
For best texture, enjoy sooner.
Best Storage Method
Wrap tightly using:
- Plastic wrap
- Freezer-safe container
This helps prevent freezer odors.
Can You Refreeze Leftovers?
Yes, but texture may change slightly.
Slice leftovers first for easier serving later.
Frequently Asked Questions
Can Neapolitan Baked Alaska Be Made in Advance?
Yes.
Prepare everything 1–2 days early and freeze.
Brown the exterior just before serving.
Why Doesn’t the Ice Cream Melt?
The thick meringue topping acts as insulation.
Short baking times also help preserve the frozen center.
What Cake Works Best?
Most bakers prefer:
- Sponge cake
- Pound cake
Both provide excellent structure.
Can I Make It Without a Torch?
Absolutely.
The oven method works perfectly.
How Long Should It Freeze Before Baking?
At least:
30–60 minutes
Longer is even better.
Final Thoughts on Making Neapolitan Baked Alaska at Home
Creating a stunning Neapolitan baked Alaska recipe may seem intimidating at first, but once broken into steps, it becomes surprisingly manageable. The combination of toasted meringue, creamy frozen layers, and soft cake creates an unforgettable dessert experience that feels both nostalgic and elegant.