
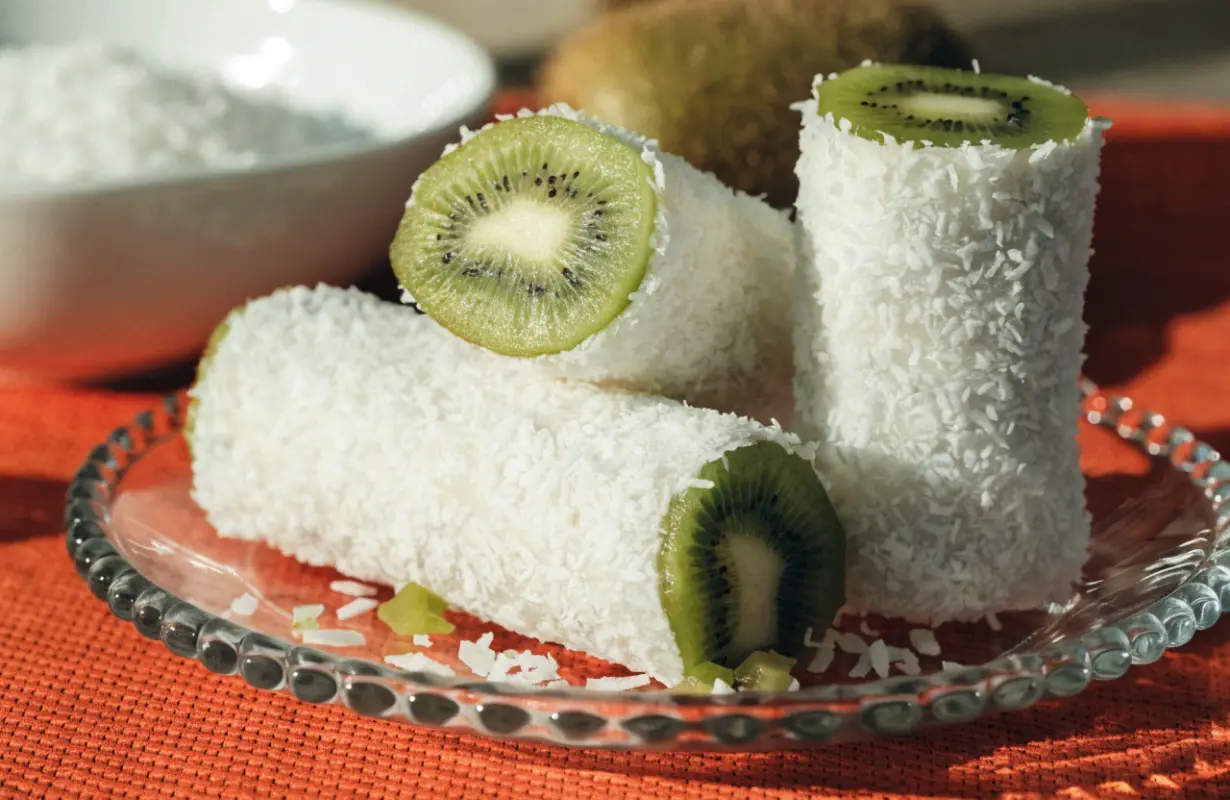
What Are No Bake Kiwi Coconut Rolls?
No bake kiwi coconut rolls are small, chilled dessert rolls made by combining a soft coconut mixture with a creamy filling and fresh kiwi. Instead of baking a traditional cake or pastry, the ingredients are assembled while cold and allowed to firm up in the refrigerator.
The result is a dessert with several contrasting textures:
- A soft, slightly chewy coconut exterior.
- A smooth and creamy filling.
- Juicy pieces of fresh kiwi.
- A delicate coconut flavor that complements the fruit.
Depending on how you shape them, the rolls can be served as individual dessert bites or sliced into attractive spiral-shaped pieces.
Their appearance makes them particularly appealing on dessert platters. The white coconut exterior contrasts beautifully with the bright green kiwi center, creating a colorful presentation without requiring complicated decorating techniques.
Ingredients Needed to Make No Bake Kiwi Coconut Rolls
Before starting, gather all the ingredients and prepare your workspace. Having everything ready makes the assembly process easier and helps prevent the coconut mixture from becoming difficult to handle.
Here are the ingredients you’ll need for this version of the recipe.
1. Fresh Kiwi
You’ll need approximately 3 medium-sized kiwis.
Choose fruit that is ripe but not overly soft. Firm kiwis are easier to peel, slice, and arrange inside the rolls.
Before using them:
- Wash the outside of each kiwi.
- Peel the skin using a vegetable peeler or small knife.
- Remove the ends.
- Cut the fruit into thin slices or small strips.
- Pat the pieces dry with a clean paper towel.
Avoid using very soft or overripe kiwi because it can release too much juice during assembly.
2. Shredded Coconut
Use approximately 2 cups of finely shredded desiccated coconut for the outer mixture, with another half cup available for coating.
Unsweetened coconut works particularly well because sweetened condensed milk already adds plenty of sweetness.
Fine coconut is easier to combine into a smooth, manageable mixture. Coarse coconut can also be used, but the final texture may be more noticeable.
3. Sweetened Condensed Milk
You’ll need approximately 1/2 cup of sweetened condensed milk.
This ingredient helps bind the shredded coconut together and gives the outer layer a soft, slightly chewy texture.
Add it gradually rather than pouring everything in at once. Different brands of coconut absorb liquid differently, so you may need slightly more or less to achieve the right consistency.
4. Cream Cheese
Use approximately 4 ounces of softened cream cheese for the filling.
Cream cheese creates a smooth, rich center that pairs nicely with the tangy kiwi.
Allow it to sit at room temperature briefly before mixing. Softened cream cheese is easier to beat and less likely to form lumps.
5. Powdered Sugar
Add approximately 2 tablespoons of powdered sugar to the cream cheese filling.
Adjust the amount according to your preferred sweetness.
Powdered sugar is a convenient choice because it blends smoothly into the filling without leaving a grainy texture.
6. Vanilla Extract
Use approximately 1/2 teaspoon of vanilla extract.
Vanilla adds a pleasant aroma and helps round out the flavor of the cream cheese mixture.
7. Optional Ingredients
You can also prepare a few optional ingredients to customize the dessert:
- 1 tablespoon of finely chopped pistachios.
- 2 tablespoons of melted white chocolate.
- A little lime zest.
- Extra shredded coconut for decoration.
- Finely chopped almonds.
- A few fresh mint leaves for serving.
Kitchen Equipment You’ll Need
You don’t need complicated equipment to prepare homemade kiwi coconut rolls.
Gather the following:
- A large mixing bowl.
- A medium mixing bowl.
- A hand mixer or whisk.
- A silicone spatula.
- Measuring cups and spoons.
- A vegetable peeler.
- A sharp knife.
- A cutting board.
- Parchment paper.
- A rolling pin.
- A refrigerator-safe container.
- A clean serving plate.
How to Make No Bake Kiwi Coconut Rolls Step by Step
Follow these instructions to prepare the rolls from scratch. The key is to create a coconut mixture that holds together without becoming too sticky or too dry.
Step 1: Prepare the Kiwis
Start by preparing the fresh fruit.
- Wash the kiwis under cool running water.
- Peel the skin using a vegetable peeler or small knife.
- Remove both ends.
- Slice each kiwi into thin rounds or narrow strips.
- Place the pieces on a paper towel.
- Gently pat away excess moisture.
For this recipe, narrow kiwi strips are particularly convenient because they can be arranged in a line inside the filling.
If you prefer a decorative spiral appearance, you can also use thin kiwi slices.
Try to keep the fruit pieces relatively uniform so the finished rolls have an even shape.
Set the prepared kiwi aside while you make the filling and coconut mixture.
Step 2: Prepare the Creamy Filling
Place the softened cream cheese in a medium mixing bowl.
Add the powdered sugar and vanilla extract.
Using a hand mixer or whisk, beat everything until the mixture becomes smooth and creamy.
Scrape down the sides of the bowl with a spatula to make sure no lumps remain.
The filling should have a thick but spreadable consistency.
If it feels too firm, continue mixing briefly. If it seems too loose, place it in the refrigerator for approximately 10–15 minutes before assembling the rolls.
Avoid making the filling too runny because it may escape from the sides when you roll the coconut layer.
Once the filling is ready, set it aside.
Step 3: Prepare the Coconut Mixture
Place the shredded coconut in a large mixing bowl.
Gradually add the sweetened condensed milk while stirring with a spatula.
Continue mixing until the coconut becomes evenly coated.
The mixture should resemble a soft, slightly sticky dough.
To check whether it is ready, take a small amount between your fingers and press it gently.
It should hold together without crumbling apart.
If the mixture is too dry, add another teaspoon of condensed milk at a time.
If it is too sticky, gradually add more shredded coconut.
Avoid adding too much condensed milk at once. A mixture that is overly wet will be difficult to flatten and roll.
Step 4: Flatten the Coconut Mixture
Place a large sheet of parchment paper on a clean work surface.
Transfer the coconut mixture onto the parchment paper.
Cover it with another sheet of parchment paper.
Using a rolling pin, gently flatten the mixture into a rectangular sheet approximately 1/4 inch thick.
Try to maintain an even thickness throughout.
A rectangular shape makes rolling easier and helps create uniform dessert pieces.
If the edges look uneven, use your fingers to press them gently into place.
Don’t worry if the sheet isn’t perfectly shaped. Small imperfections can be trimmed before rolling.
Step 5: Spread the Cream Cheese Filling
Remove the upper parchment sheet.
Spread the cream cheese filling evenly over the coconut layer using a spatula.
Leave a small border around the edges.
This is important because too much filling near the edges can squeeze out when you roll the mixture.
Try to keep the filling layer relatively thin and consistent.
If you want a more decorative center, you can add a small amount of finely chopped kiwi over the filling before arranging the larger kiwi pieces.
Step 6: Arrange the Fresh Kiwi
Place the prepared kiwi strips along one side of the coconut sheet.
Arrange them in a single layer rather than stacking too many pieces together.
This helps prevent the rolls from becoming bulky.
Make sure the kiwi is distributed evenly so each slice contains a good amount of fruit.
If you prefer a stronger kiwi flavor, you can add a few additional strips, but avoid overfilling.
Step 7: Carefully Roll the Mixture
Now comes the most important part of the assembly process.
Lift the edge of the parchment paper closest to the kiwi filling.
Use the paper to guide the coconut sheet forward, gently rolling it over the filling.
Continue rolling slowly until you reach the opposite edge.
Use your fingers to support the sides and keep the roll compact.
Don’t pull too tightly because the coconut mixture may crack.
Once rolled, gently press along the seam to help seal it.
If small cracks appear, smooth them with your fingertips.
Step 8: Coat the Roll with Shredded Coconut
Place the additional shredded coconut in a shallow plate.
Carefully transfer the roll onto the coconut.
Gently turn it until the exterior is coated on all sides.
You can also sprinkle coconut over the top and press it lightly into the surface.
For a more attractive appearance, use finely shredded coconut rather than large flakes.
Make sure the coating is evenly distributed.
Step 9: Refrigerate Until Firm
Wrap the roll gently in parchment paper or plastic wrap.
Place it in the refrigerator for approximately 30–60 minutes.
This chilling period allows the coconut mixture to firm up and makes the roll easier to slice.
Avoid placing heavy objects on top of it because this may flatten the shape.
If the roll still feels soft after chilling, leave it in the refrigerator a little longer.
Step 10: Slice and Serve
Once the roll is firm, remove it from the refrigerator.
Unwrap it and place it on a clean cutting board.
Using a sharp knife, cut it into approximately 1-inch slices.
For clean cuts:
- Use a sharp, thin-bladed knife.
- Wipe the blade between slices.
- Avoid pressing down too forcefully.
- Support the roll gently while cutting.
Arrange the finished pieces on a serving plate.
You can sprinkle additional coconut over the top or add a small amount of melted white chocolate for decoration.
Your No Bake Kiwi Coconut Rolls are now ready to enjoy!
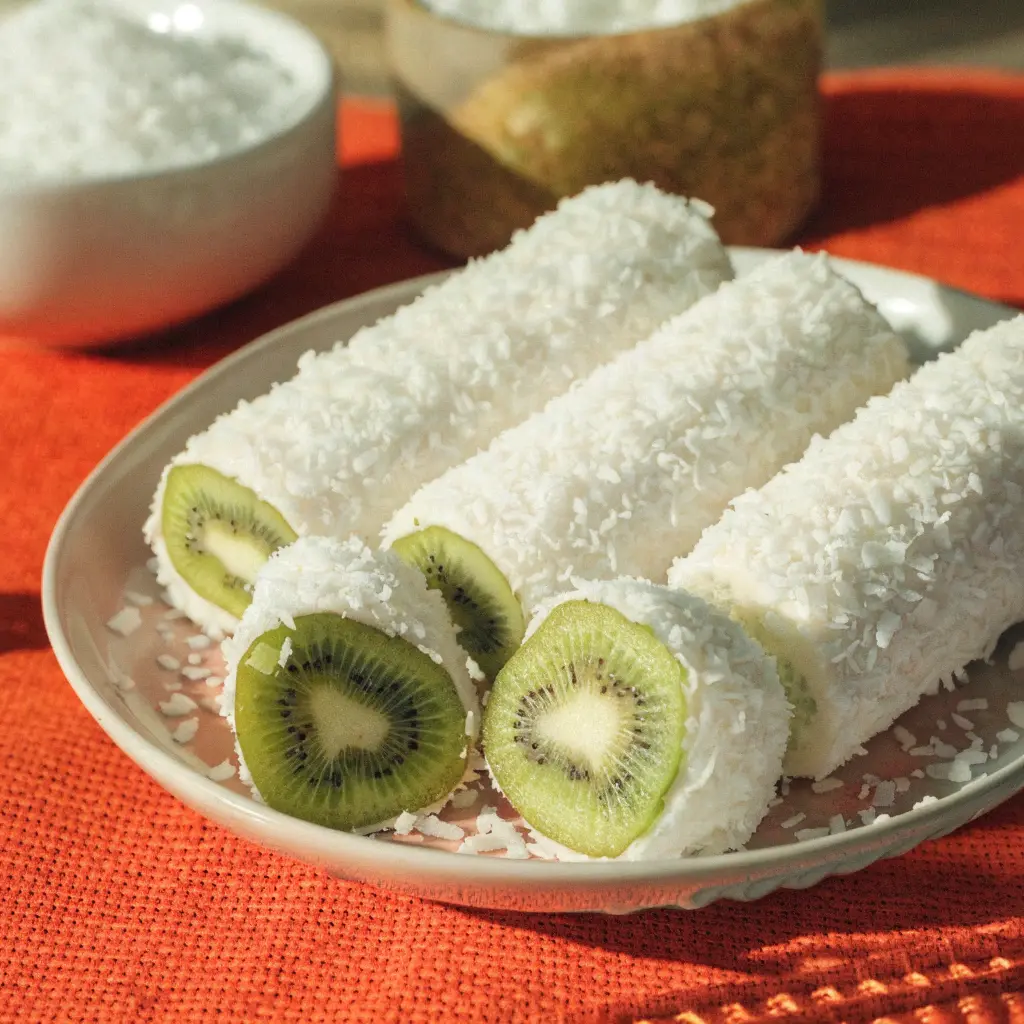
Delicious Variations of No Bake Kiwi Coconut Rolls
One of the best things about this dessert is how easily you can change the ingredients.
Once you’ve mastered the basic preparation method, experiment with different fruit combinations and toppings.
1. Kiwi and Mango Coconut Rolls
Mango is an excellent addition because its sweet tropical flavor complements the tanginess of kiwi.
To make this variation:
- Peel and slice a ripe mango.
- Cut it into thin strips.
- Arrange the mango alongside the kiwi.
- Follow the same rolling and chilling process.
Use firm mango pieces rather than very soft fruit.
You can also add a little lime zest to the cream cheese filling for an extra citrus flavor.
2. Kiwi and Strawberry Coconut Rolls
Strawberries add a lovely color and a slightly sweet flavor.
Wash the strawberries, remove their green tops, and slice them into thin pieces.
Arrange them with the kiwi before rolling.
The combination of bright green kiwi, red strawberries, and white coconut creates an attractive dessert.
Make sure the strawberries are thoroughly dried after washing.
3. Chocolate-Dipped Kiwi Coconut Rolls
If you enjoy richer desserts, chocolate is a great addition.
Melt dark or white chocolate in a microwave-safe bowl using short heating intervals.
Allow it to cool slightly before decorating the finished rolls.
You can:
- Drizzle chocolate over the top.
- Dip one side of each slice into melted chocolate.
- Add a thin chocolate layer to the filling.
- Sprinkle crushed nuts over the chocolate before it sets.
White chocolate pairs particularly well with coconut, while dark chocolate provides a deeper flavor.
4. Vegan Kiwi Coconut Rolls
You can adapt the recipe using plant-based alternatives.
Replace the regular cream cheese with vegan cream cheese.
For the coconut mixture, choose a suitable plant-based condensed milk alternative.
Check the consistency carefully because different brands may behave differently.
The remaining preparation process stays largely the same.
Common Mistakes to Avoid When Making Kiwi Coconut Rolls
A few preparation mistakes can affect the appearance and texture of the finished dessert.
Here are the most common problems and how to prevent them.
Using Overripe Kiwi
Very soft kiwi can become difficult to slice and arrange.
Choose fruit that is ripe but still holds its shape.
Adding Too Much Condensed Milk
Excess condensed milk makes the coconut mixture sticky and difficult to roll.
Add it gradually and adjust the consistency with additional coconut when necessary.
Making the Filling Too Runny
A thin cream cheese filling may leak from the sides.
Use softened cream cheese rather than a liquid cream-based filling.
If necessary, chill the filling before assembling the rolls.
Skipping the Chilling Process
The coconut mixture needs time to firm up.
Cutting the roll immediately after assembly may cause it to flatten or fall apart.
Adding Too Much Fruit
Although kiwi is the main flavor, excessive fruit can make the roll difficult to close.
Use a moderate amount and arrange the pieces in an even layer.
How to Serve No Bake Kiwi Coconut Rolls
Presentation can make a simple homemade dessert look especially appealing.
Here are several easy ways to serve these rolls.
Serve as Individual Dessert Bites
Slice the chilled roll into small, even pieces.
Arrange the pieces in a circular pattern on a serving plate.
This presentation works well for afternoon tea, parties, and casual gatherings.
Pair with Fresh Tropical Fruits
Create a colorful fruit platter by adding:
- Mango slices.
- Fresh strawberries.
- Pineapple cubes.
- Blueberries.
- Orange segments.
- Additional kiwi slices.
The different colors make the dessert table more attractive.
Serve with Whipped Cream
A small spoonful of whipped cream alongside each slice creates a more elaborate dessert presentation.
You can also pipe a little whipped cream onto the serving plate before arranging the rolls.
Add Decorative Toppings
Try decorating the rolls with:
- Toasted coconut flakes.
- Chopped pistachios.
- Melted white chocolate.
- Dark chocolate drizzle.
- Fresh mint leaves.
- Lime zest.
Use toppings sparingly so the coconut and kiwi remain the main features.
How to Store No Bake Kiwi Coconut Rolls
Because this recipe contains fresh fruit and cream cheese, proper storage is important for maintaining its texture and freshness.
Refrigerator Storage
Place the finished rolls in an airtight container.
If you’re stacking several layers, separate them using parchment paper to prevent the coconut coating from sticking together.
Keep the container refrigerated at or below 40°F (4°C).
For the best texture and appearance, enjoy the rolls within 1–2 days.
The kiwi may release additional moisture as time passes, so the coconut exterior can gradually become softer.
Can You Make Them Ahead of Time?
Yes! These rolls are convenient to prepare ahead of a gathering.
You can assemble the entire roll, wrap it, and refrigerate it before slicing.
For the best presentation, slice the roll shortly before serving.
This helps the individual pieces maintain their shape and keeps the coconut coating looking neat.
If you’re preparing the dessert for a party, you can also make the cream cheese filling and slice the kiwi in advance.
Keep the components covered and refrigerated until you’re ready to assemble everything.
Can You Freeze Kiwi Coconut Rolls?
Freezing is possible, but the texture may change.
Fresh kiwi contains considerable moisture, and freezing followed by thawing can make the fruit softer.
The cream cheese filling may also become less smooth after thawing.
If you want to experiment with freezing:
- Freeze a small test portion first.
- Place the pieces on a parchment-lined tray.
- Freeze until firm.
- Transfer them to a freezer-safe container.
- Separate layers with parchment paper.
Thaw the pieces in the refrigerator rather than leaving them on the counter.
For the best original texture, however, refrigeration and fresh preparation are preferable.
Frequently Asked Questions About No Bake Kiwi Coconut Rolls
1. Can You Make Kiwi Coconut Rolls Without Baking?
Yes! This recipe requires no oven. The coconut mixture is combined with condensed milk, filled with cream cheese and kiwi, rolled, and refrigerated until firm. Chilling replaces the baking process.
2. How Long Do No Bake Kiwi Coconut Rolls Take to Prepare?
The hands-on preparation takes approximately 20 minutes, depending on how quickly you prepare the fruit and assemble the roll. Allow another 30–60 minutes for refrigeration before slicing and serving.
3. Can I Use Frozen Kiwi Instead of Fresh Kiwi?
Fresh kiwi is recommended because it holds its shape better during assembly. Thawed frozen kiwi often releases excess moisture, making the filling softer and the coconut layer more difficult to handle.
4. Can I Substitute Cream Cheese With Greek Yogurt?
You can experiment with thick Greek yogurt, but it has a different consistency from cream cheese. It may make the filling softer, so use a thick variety and chill it before assembling the rolls.
Final Thoughts: Enjoy Homemade No Bake Kiwi Coconut Rolls
These No Bake Kiwi Coconut Rolls are a simple way to create a delicious homemade dessert without using an oven. The combination of fresh kiwi, creamy filling, and shredded coconut creates an appealing contrast of flavors and textures, while the straightforward preparation makes the recipe easy to customize.
Print
No Bake Kiwi Coconut Rolls – Easy & Refreshing Dessert
- Total Time: PT50M
- Yield: 8 servings 1x
Ingredients
- 3 medium fresh kiwis.
- 2 cups finely shredded coconut.
- 1/2 cup sweetened condensed milk.
- 4 ounces softened cream cheese.
- 2 tablespoons powdered sugar.
- 1/2 teaspoon vanilla extract.
- 1/2 cup additional shredded coconut for coating.
Instructions
- Wash, peel, and slice the kiwis into thin strips.
- Beat the softened cream cheese with powdered sugar and vanilla until smooth.
- Mix shredded coconut with condensed milk until a soft dough forms.
- Place the coconut mixture between two sheets of parchment paper.
- Roll it into an even rectangular sheet.
- Spread the cream cheese filling over the coconut layer.
- Arrange the kiwi strips along one side.
- Carefully roll everything into a compact log.
- Coat the outside with additional shredded coconut.
- Wrap and refrigerate for 30–60 minutes.
- Slice into individual portions and serve chilled.
Notes
| Chilling time | 30–60 minutes |
- Prep Time: PT20M
- Category: Dessert
- Method: No-Bake
- Cuisine: American
Nutrition
- Serving Size: 2 rolls
- Calories: 210 Kcal
- Sugar: 18 g
- Sodium: 105 mg
- Fat: 12 g
- Saturated Fat: 9 g
- Unsaturated Fat: 2.5 g
- Trans Fat: 0 g
- Carbohydrates: 24 g
- Fiber: 2 g
- Protein: 4 g
- Cholesterol: 20 mg